Introduction
From recording bills, creating approval and payment processes, handling local transfers and global remittance, to tracking payment records and analysing categorised expenses, we take care of it all. This feature enhances your bill management efficiency, making bill payments faster and easier.
What is Bill Management?
The Bill Management feature helps you organise and settle all your business bills and invoices. From recording bills, creating approval and payment processes, handling local transfers and global remittance, to tracking payment records and analysing categorised expenses, we take care of it all. This feature enhances your bill management efficiency, making bill payments faster and easier.
Benefits of bill management for merchants
- Seamless one-stop digital process for smoother bill management.
- Avoid manual entry errors, ensuring accurate bill information.
- Pre-set payees and payment dates to expedite bill processing.
- Bill approval and payment reminders to ensure timely payments.
- Local transfer and global remittance with more options, faster speed, and lower cost.
How to upload paper bills?
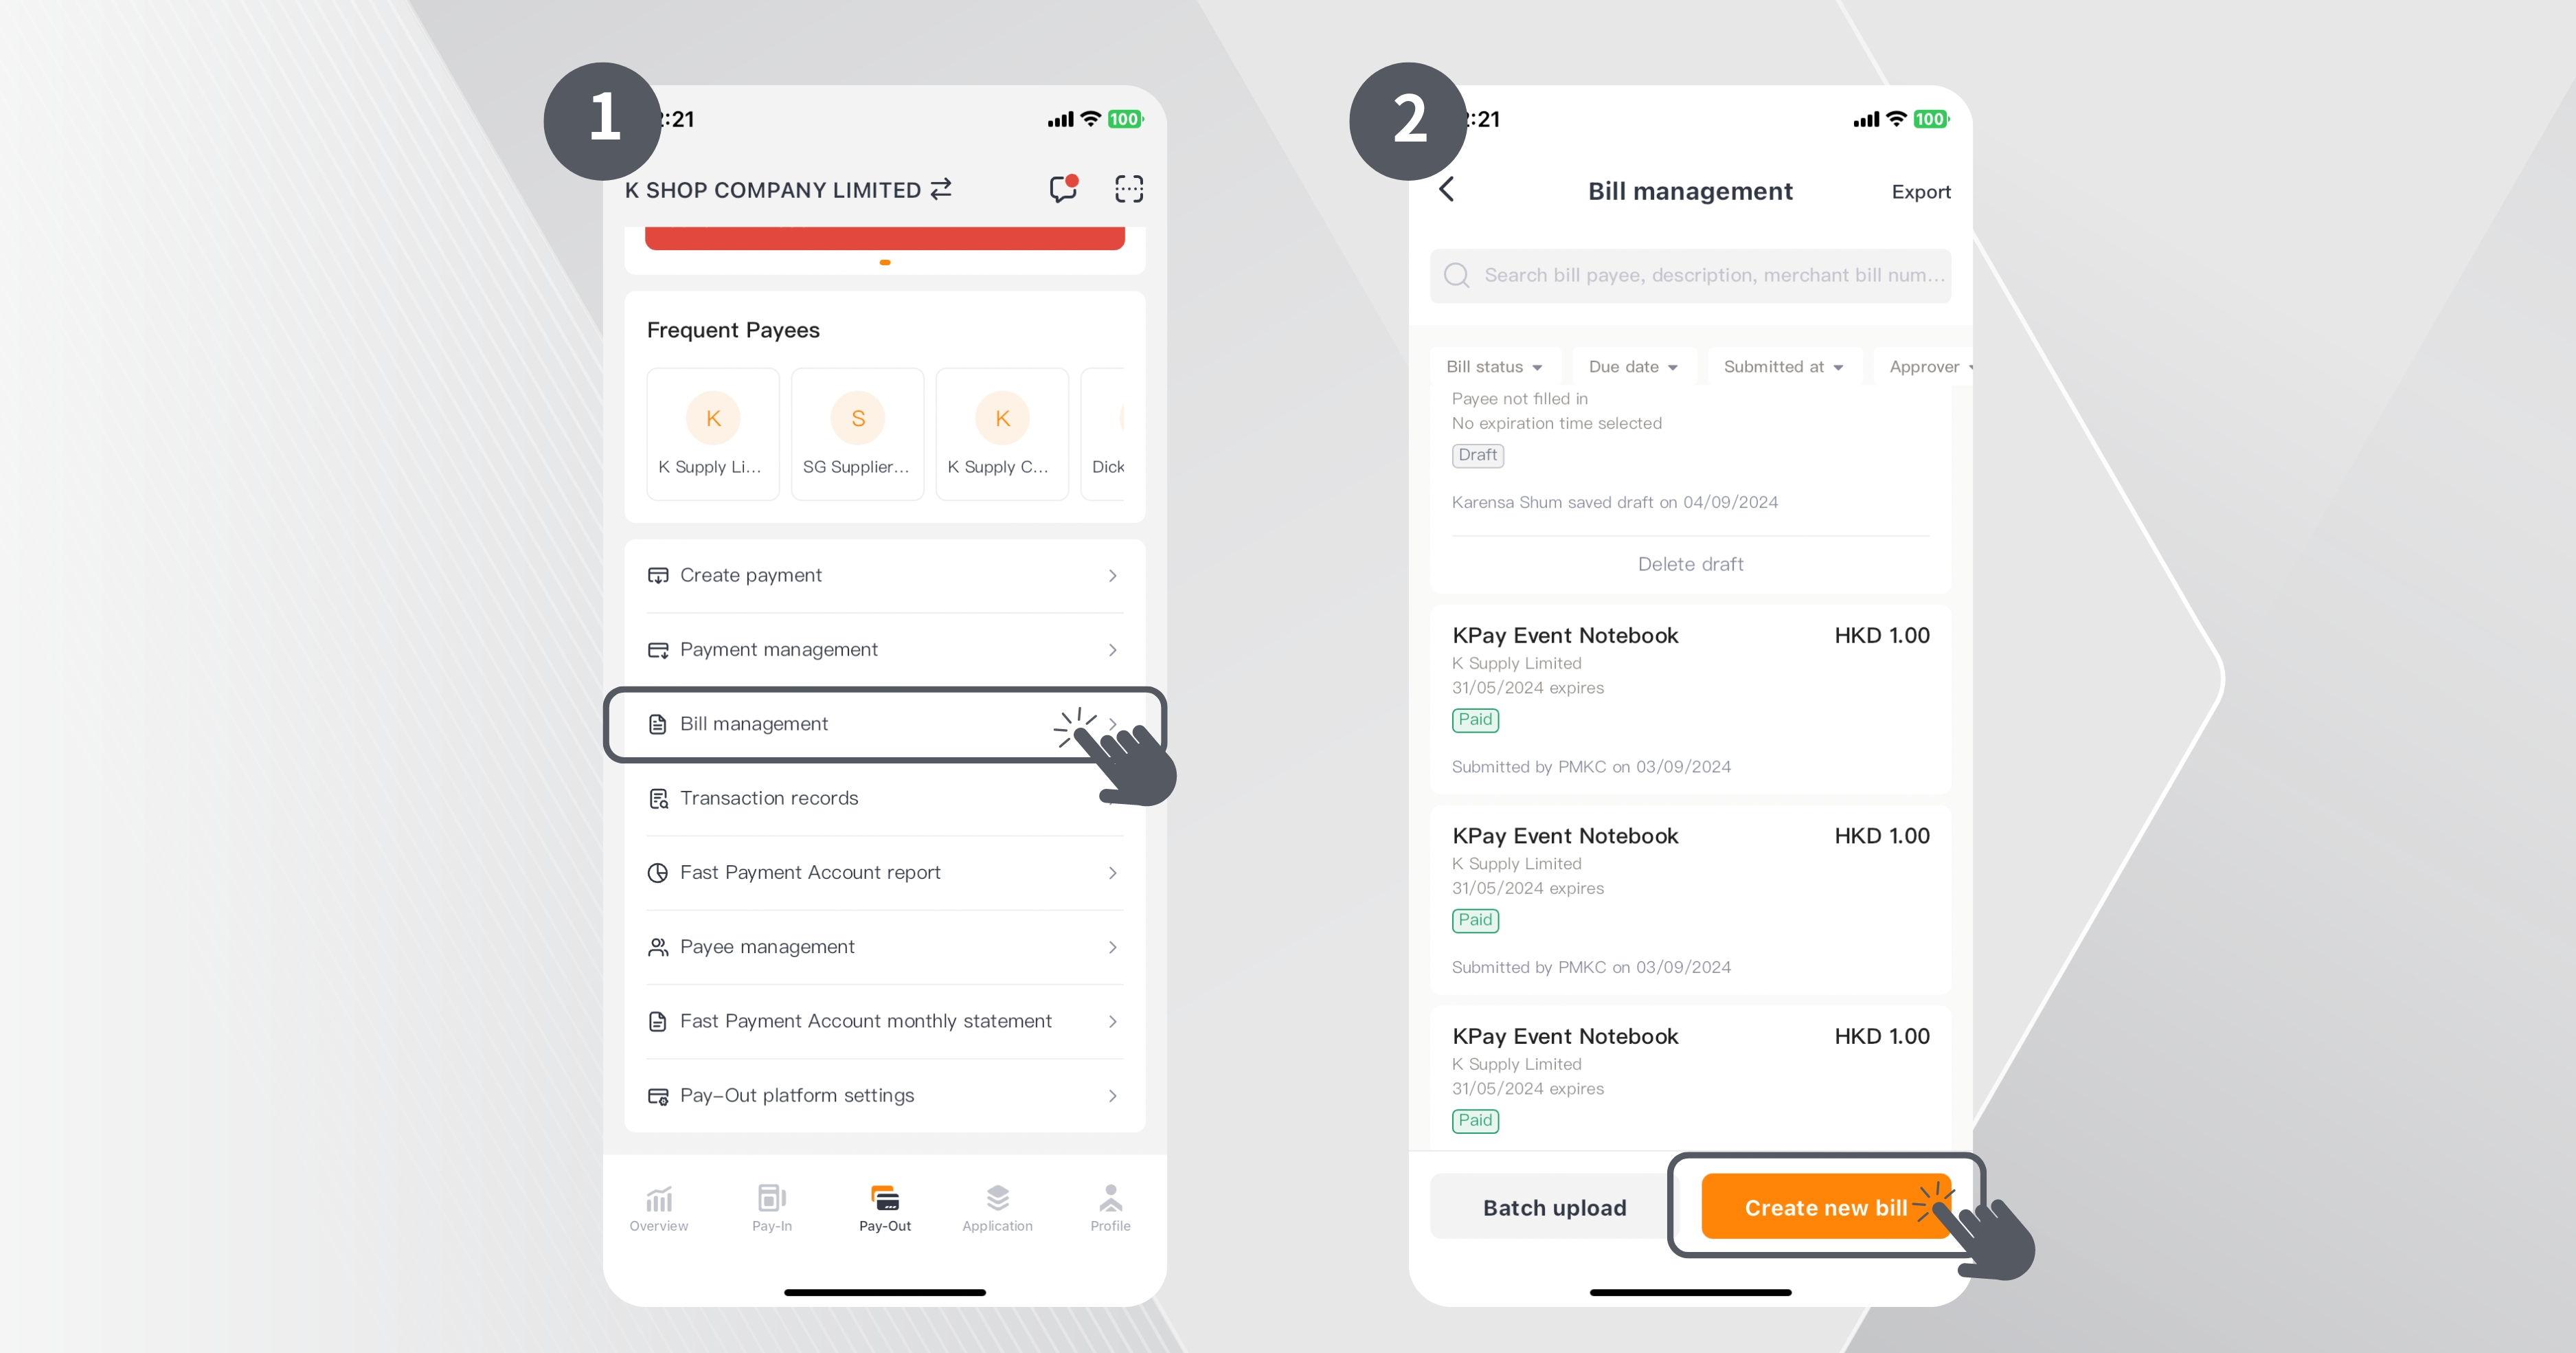
Step 1: On the “Pay-Out” page, click on “Bill Management”.
Step 2: Click on “Create new bill”.
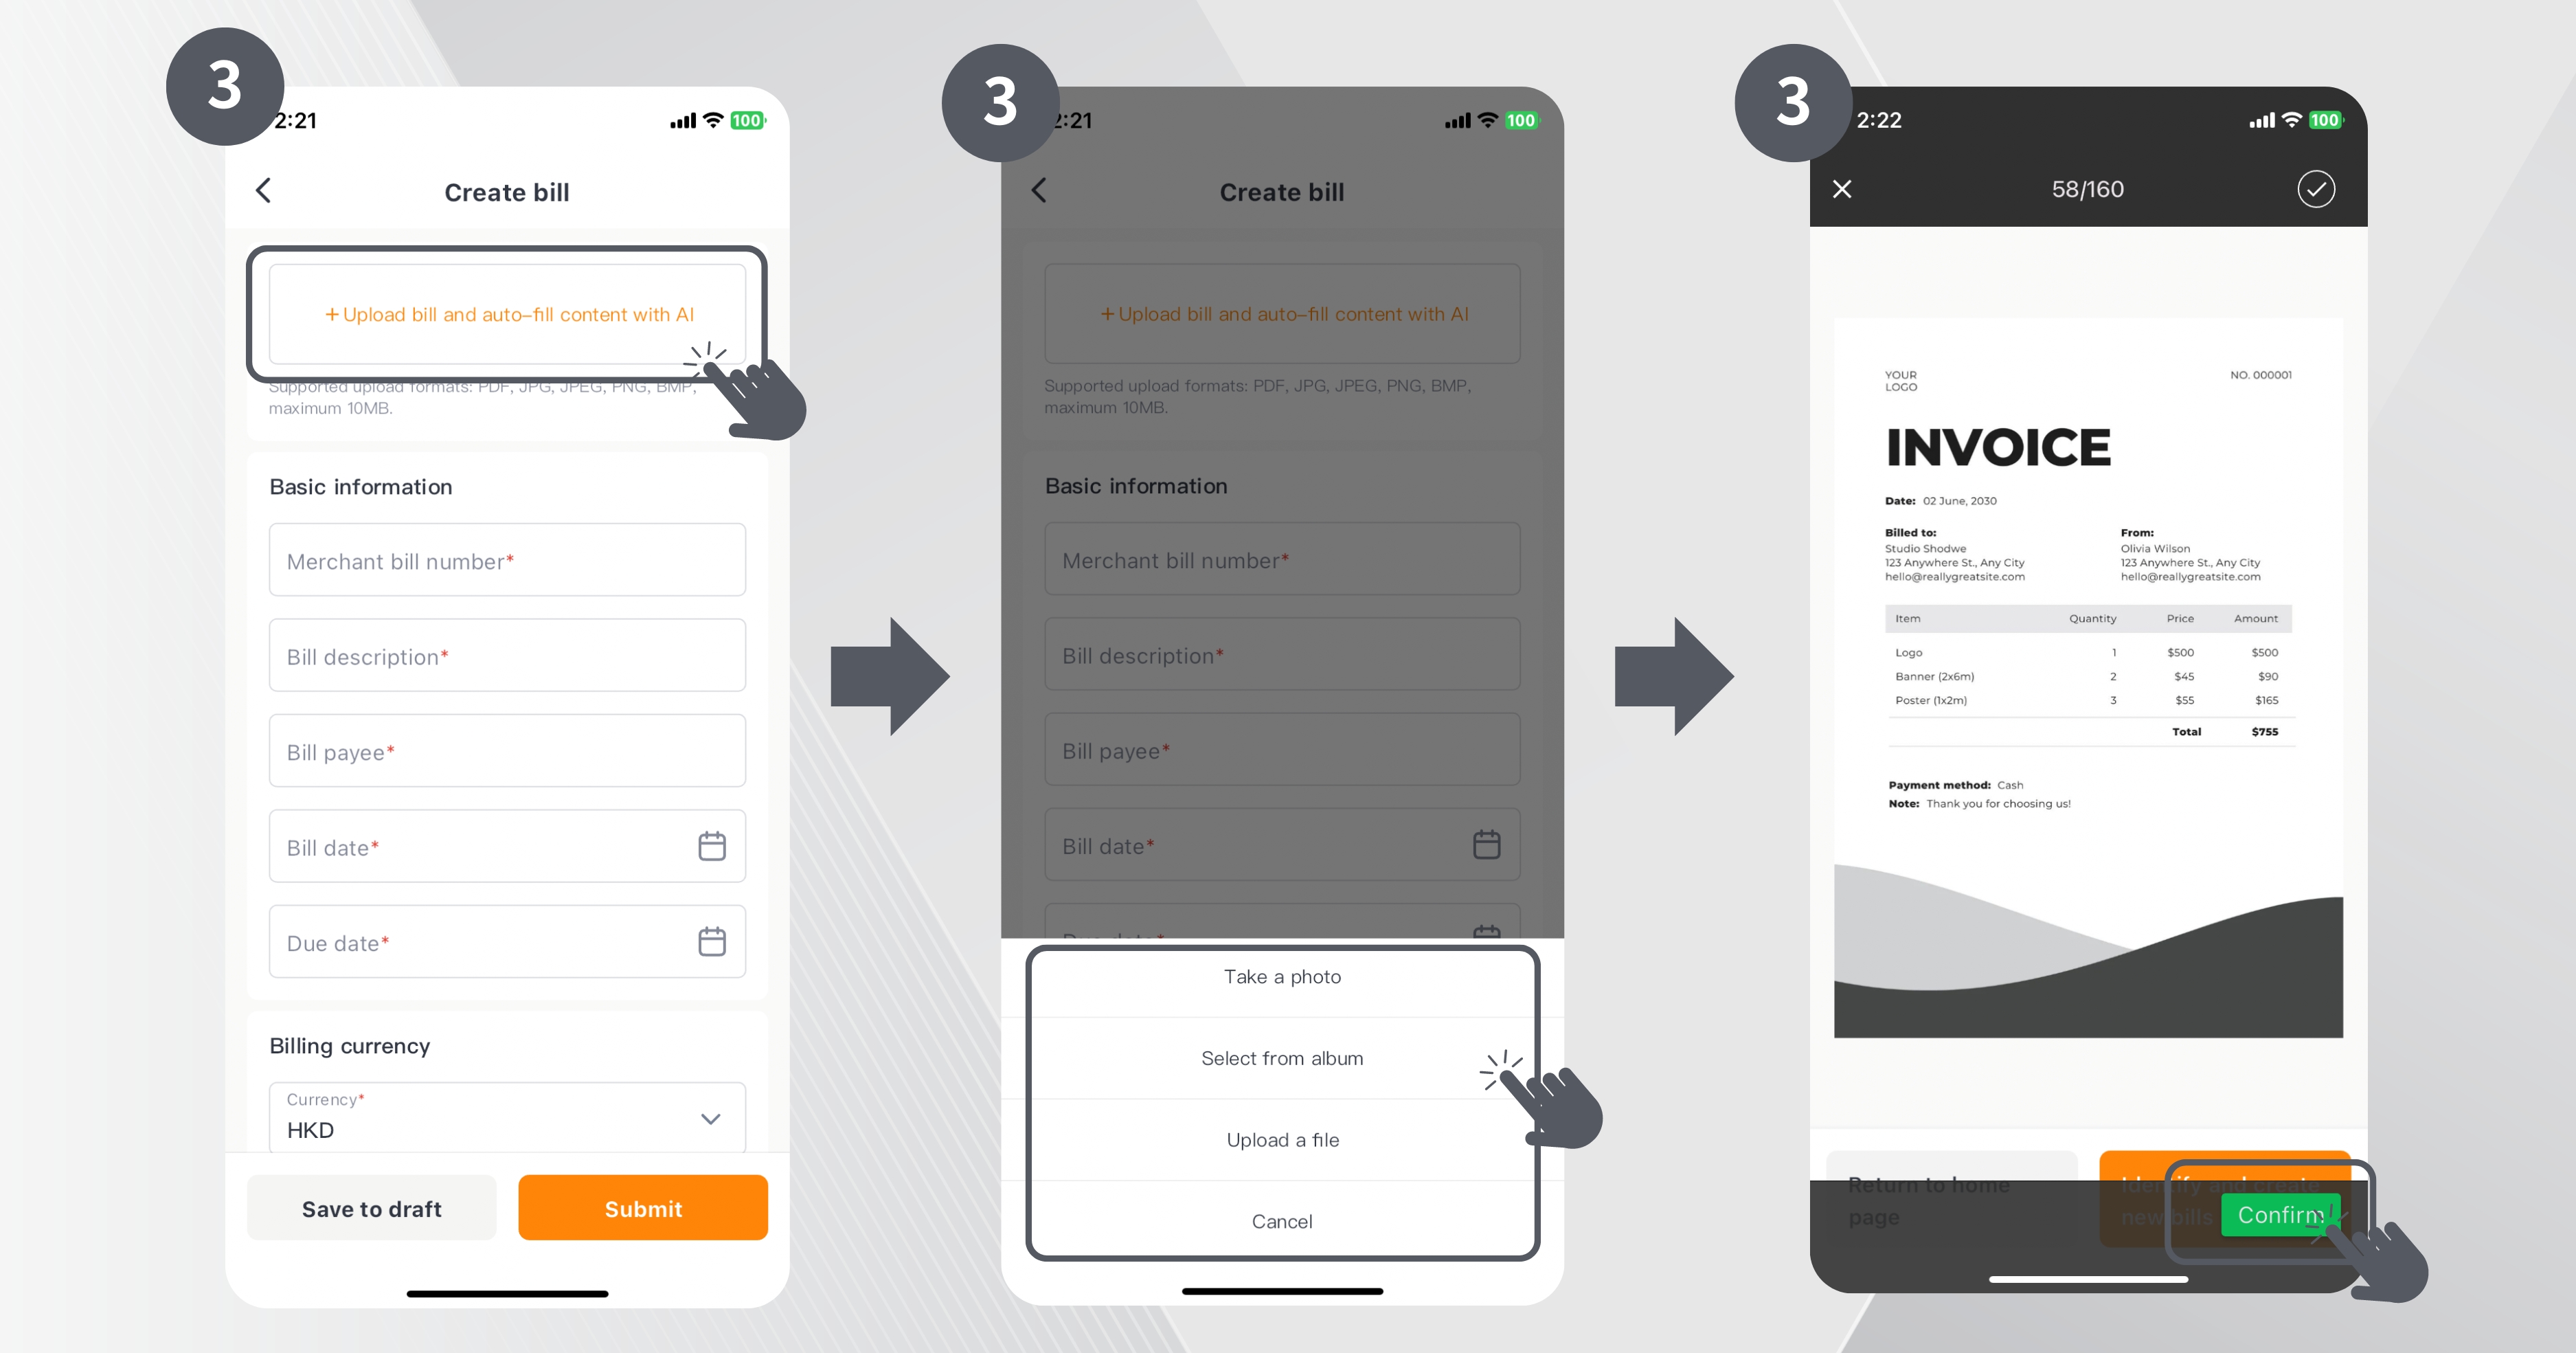
Step 3: Click on “+ Upload bill and auto-fill content with AI” and choose to either take a photo, select from your phone album, or upload a file.
Method 1: Upload via camera
| Method 2: Upload from phone album
| Method 3: Upload a file
|
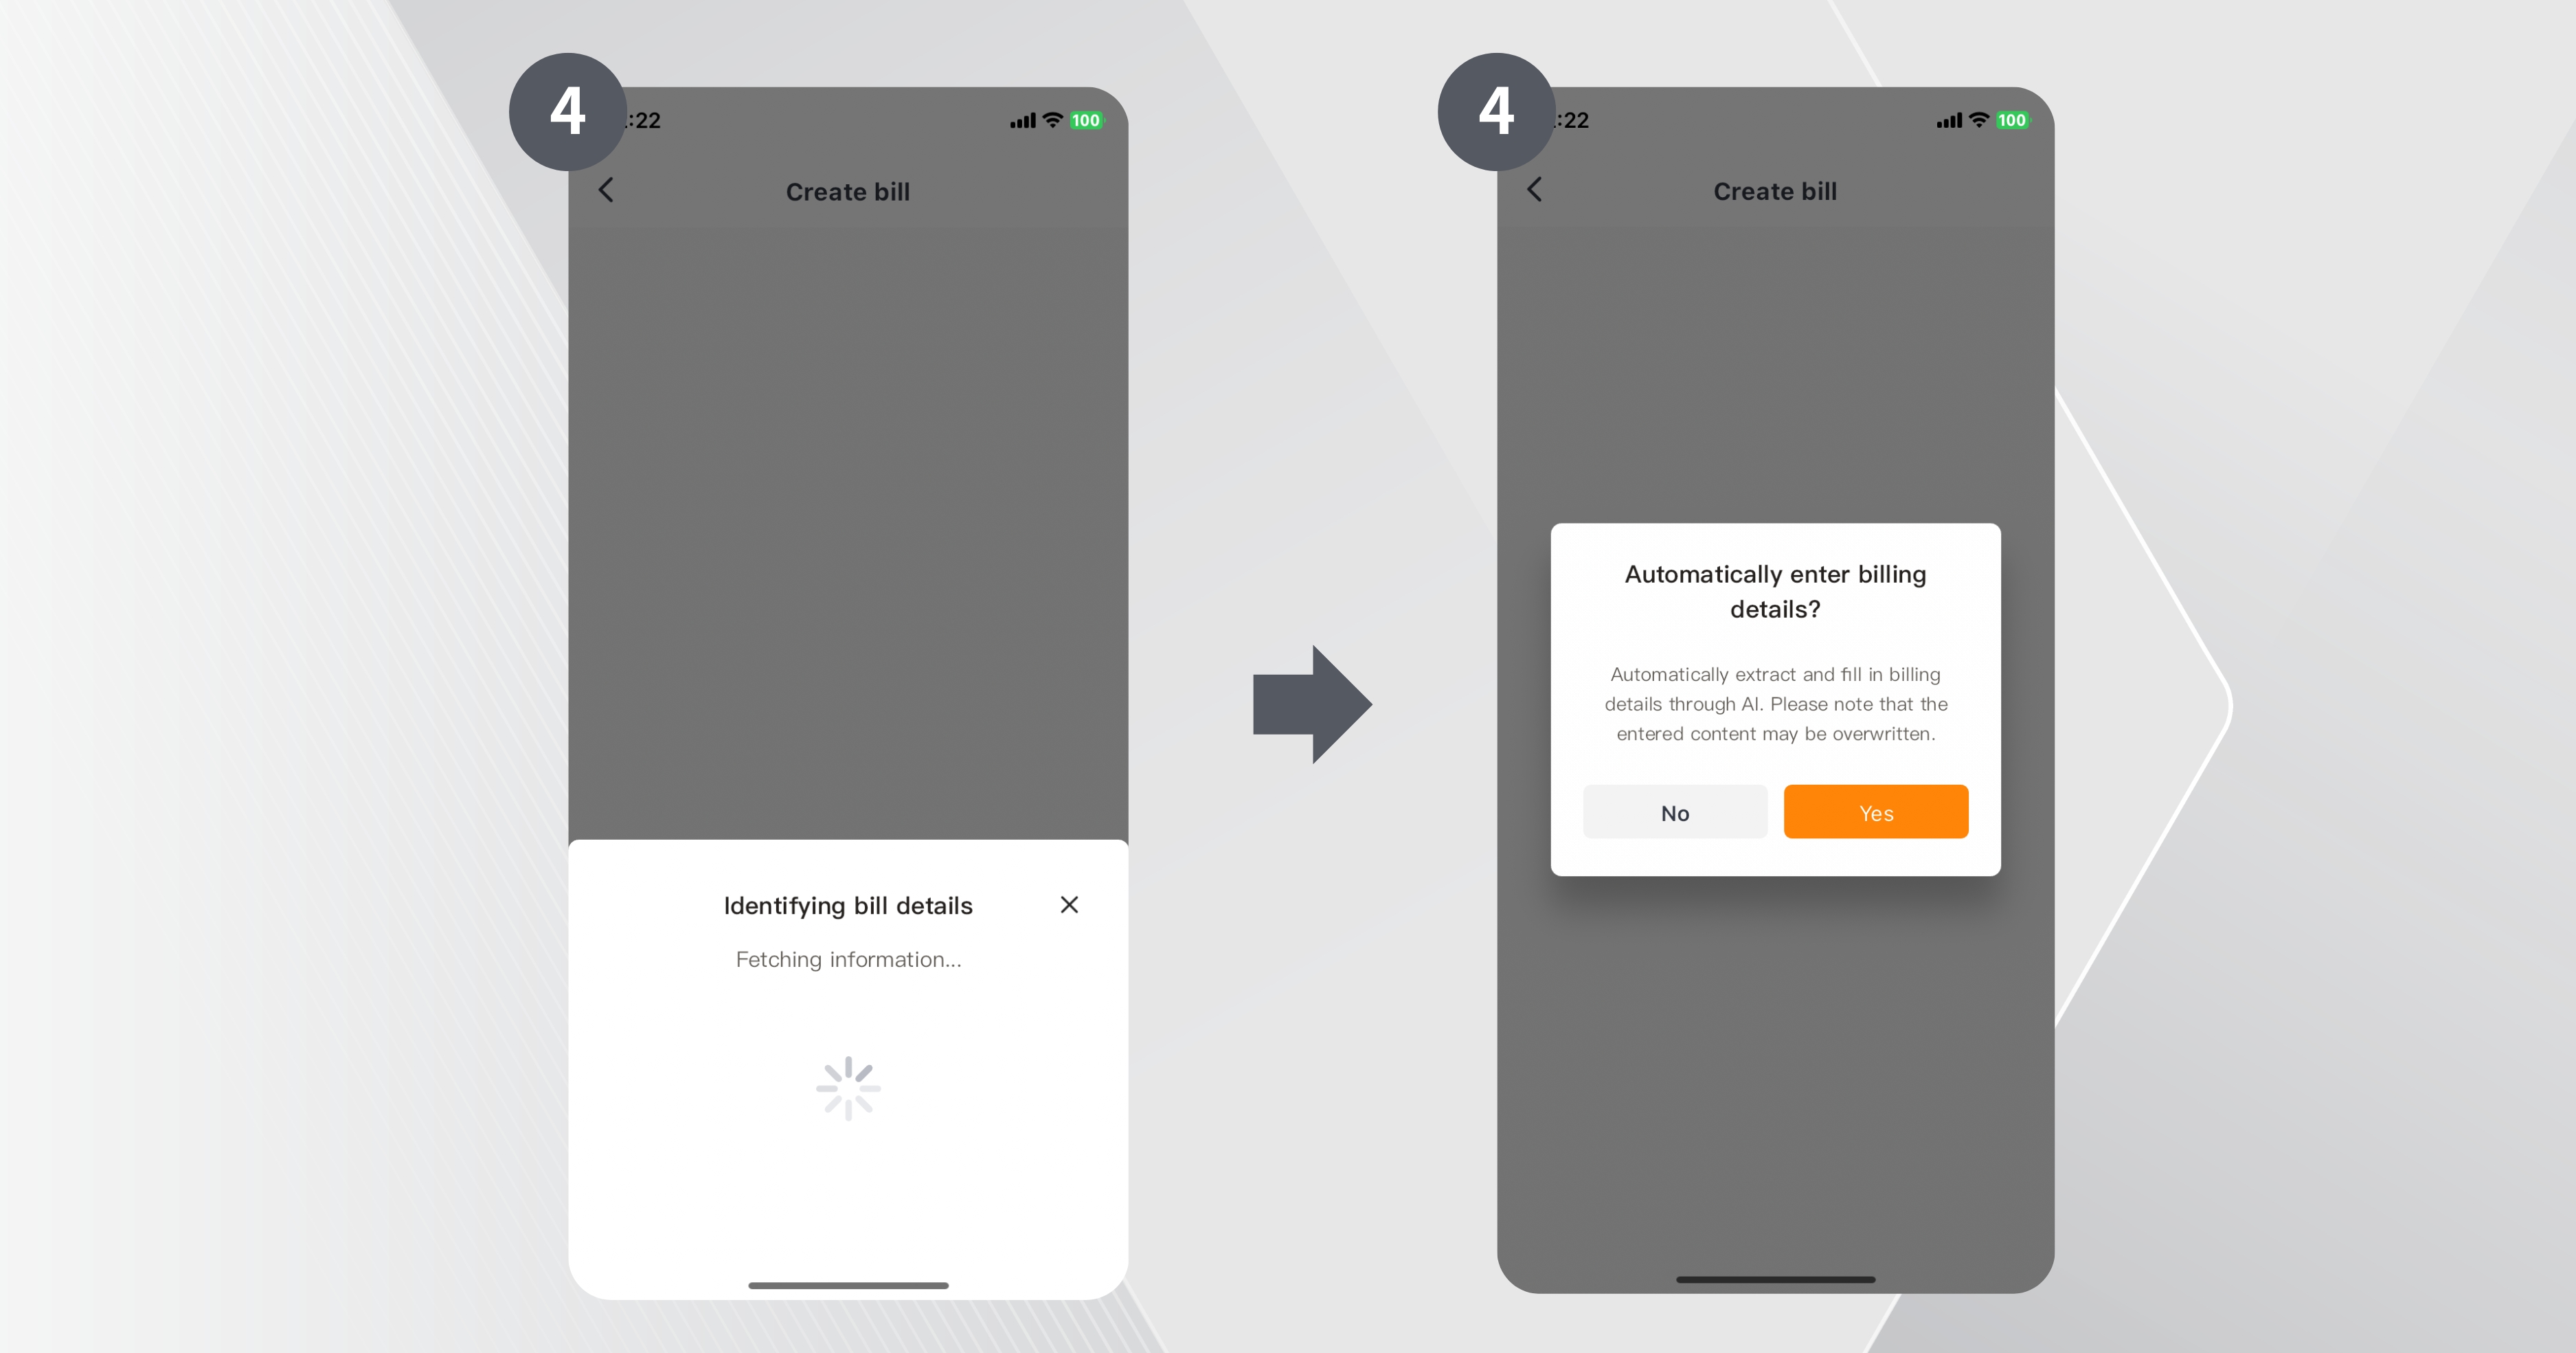
Step 4: The system will automatically extract and input the bill information, or you can manually enter the details.
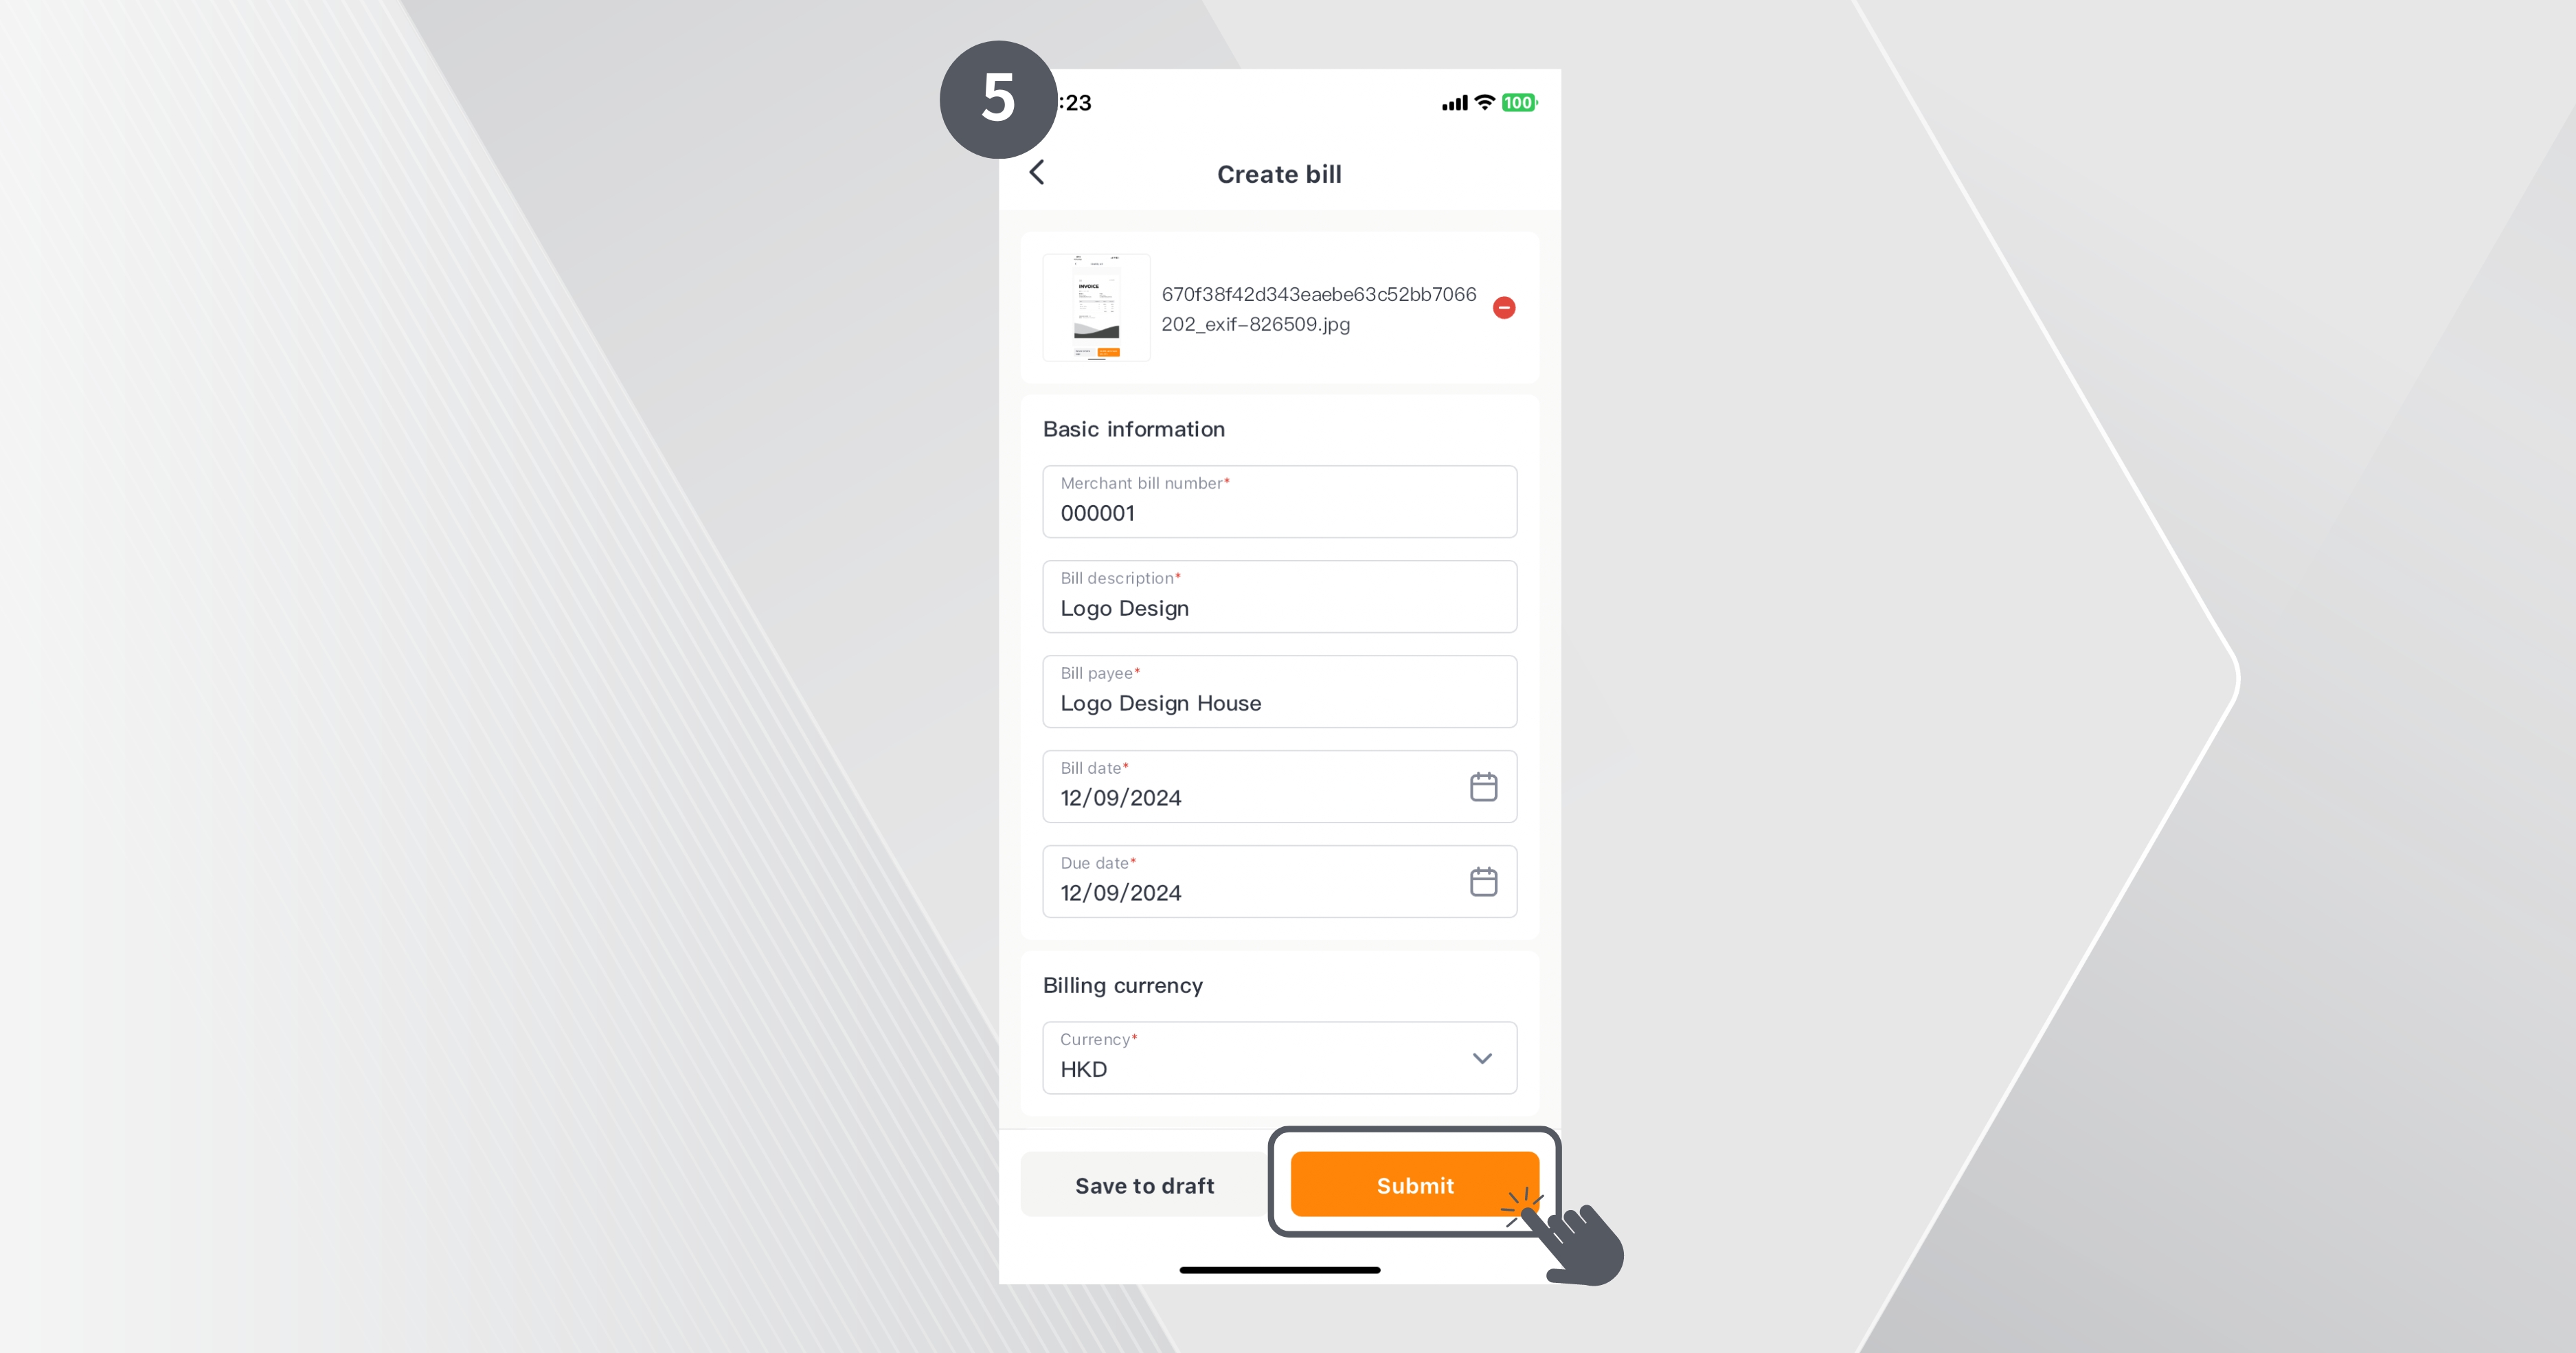
Step 5: After verifying the accuracy of the bill information, click “Submit”.
How to upload multiple bills at once (Batch upload)?
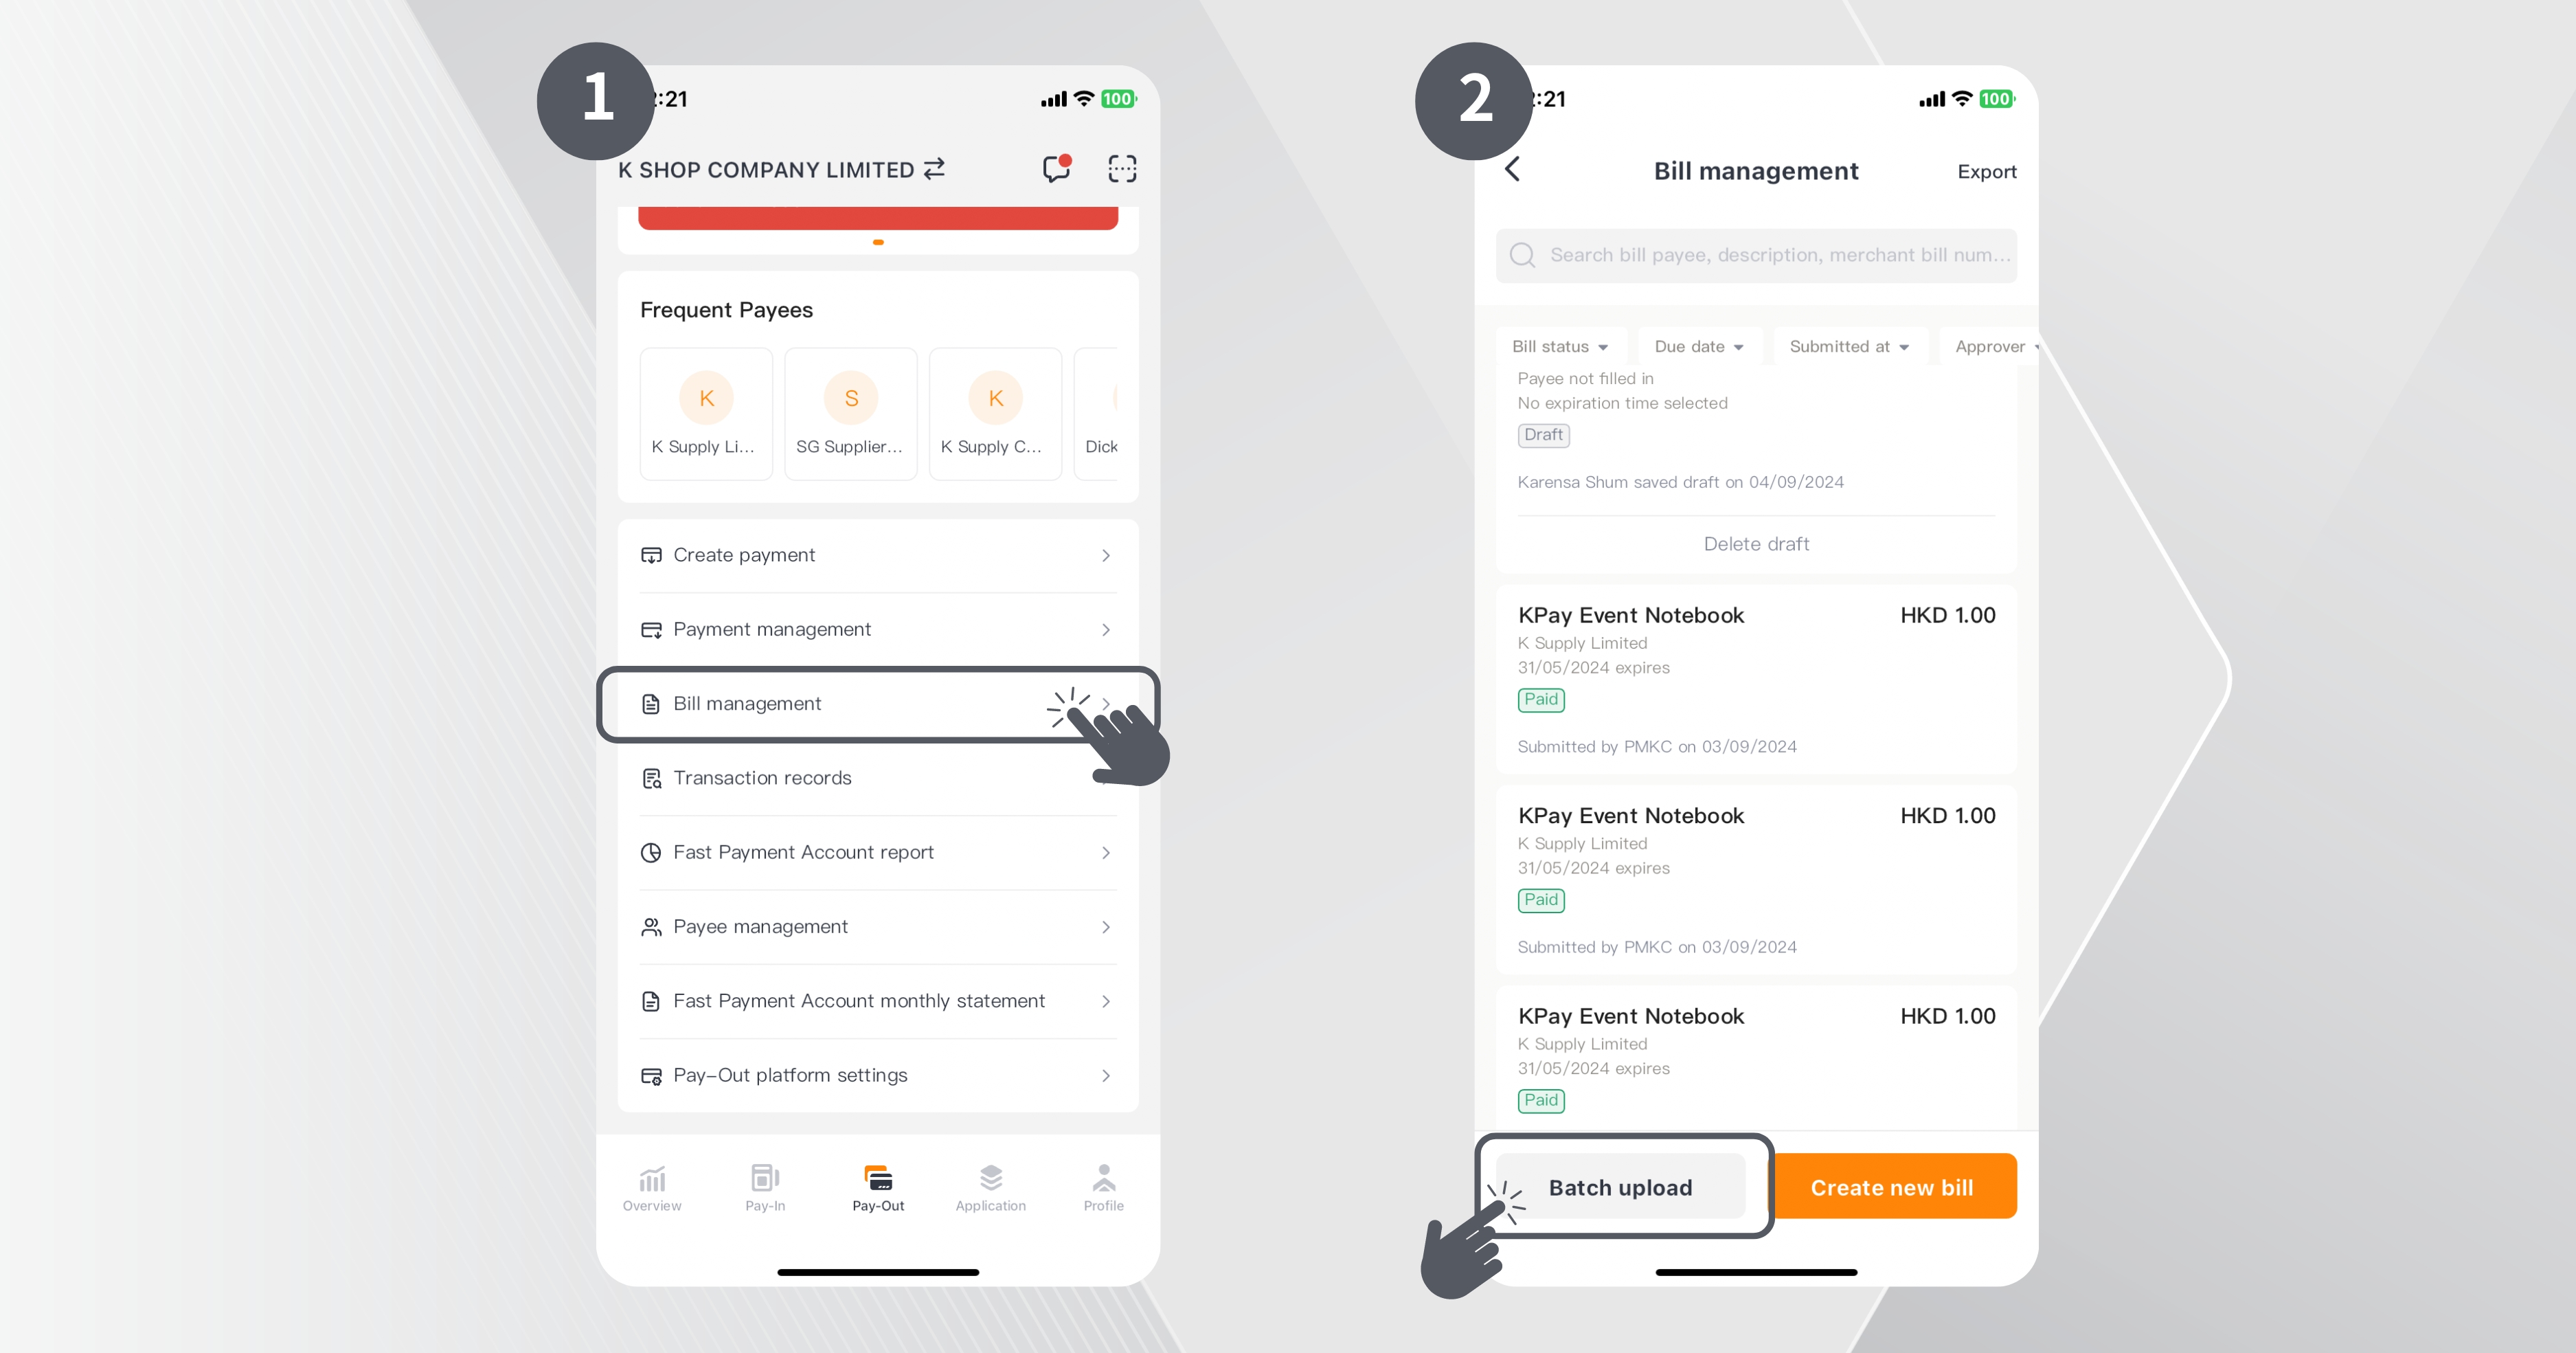
Step 1: On the “Pay Out” page, click on “Bill Management”.
Step 2: Click “Batch upload” Choose your preferred method to upload the bills: take a photo, select from your phone album, or upload a file.
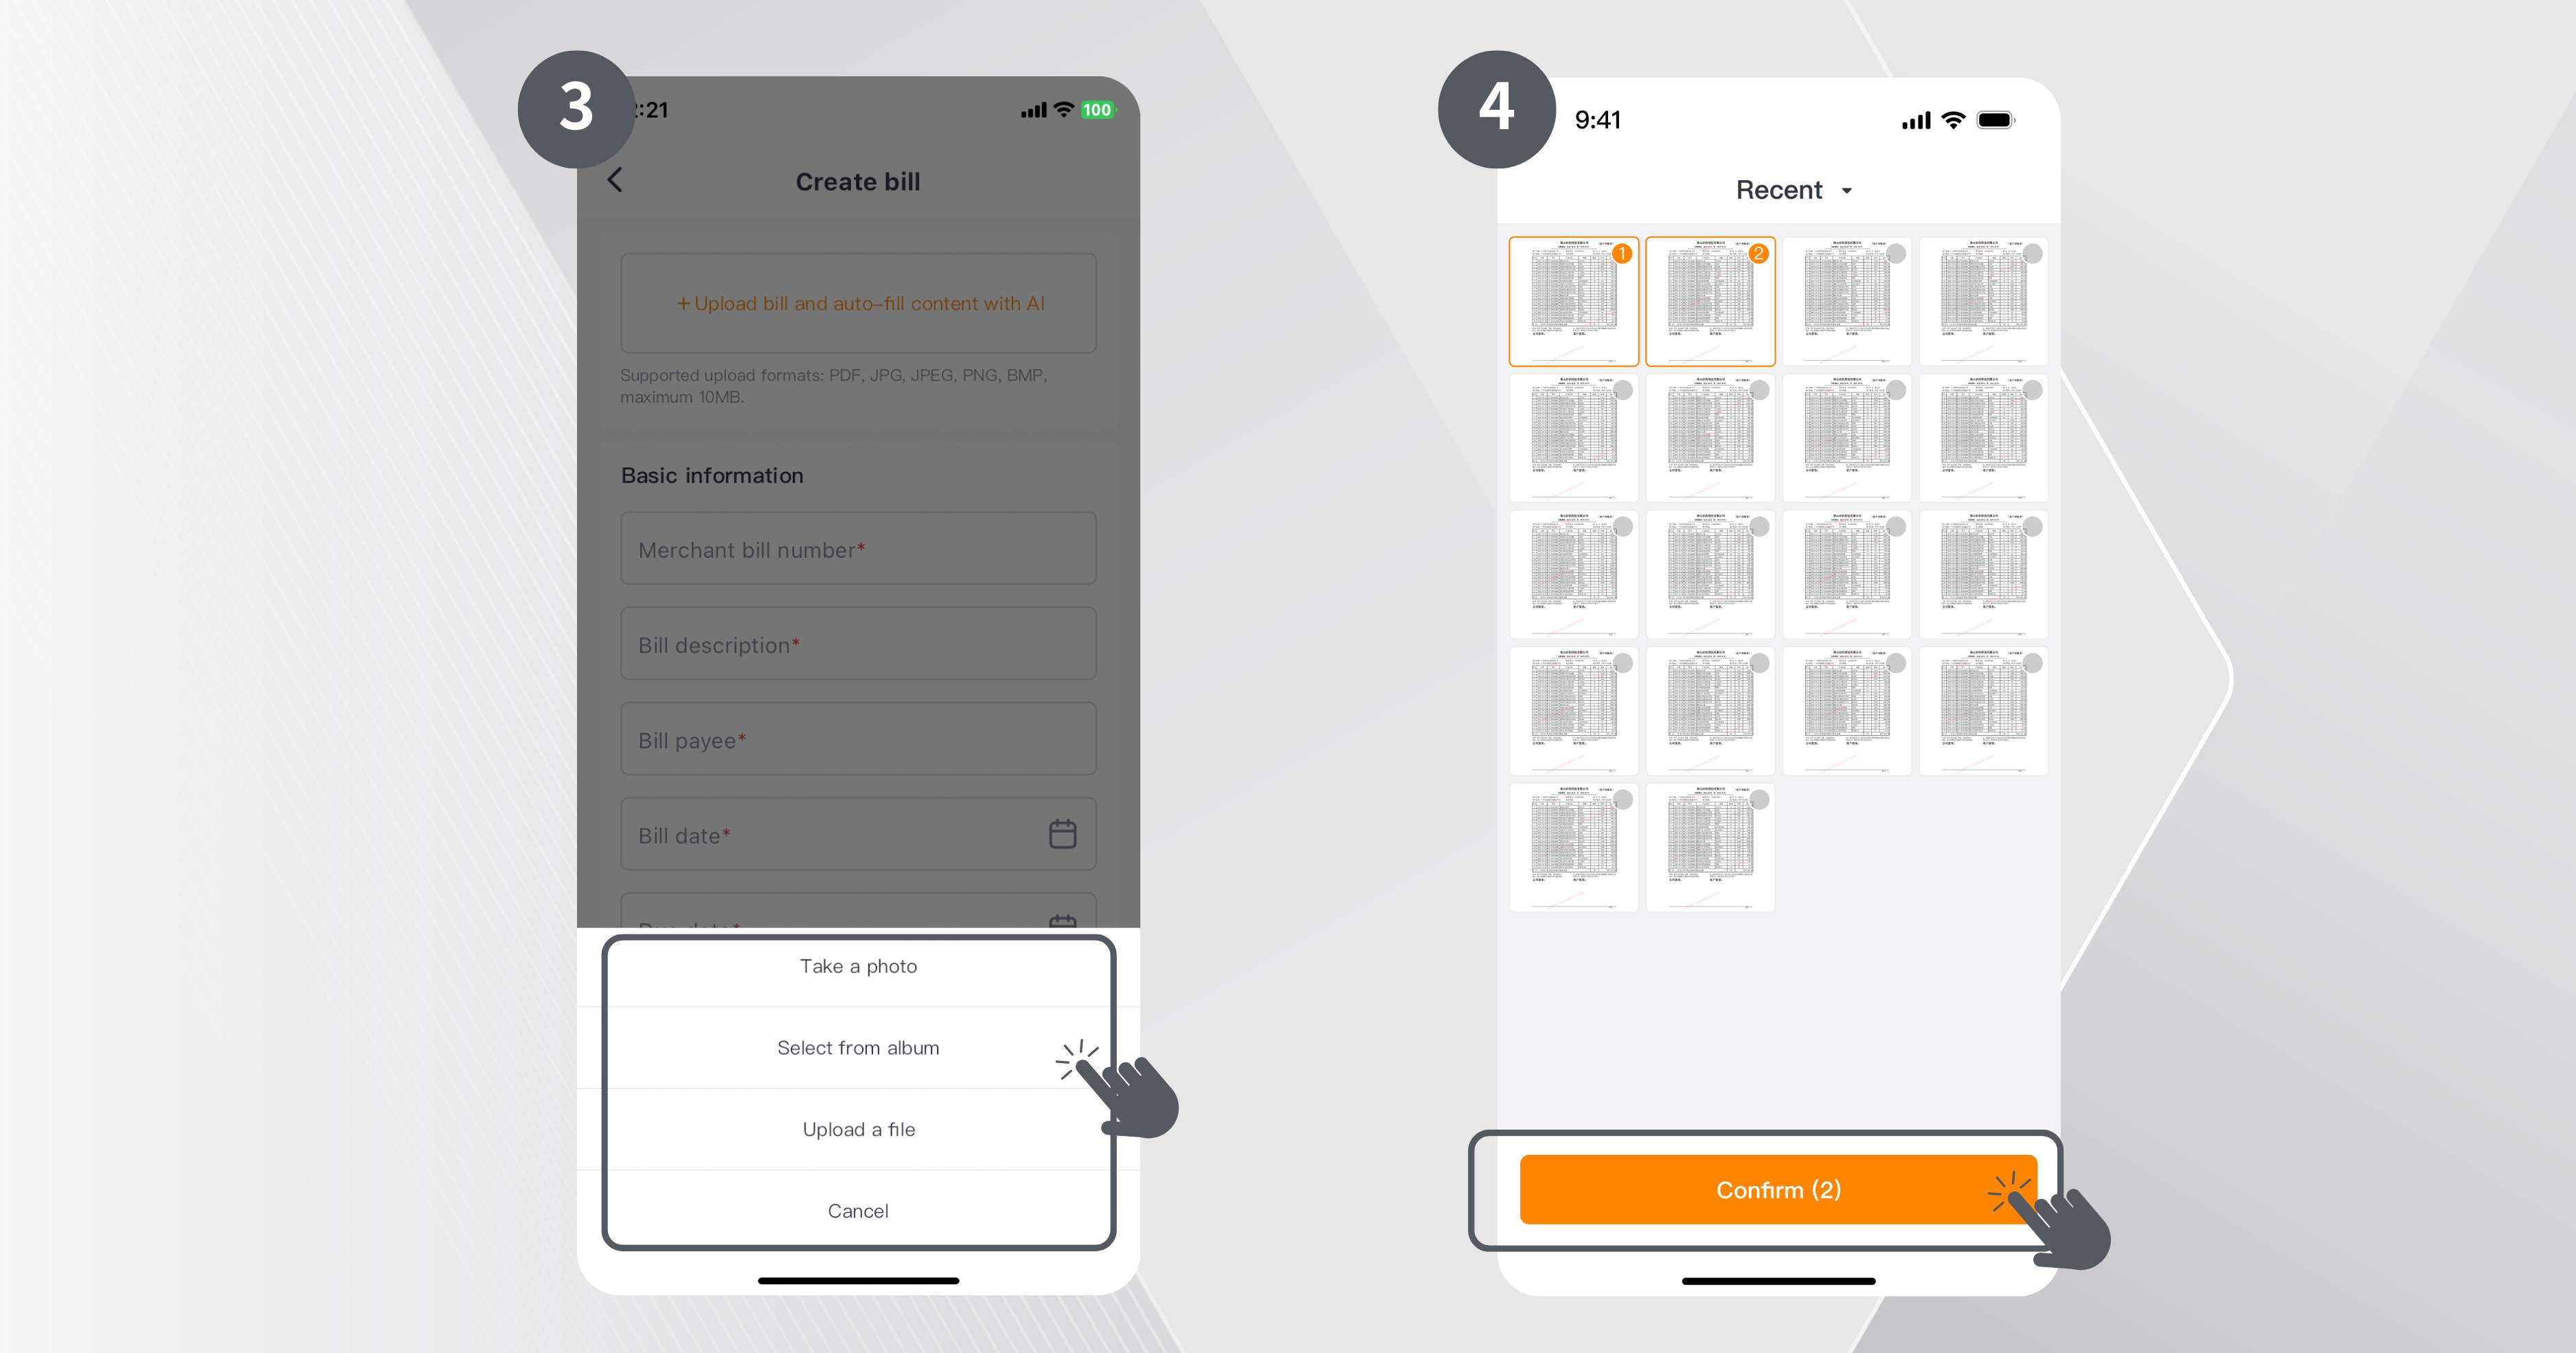
| Method 1: Upload via camera Step 3: Choose “Take a photo” Step 4: Take a photo of the bill and click “Confirm” | Method 2: Upload from phone album Step 3: Choose “Select from album” Step 4: Select the bill image to upload and click “Confirm” | Method 3: Upload a file Step 3: Choose “Upload a file”. Step 4: Select the file(s) you want to upload. |
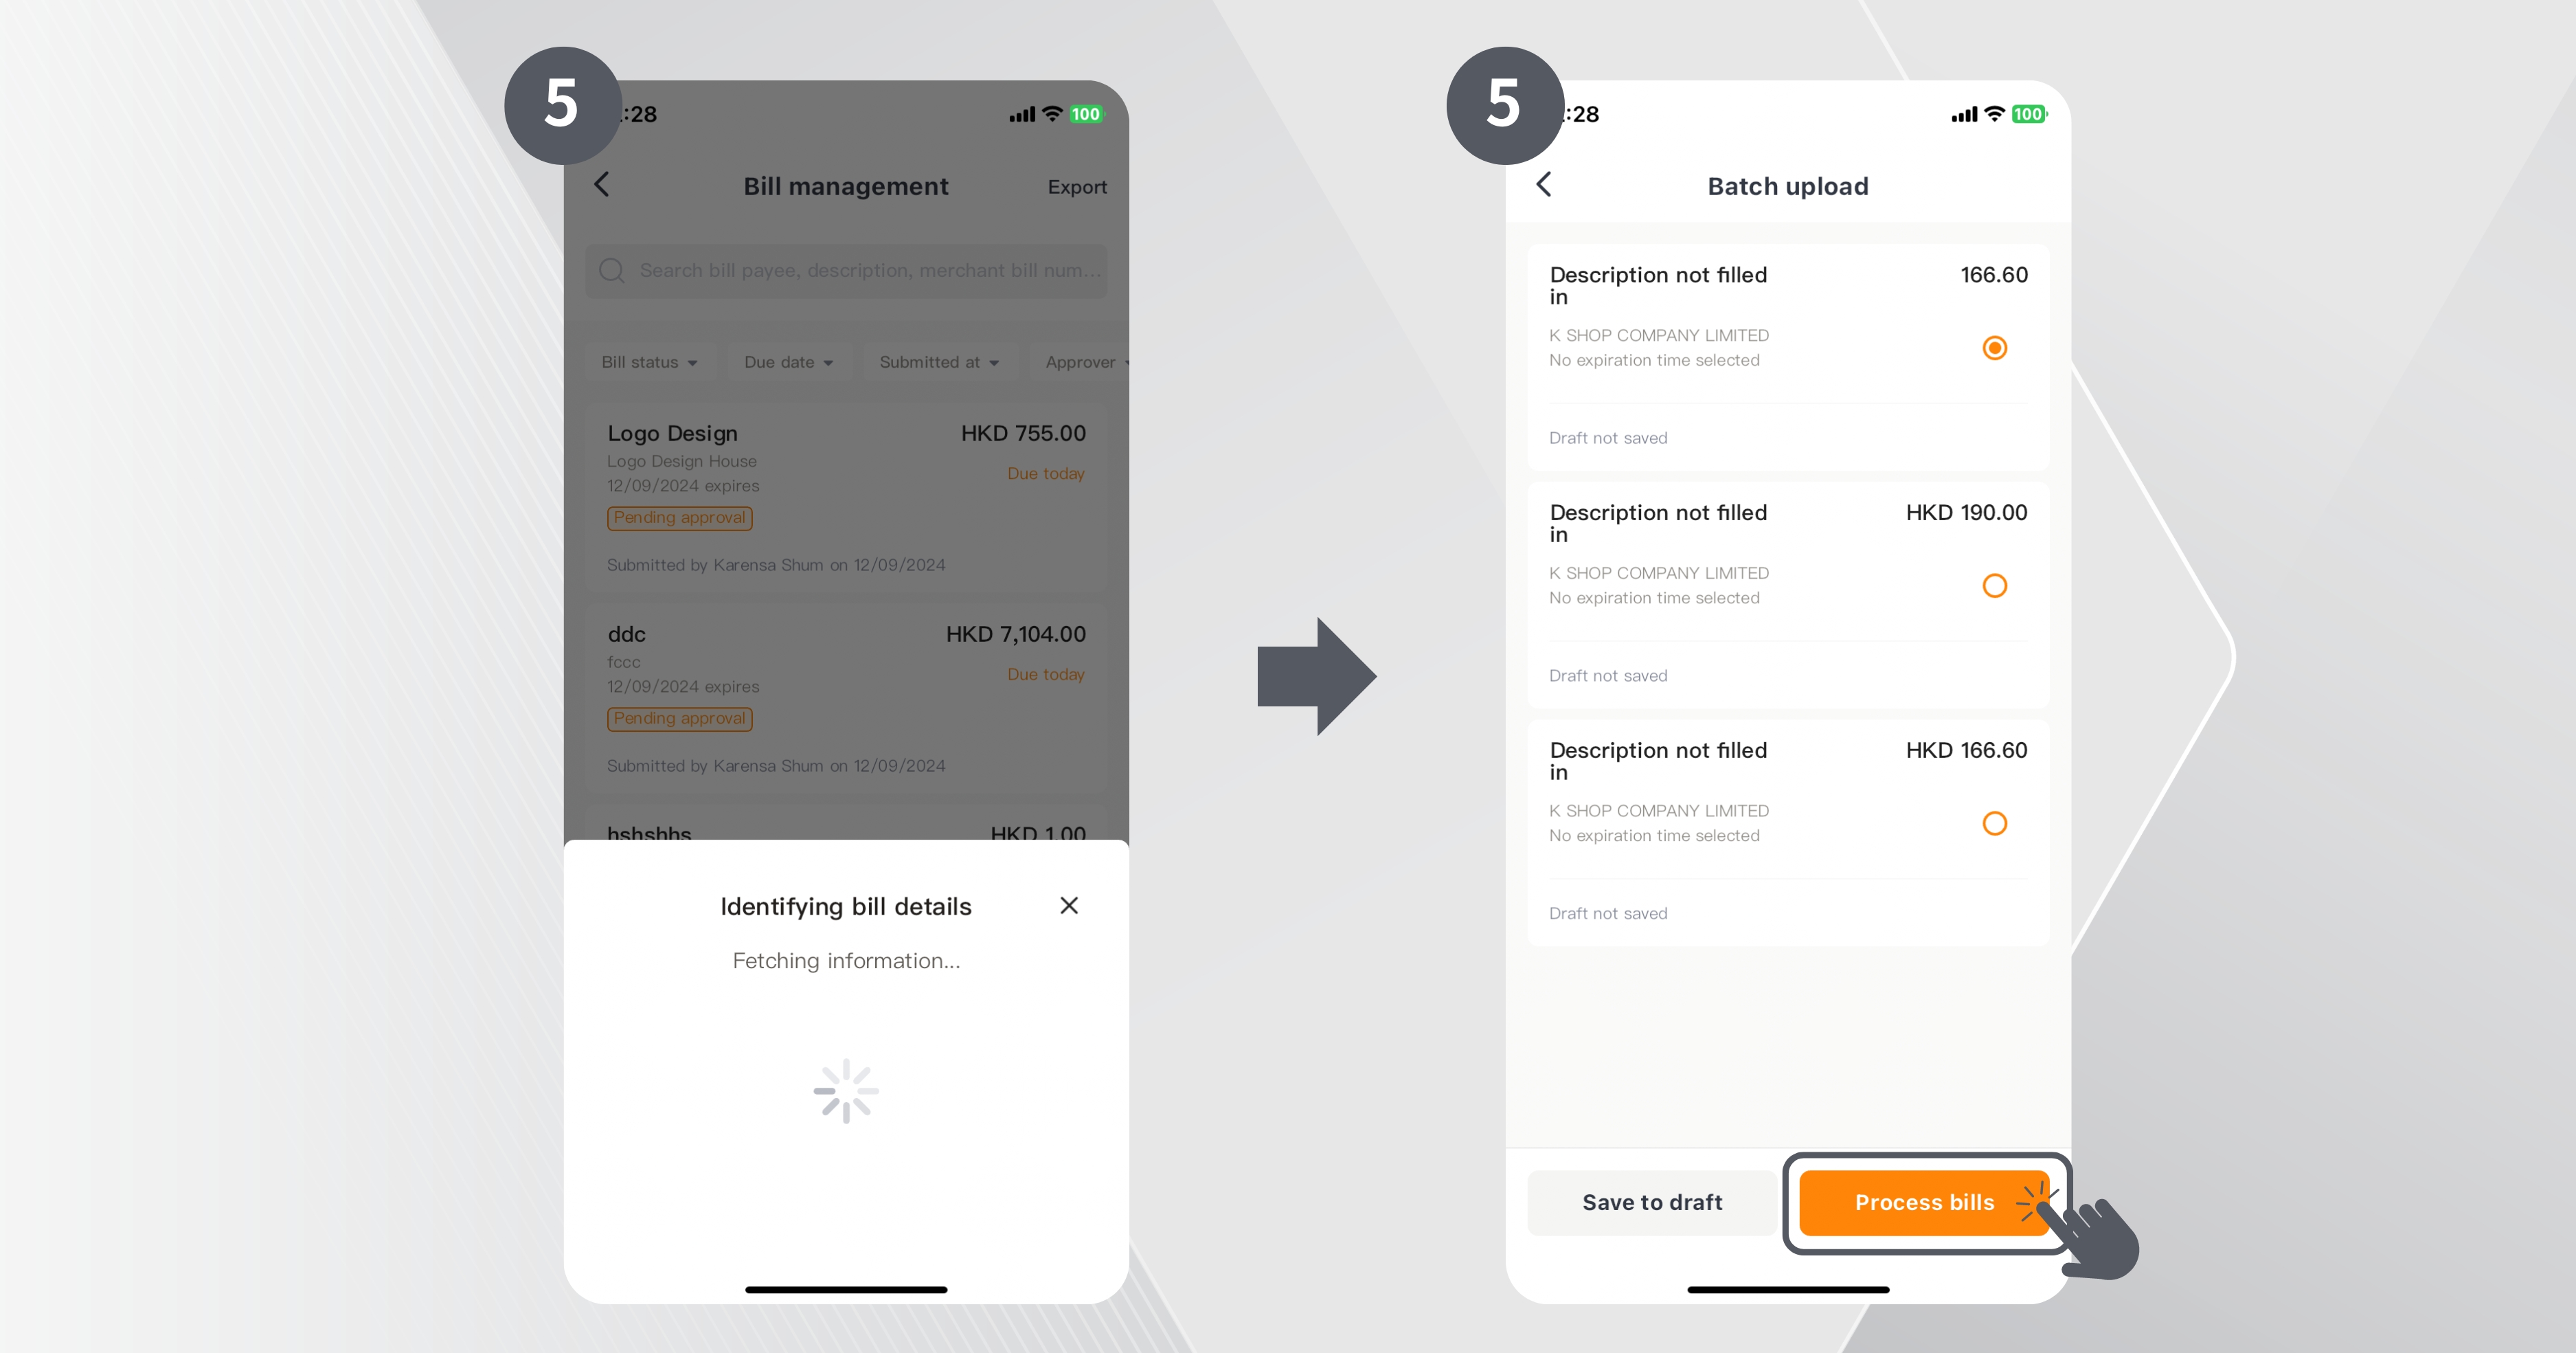
Step 5: The system will automatically extract and input the bill information, or you can manually enter the details.
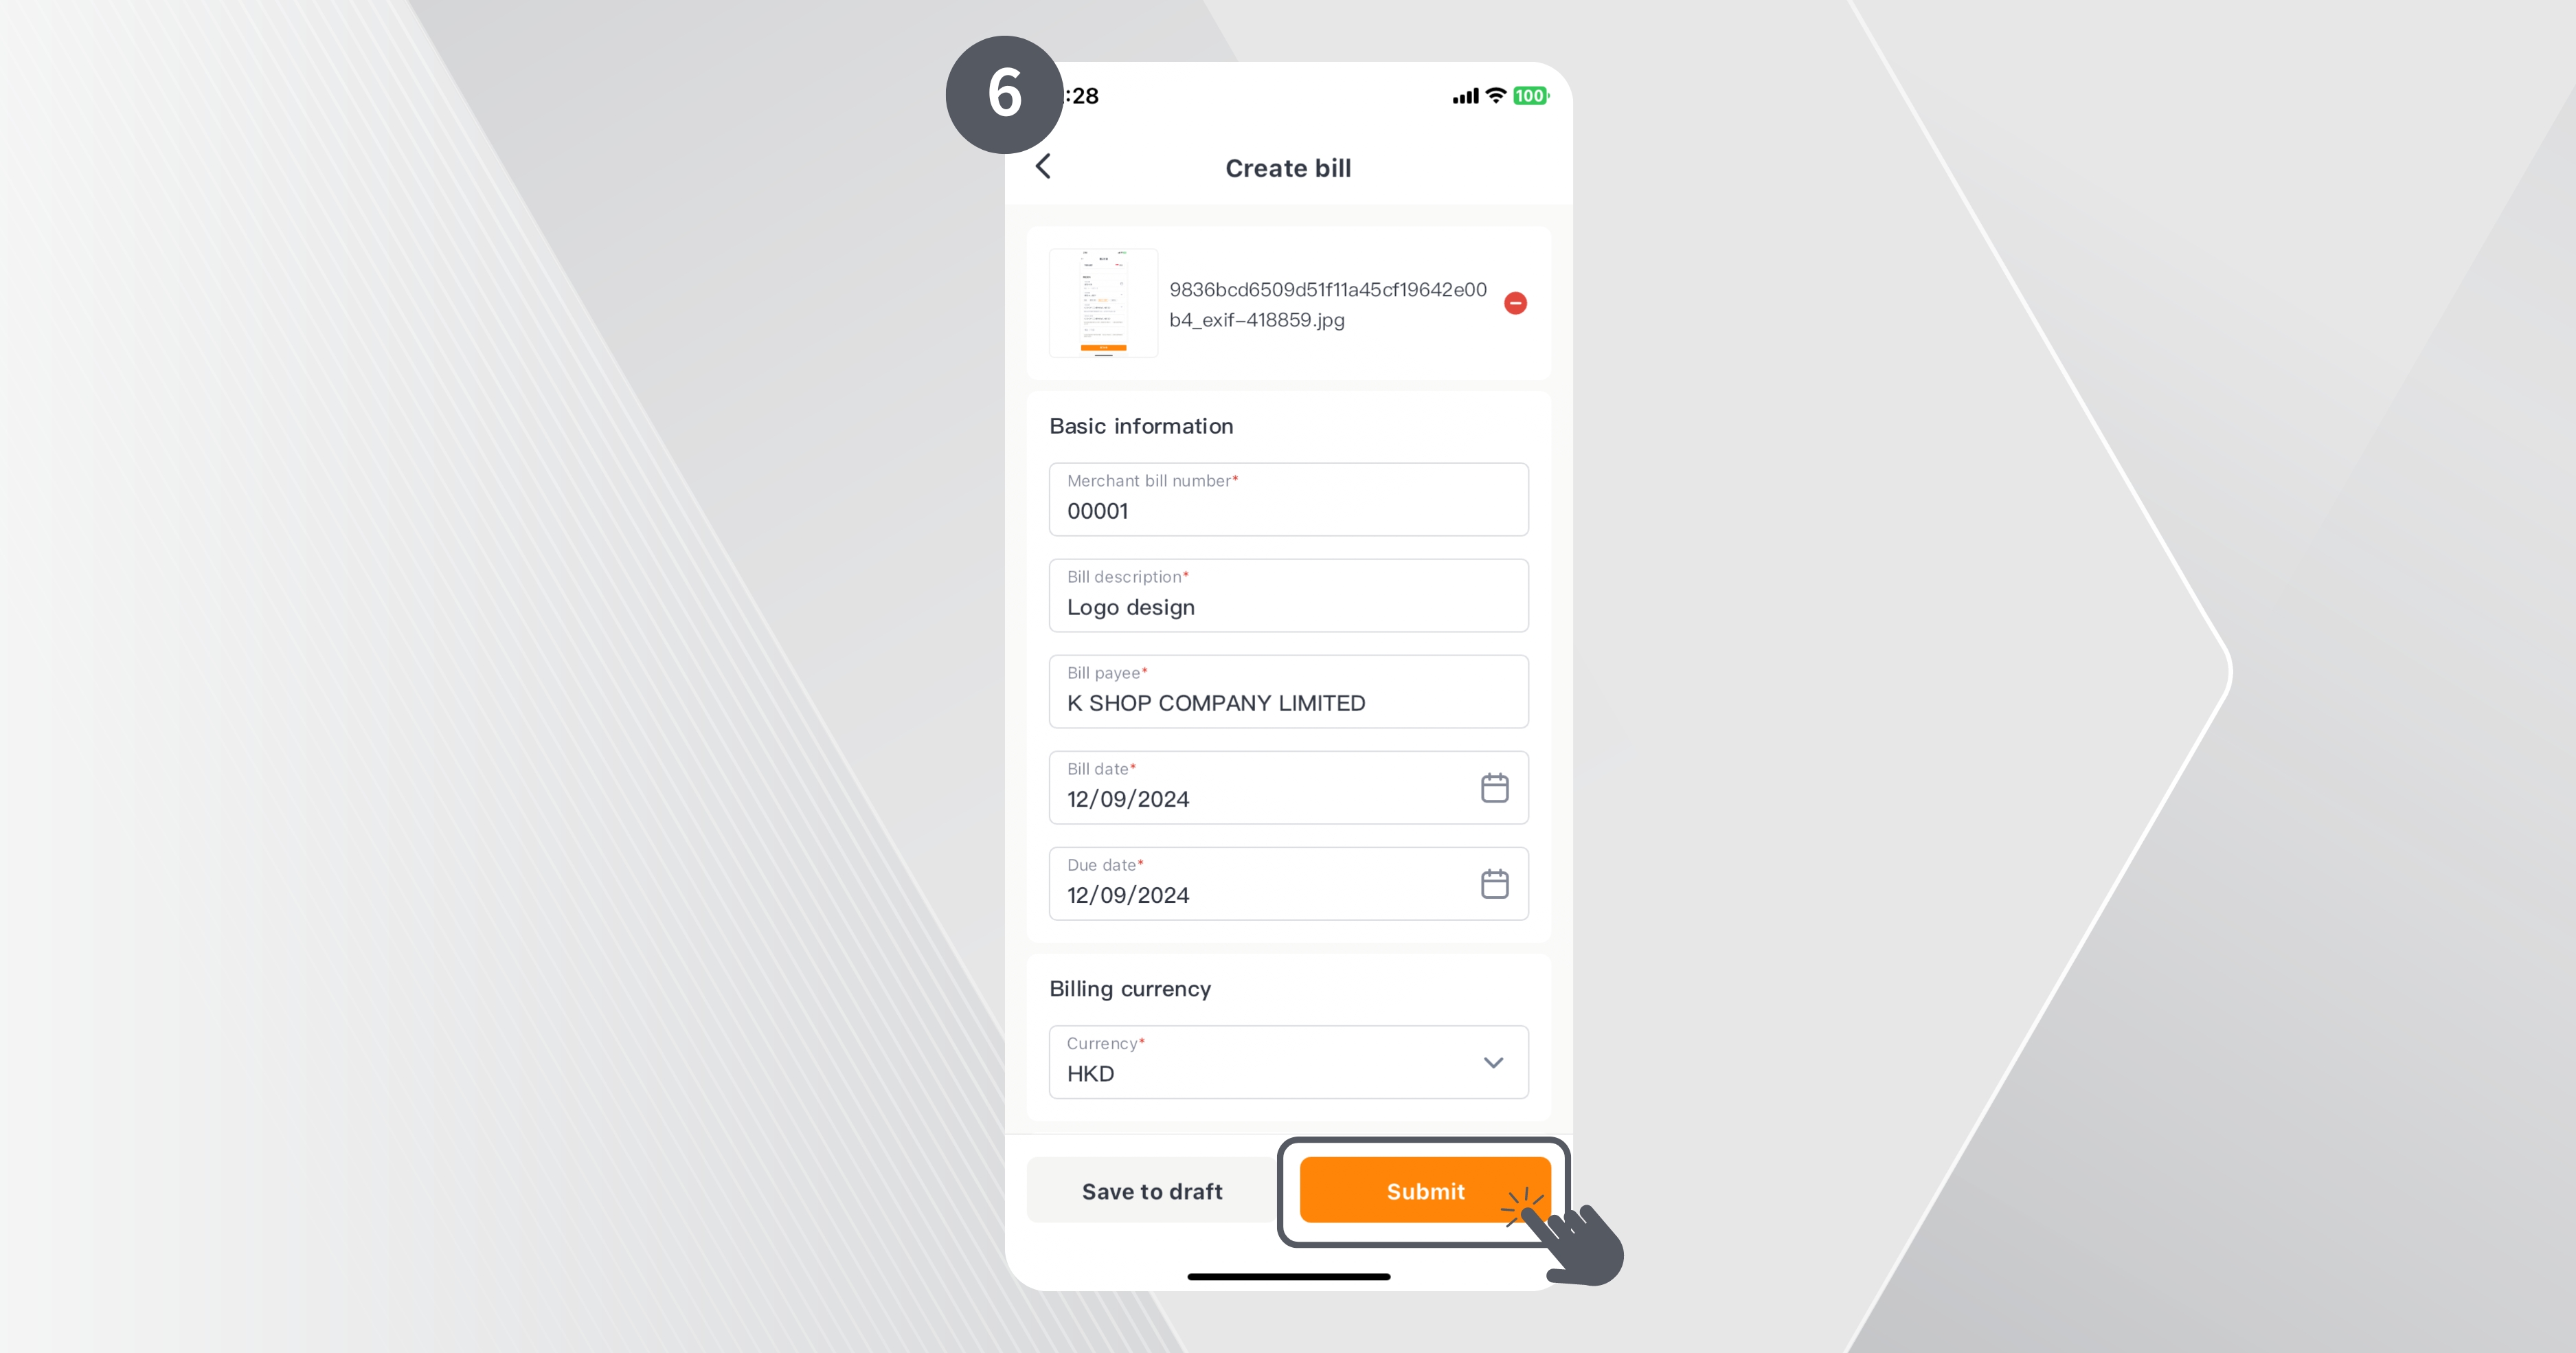
Step 6: After verifying the accuracy of the bill information, click “Submit”.
How to import bills from WhatsApp?
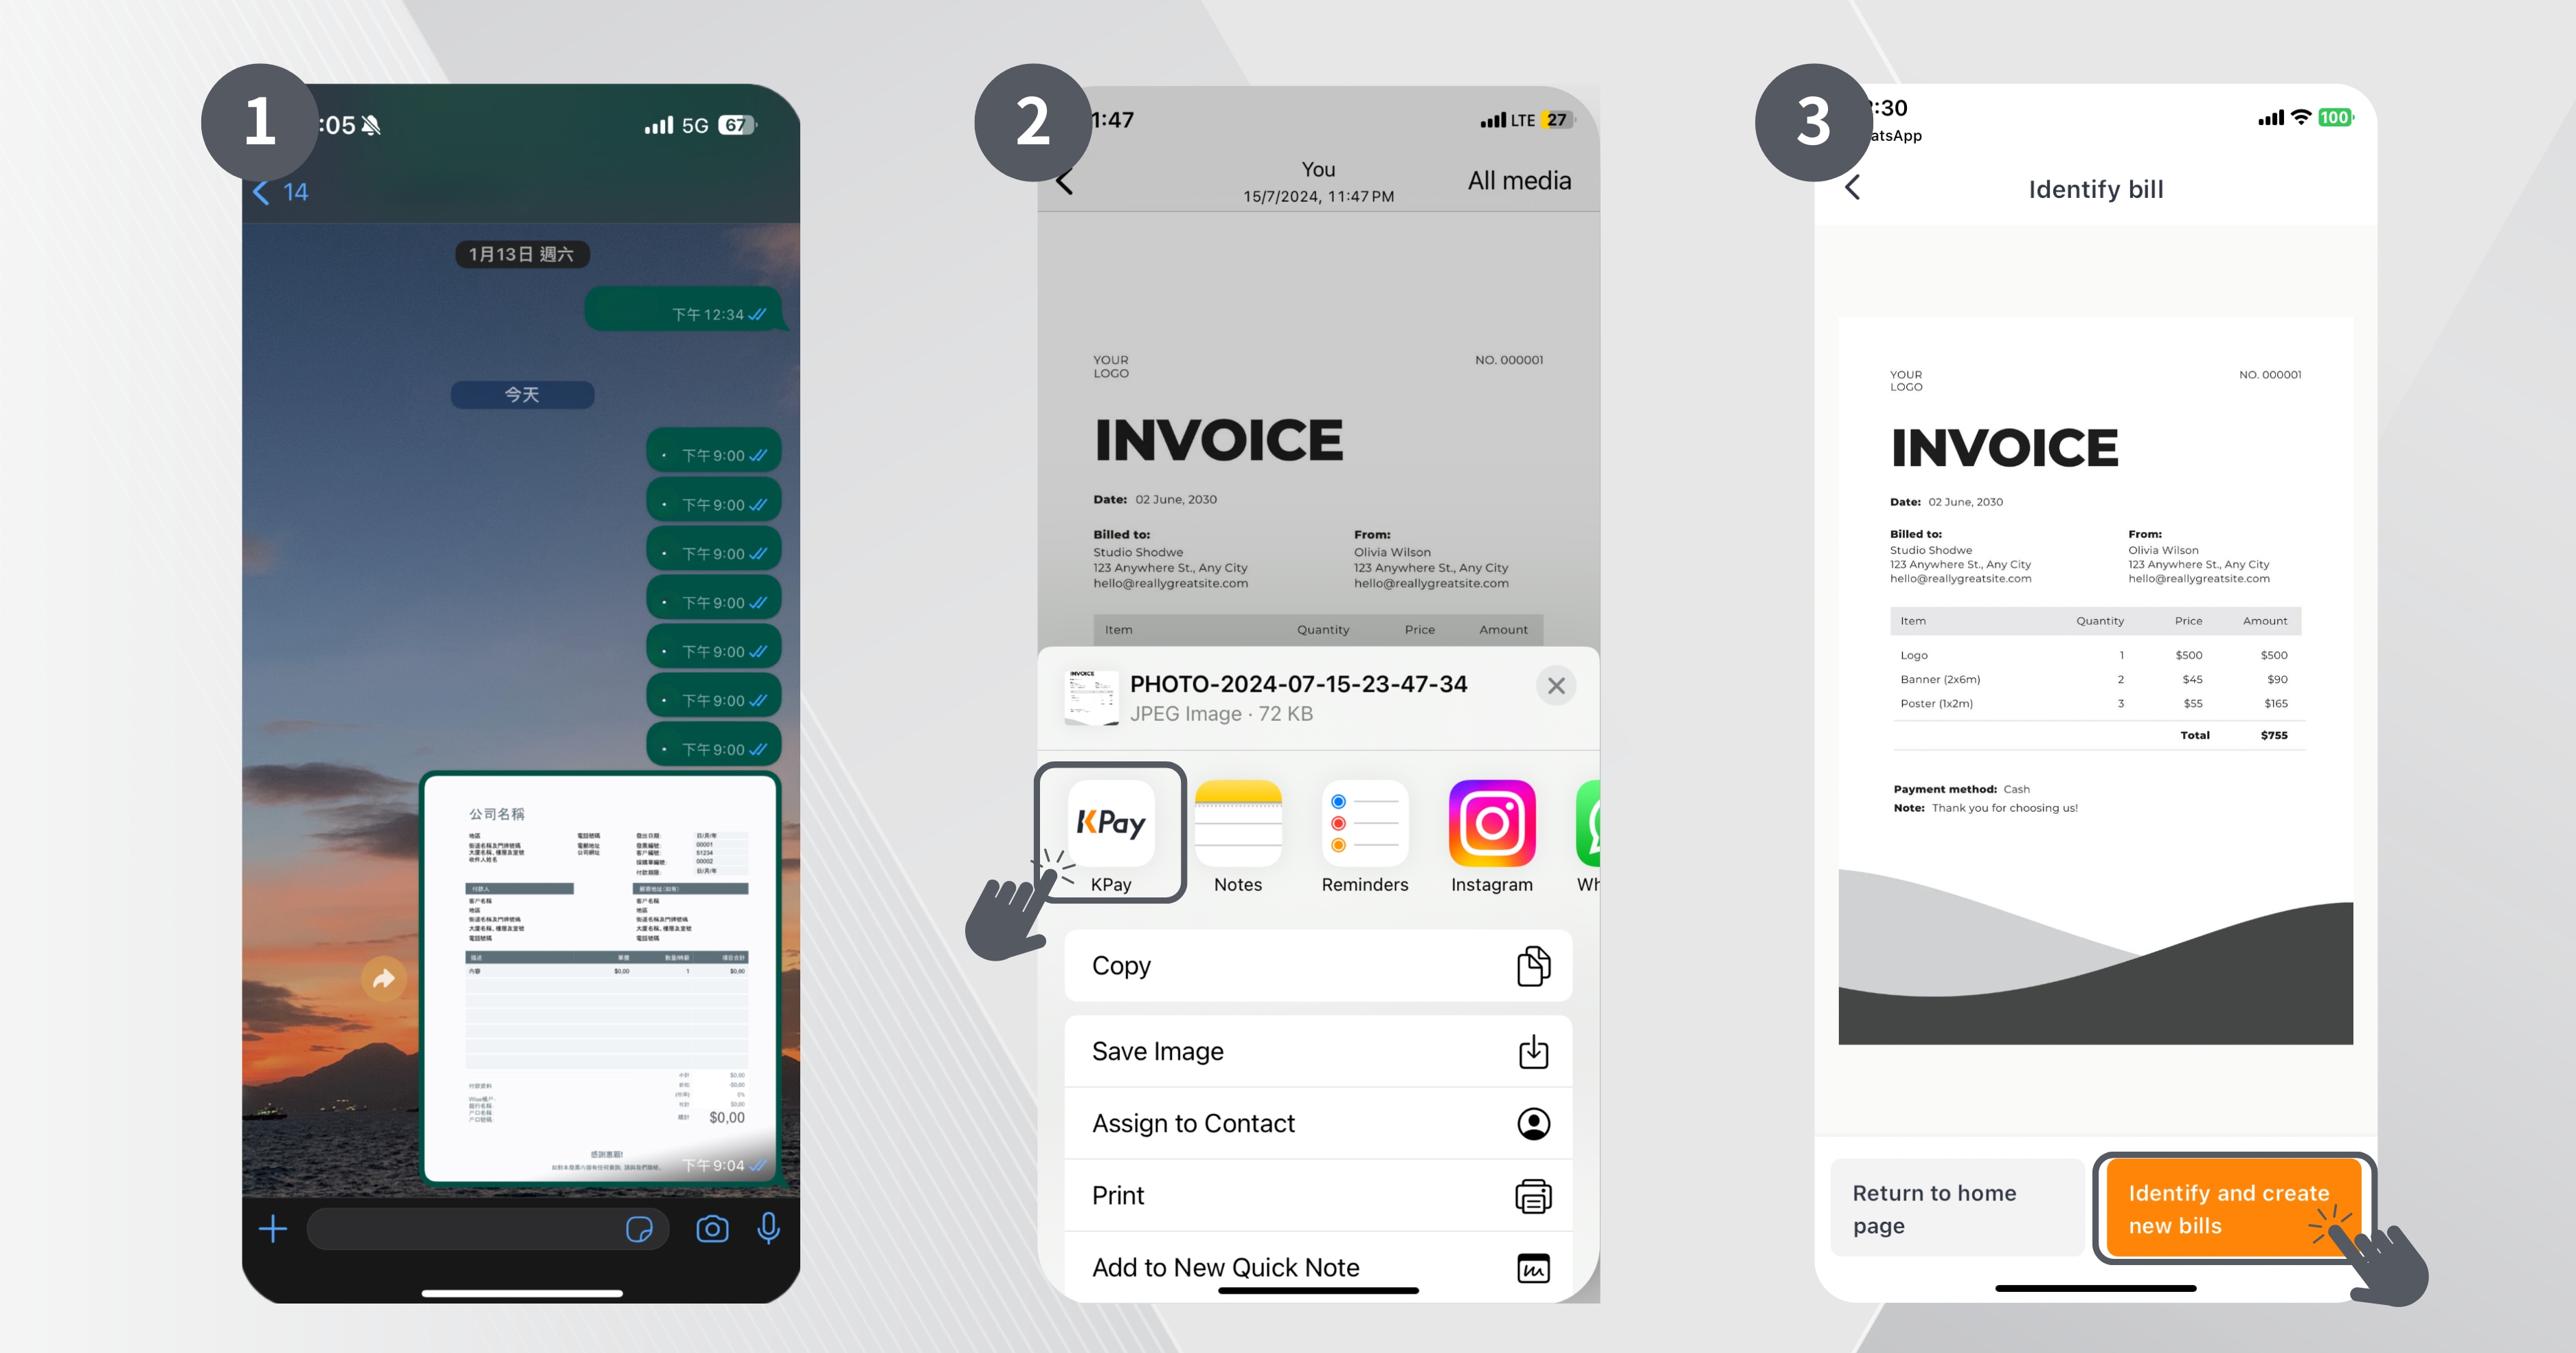
Step 1: Open WhatsApp.
Step 2: Select the bill file and share it to the KPay App.
Step 3: Click “Identify and create new bills”.

Step 4: The system will automatically extract and input the bill information, or you can manually enter the details.
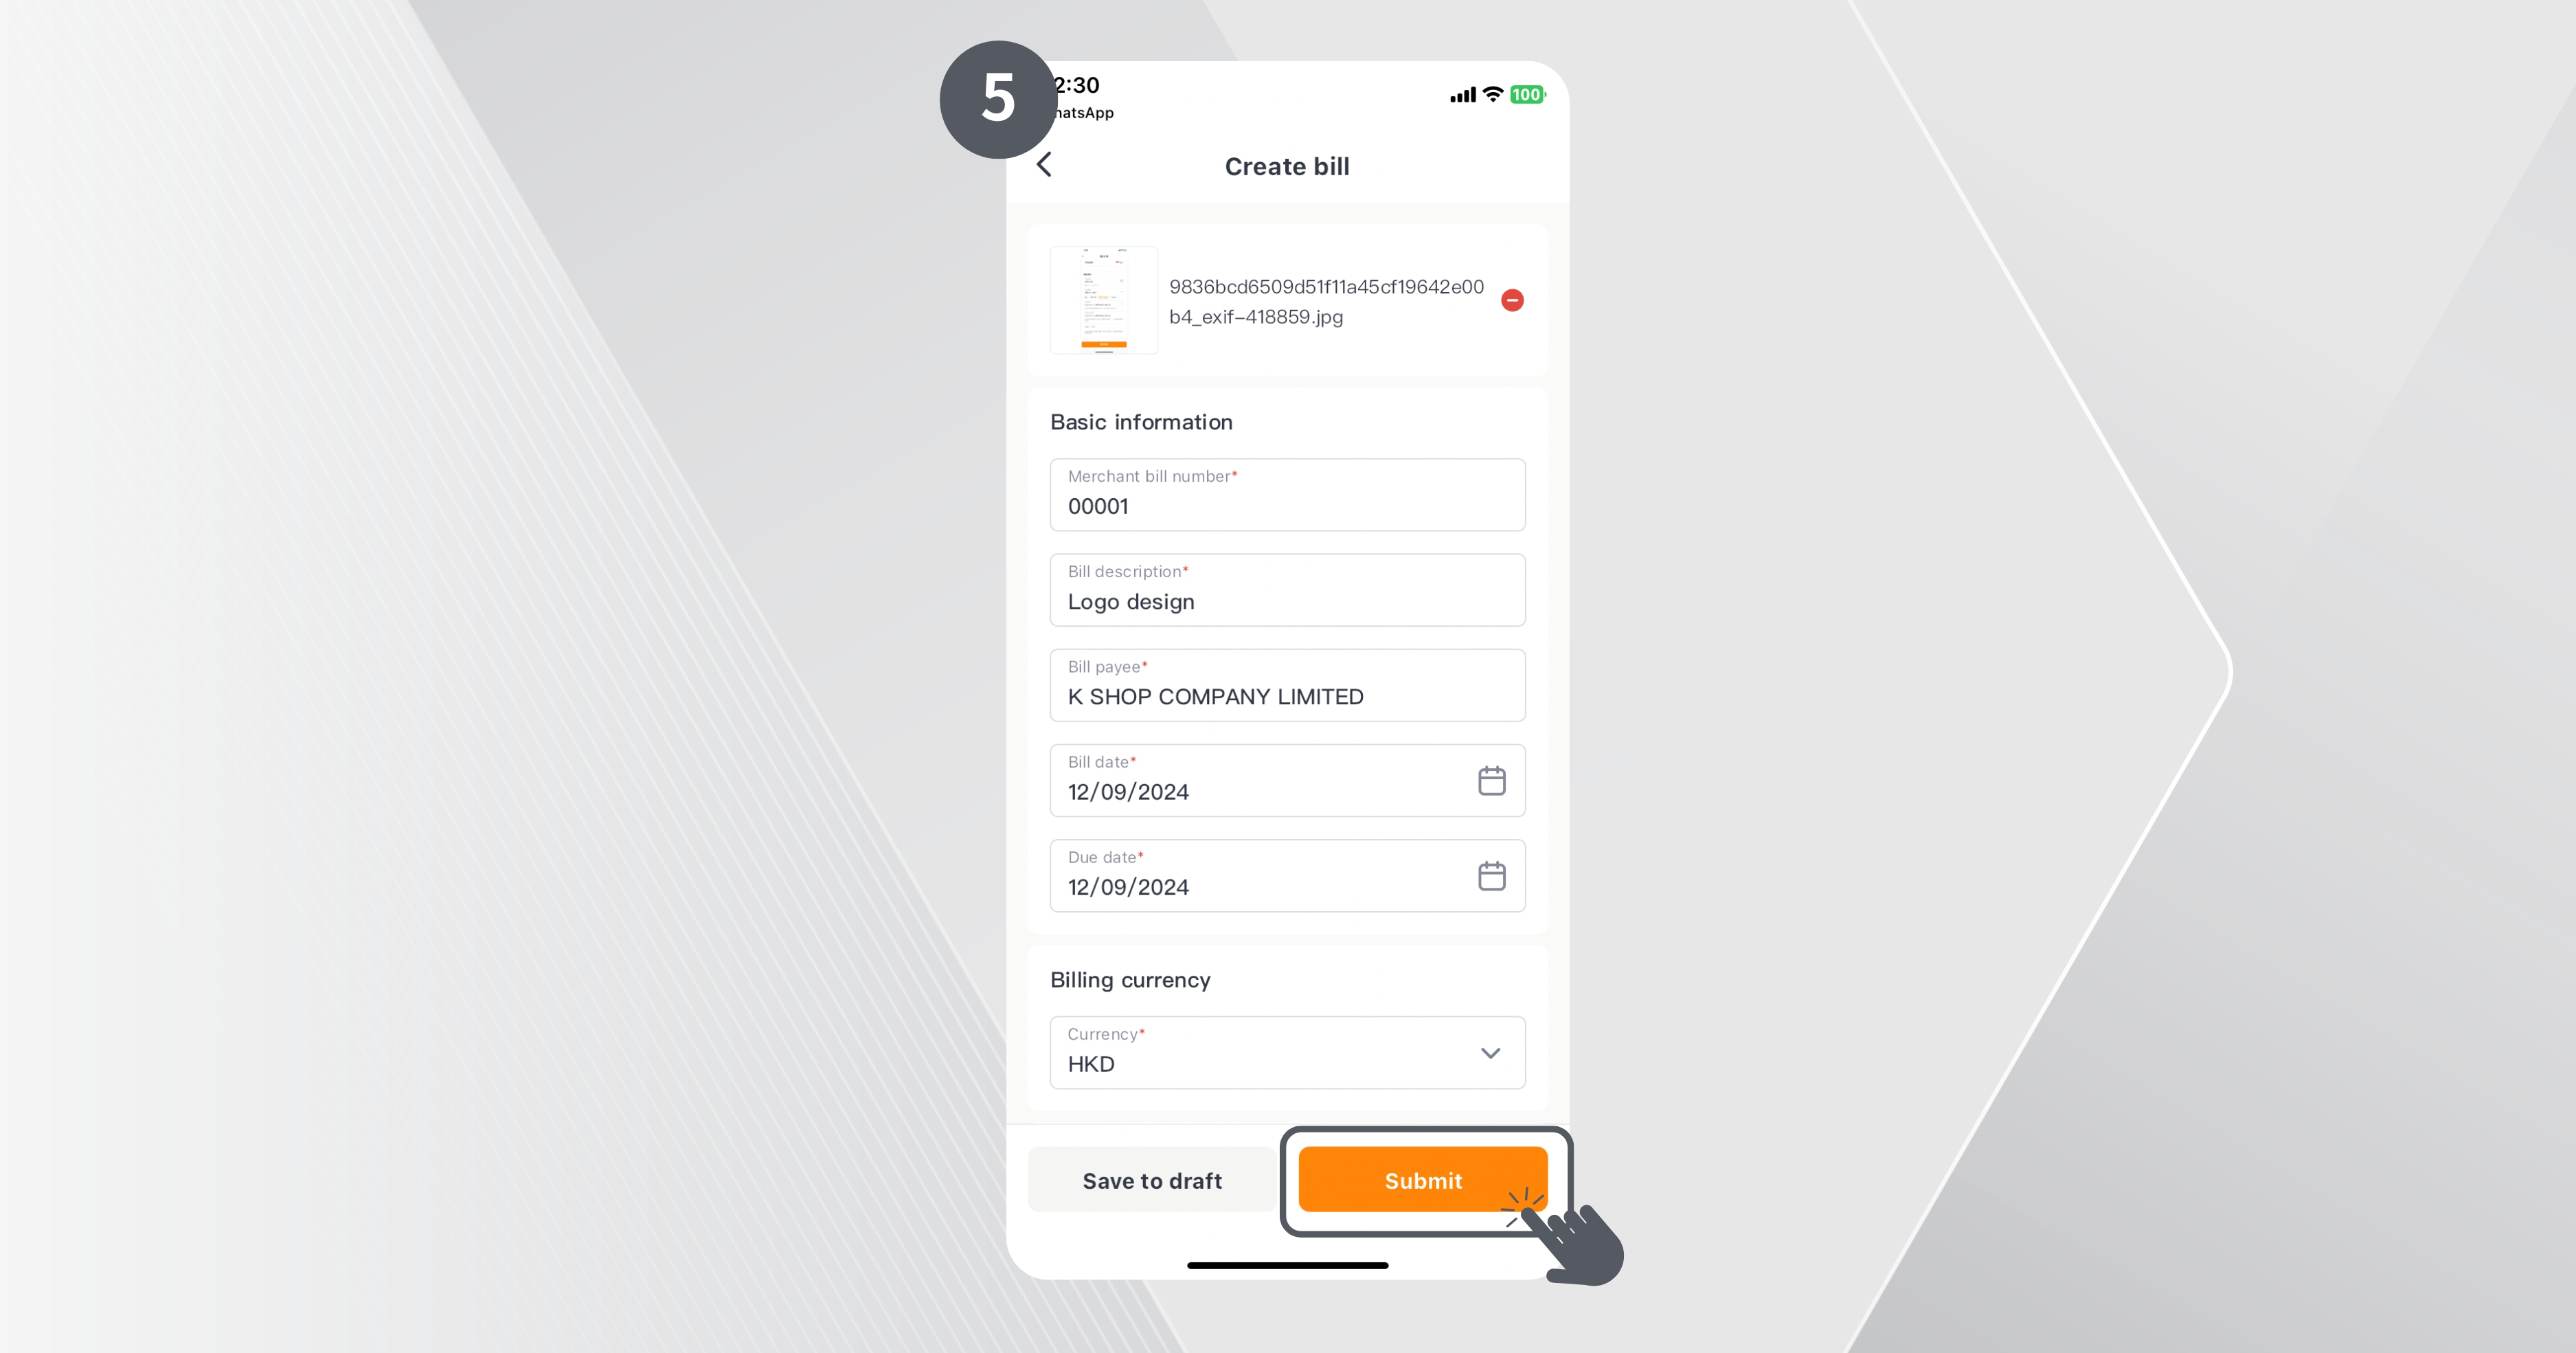
Step 5: After verifying the bill information, click “Submit”.
How to approve uploaded bills?
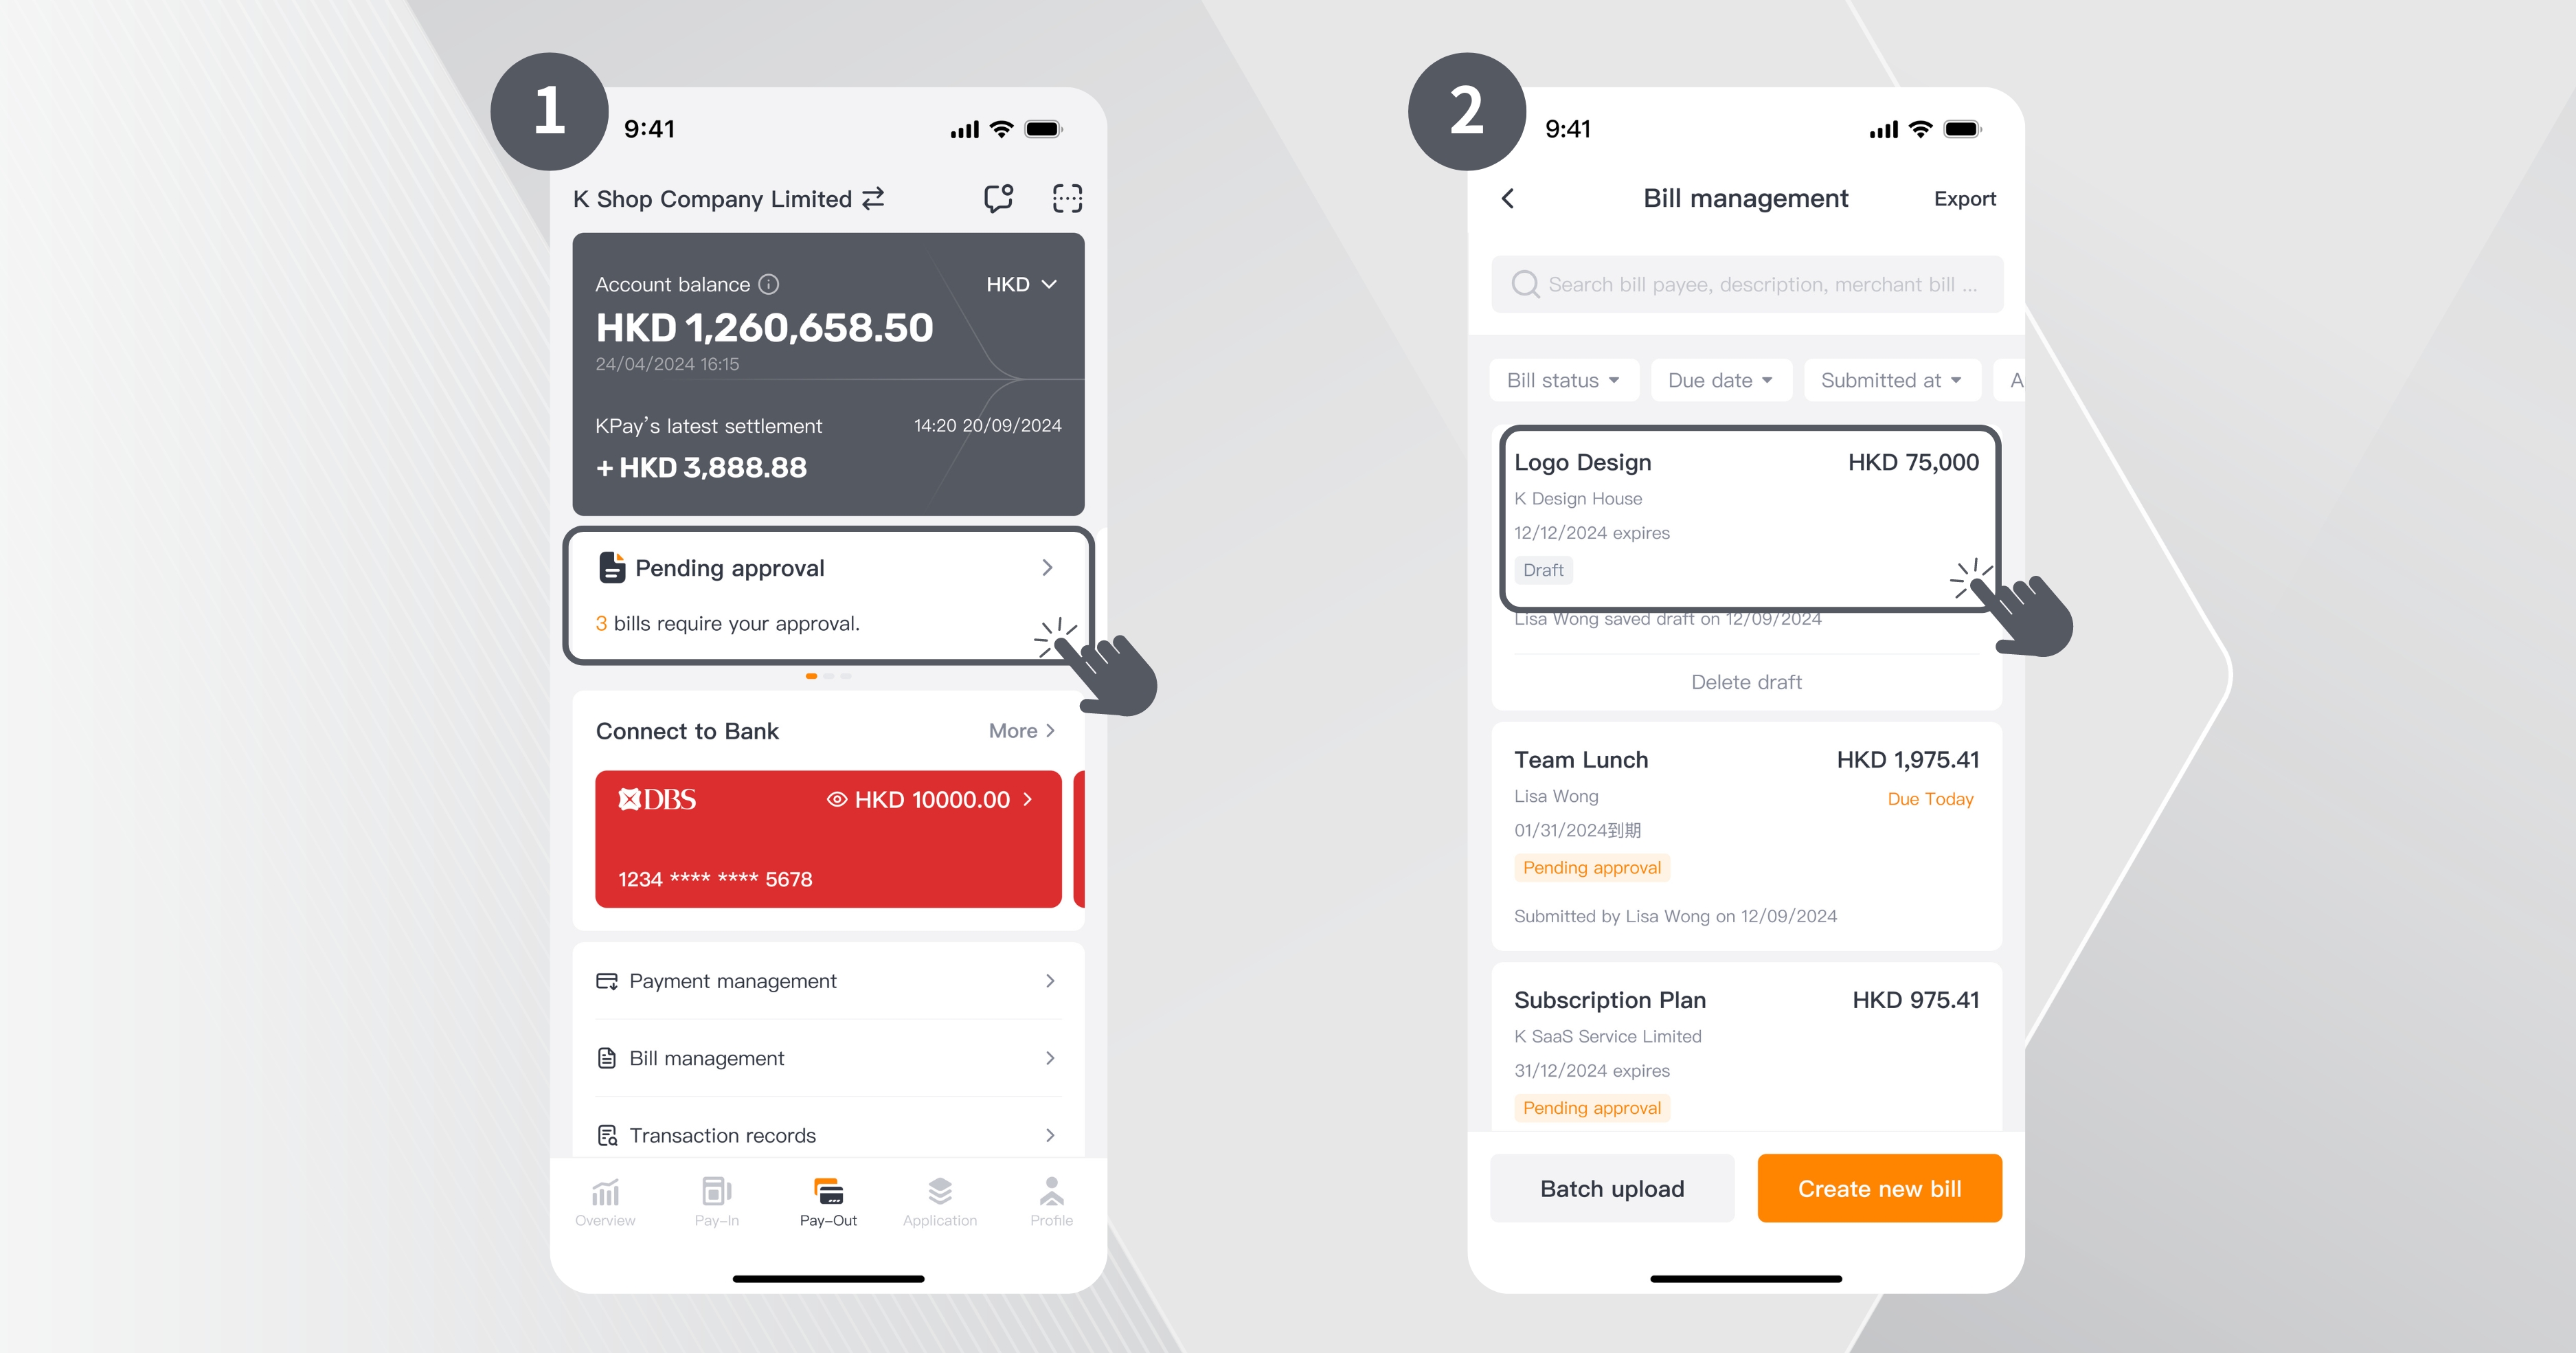
Step 1: On the Overview or Pay-Out page, click “Bill Pending.
Step 2: Click on the specific pending bill record.
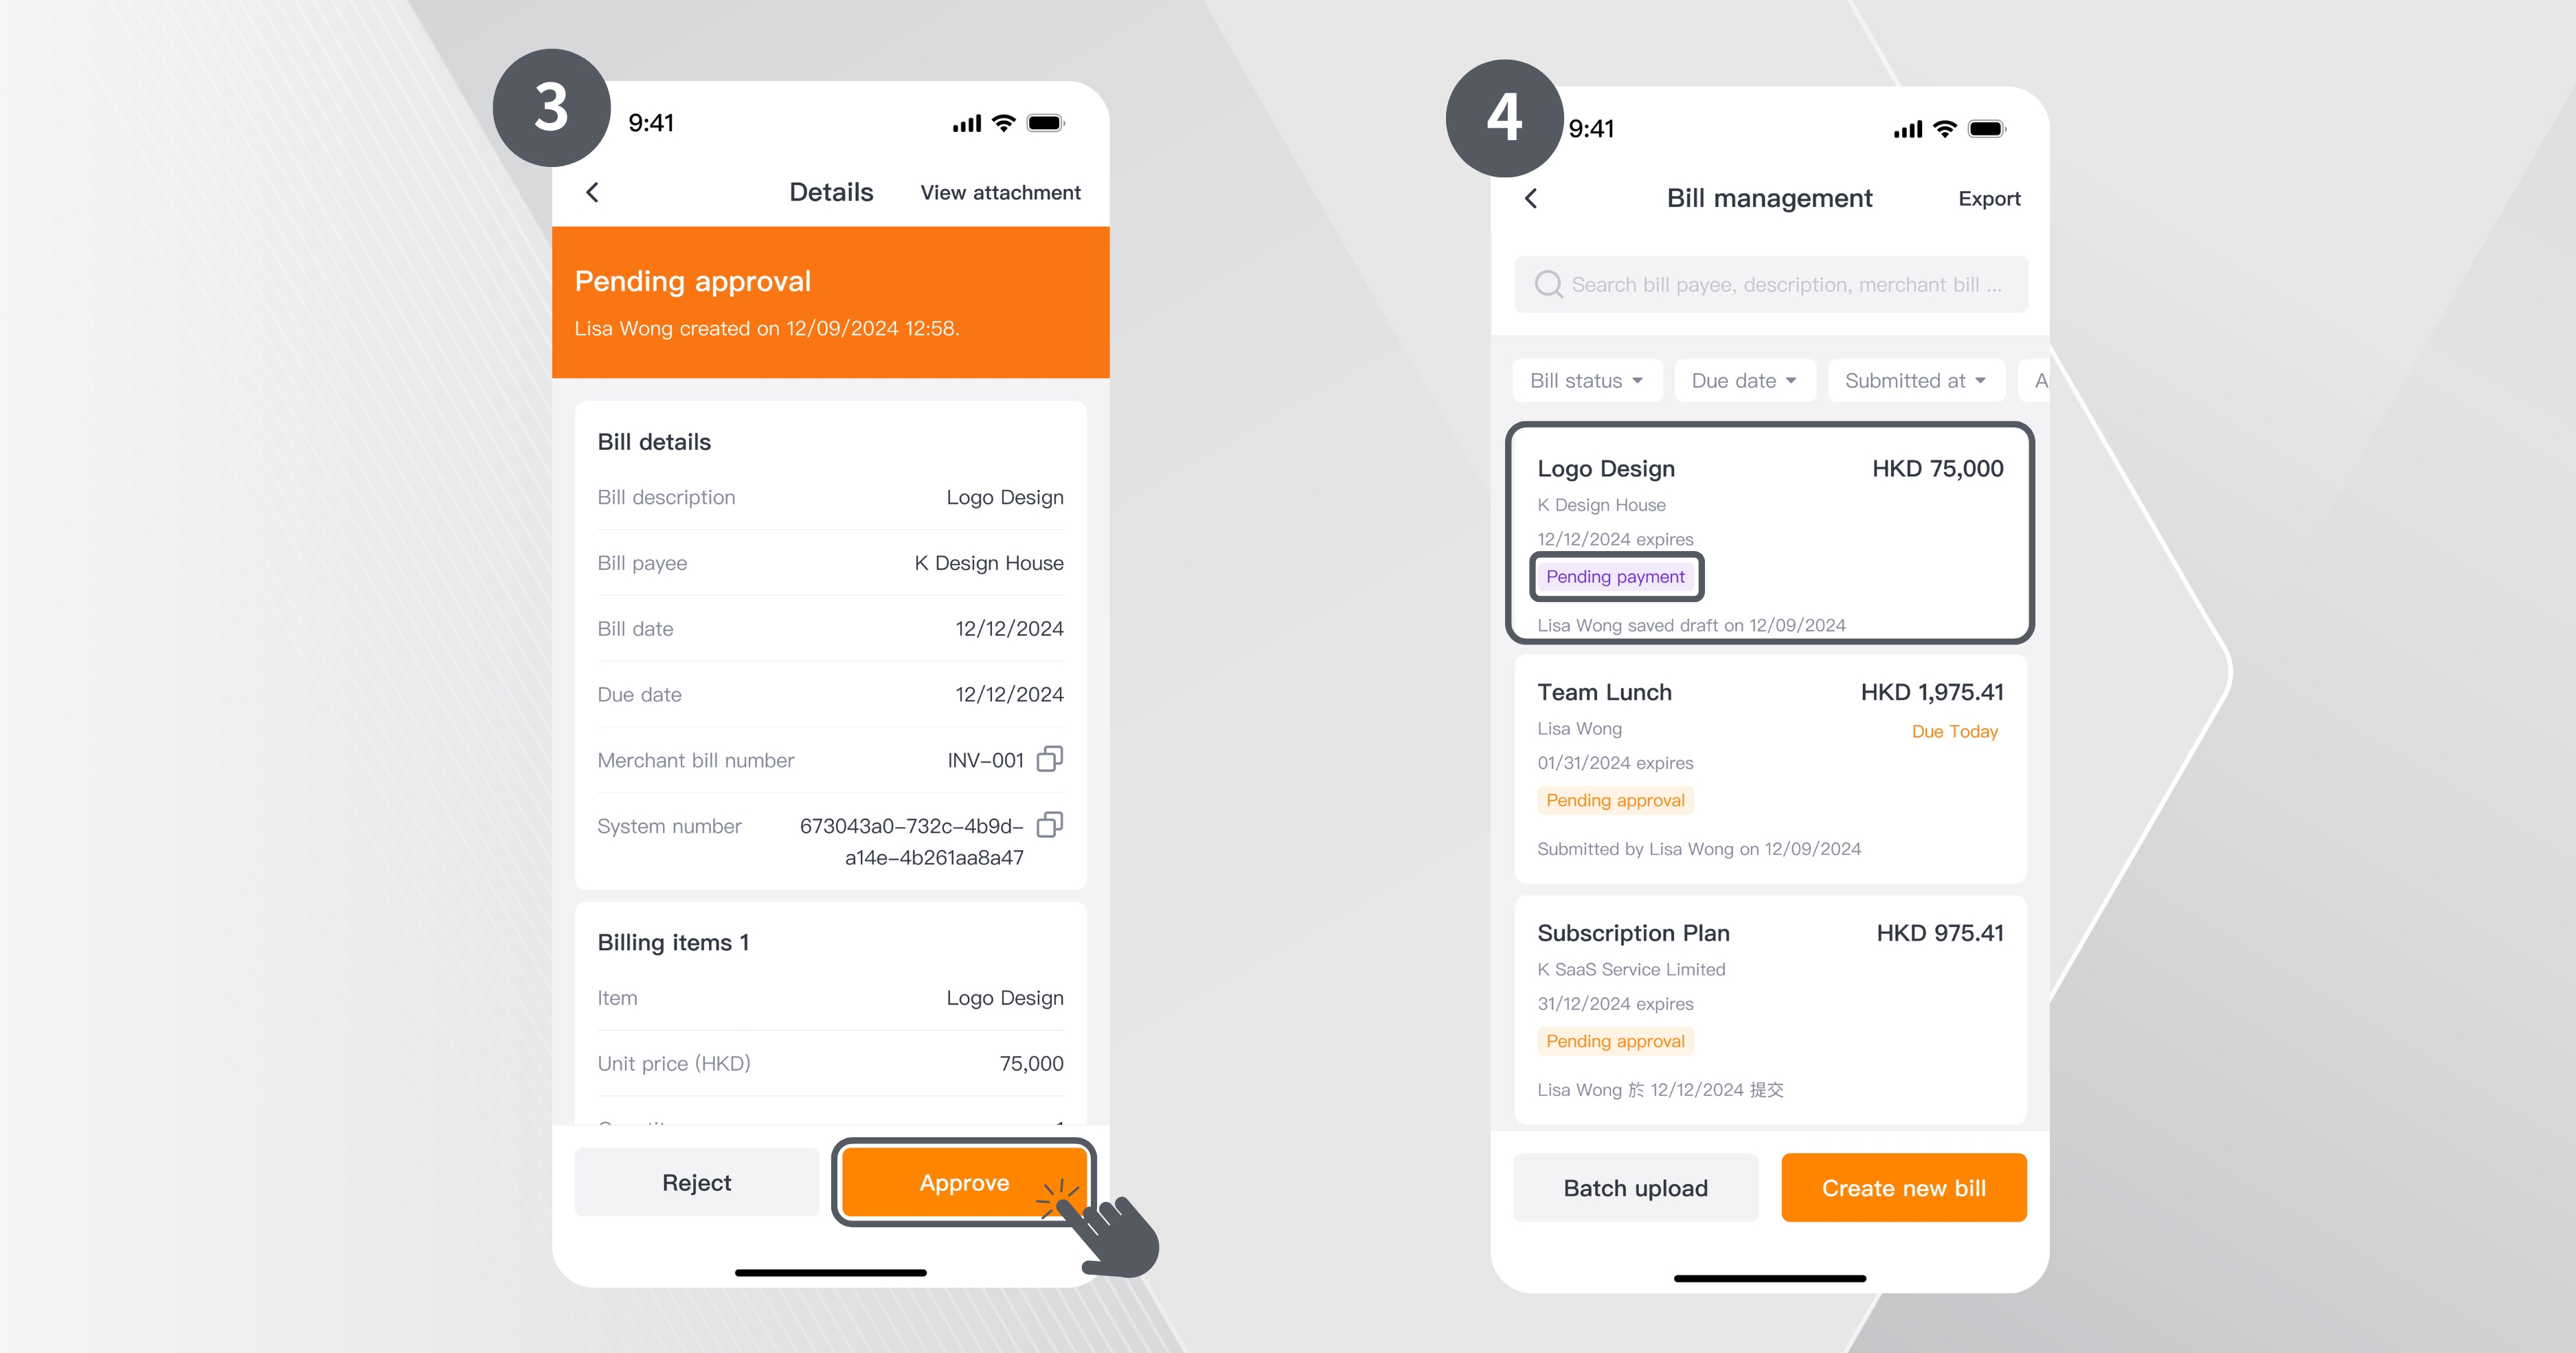
Step 3: Click “Approve” to confirm or “Reject” to withdraw the bill.
Step 4: Approved bills will be marked as “Pending Payment,” and staff will need to enter payment details and resubmit for approval.
How to set payment Instructions for approved bills?
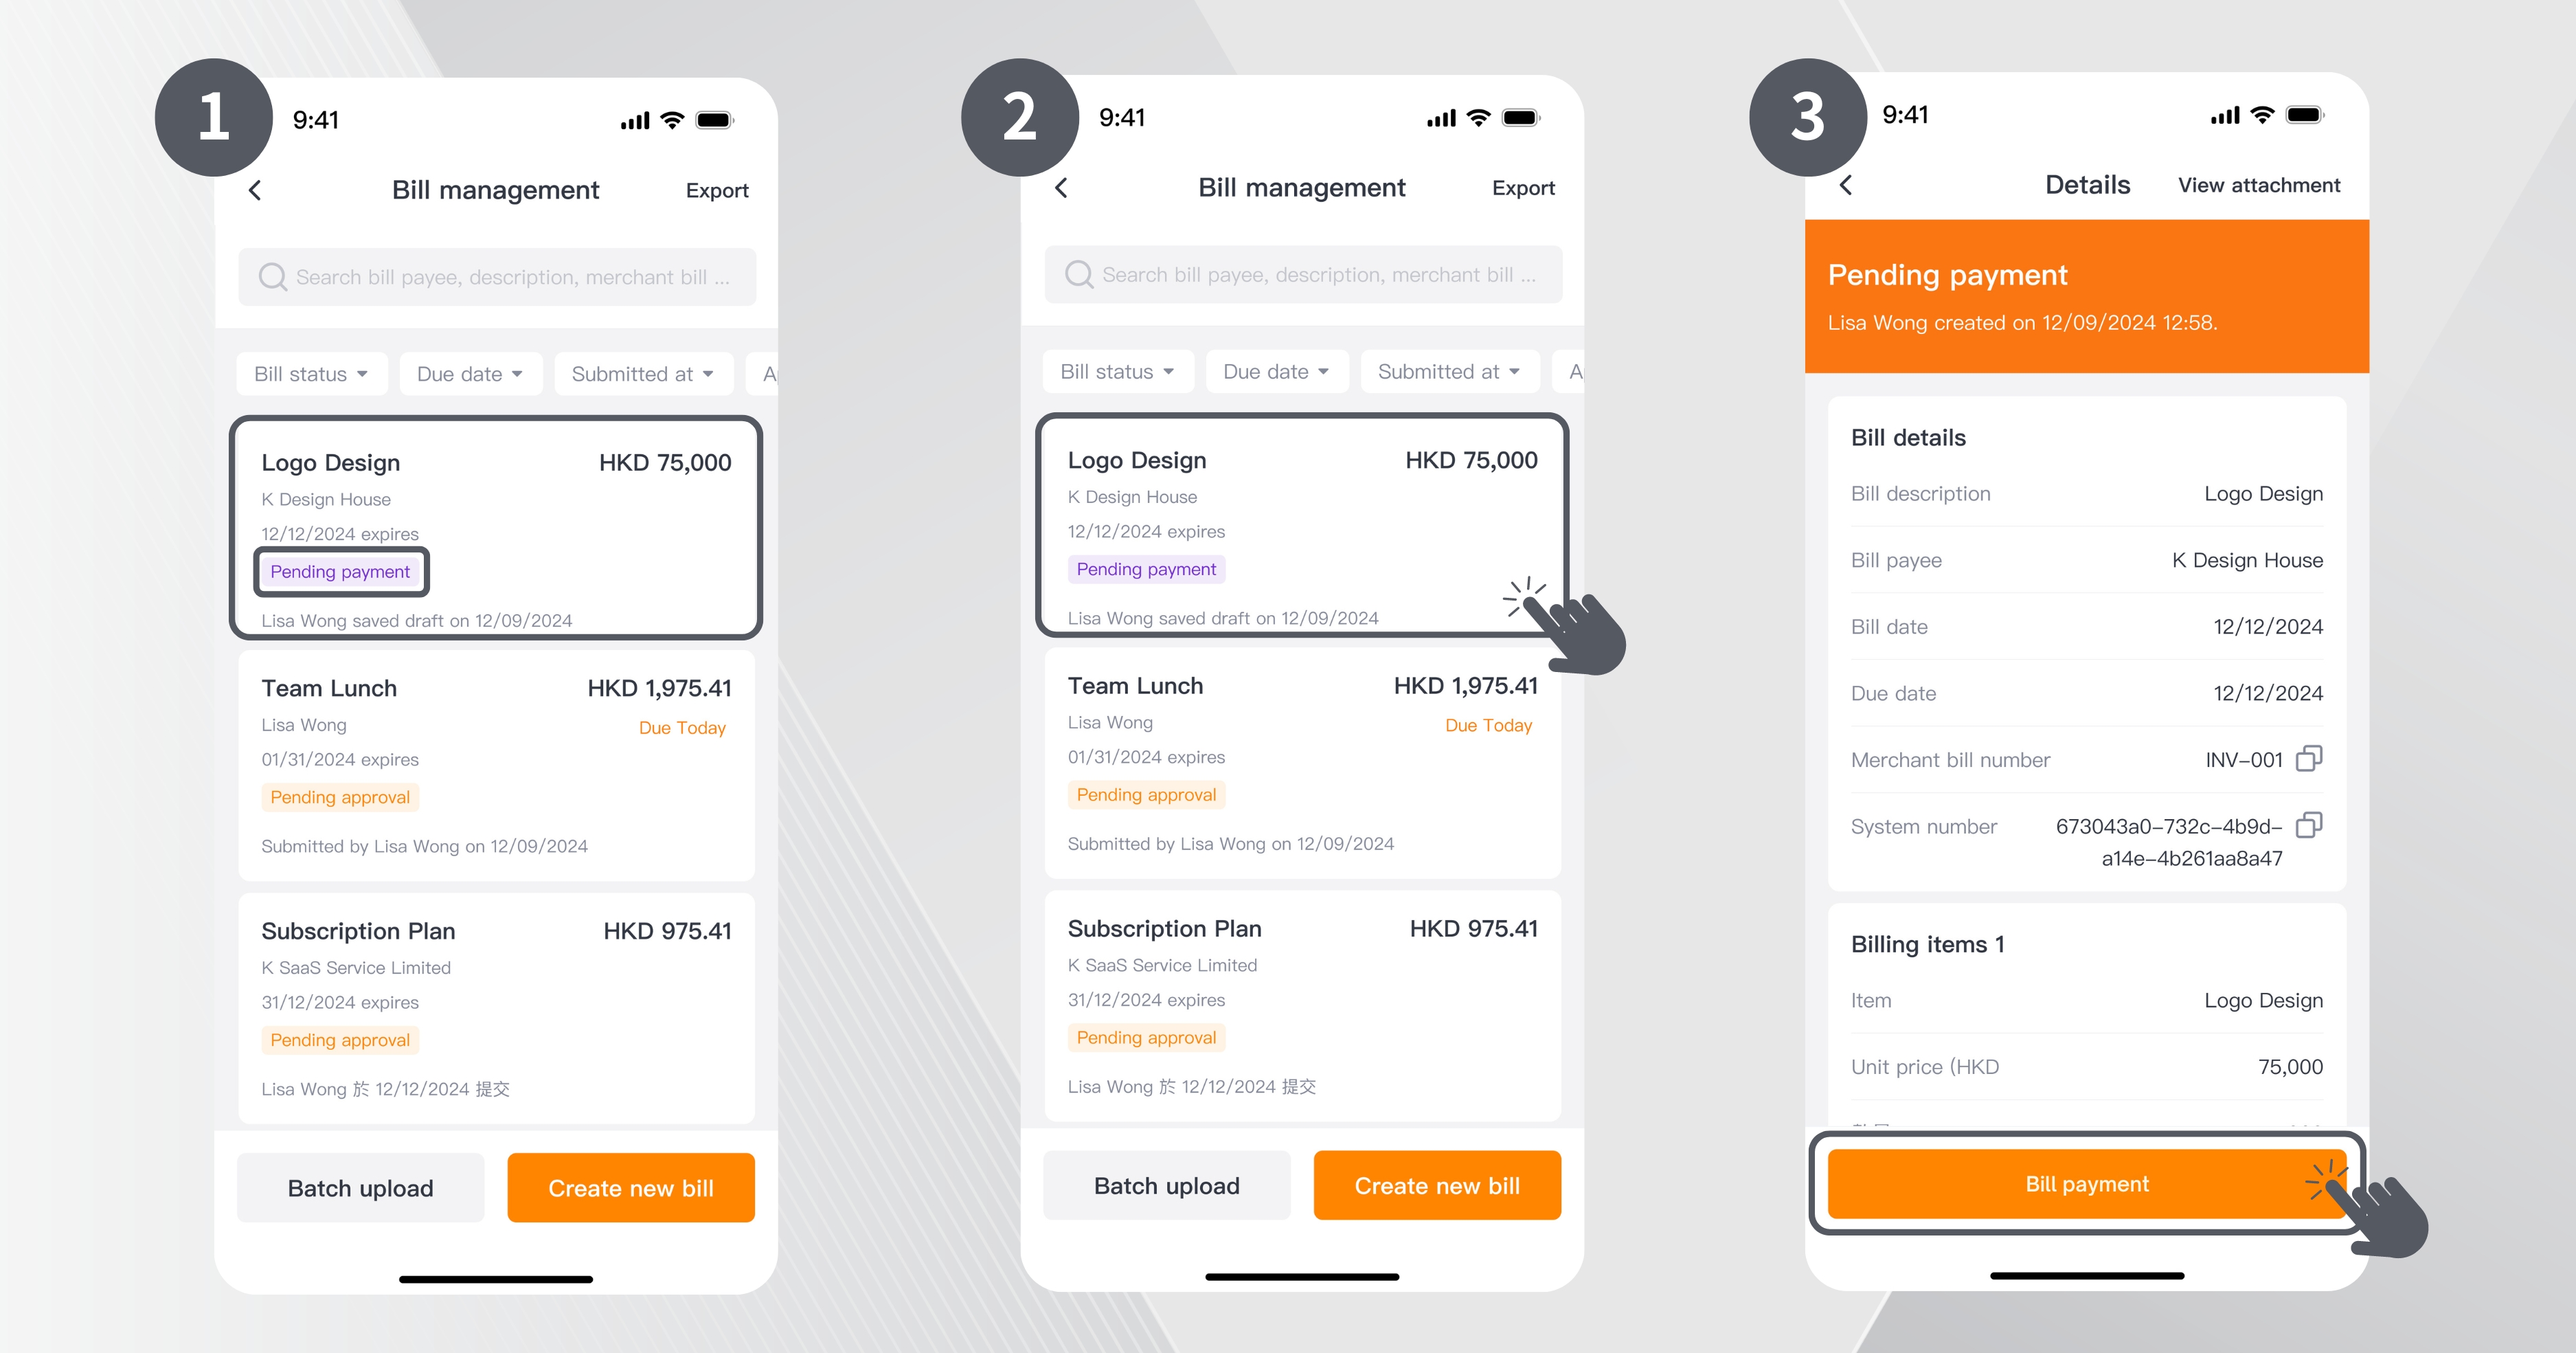
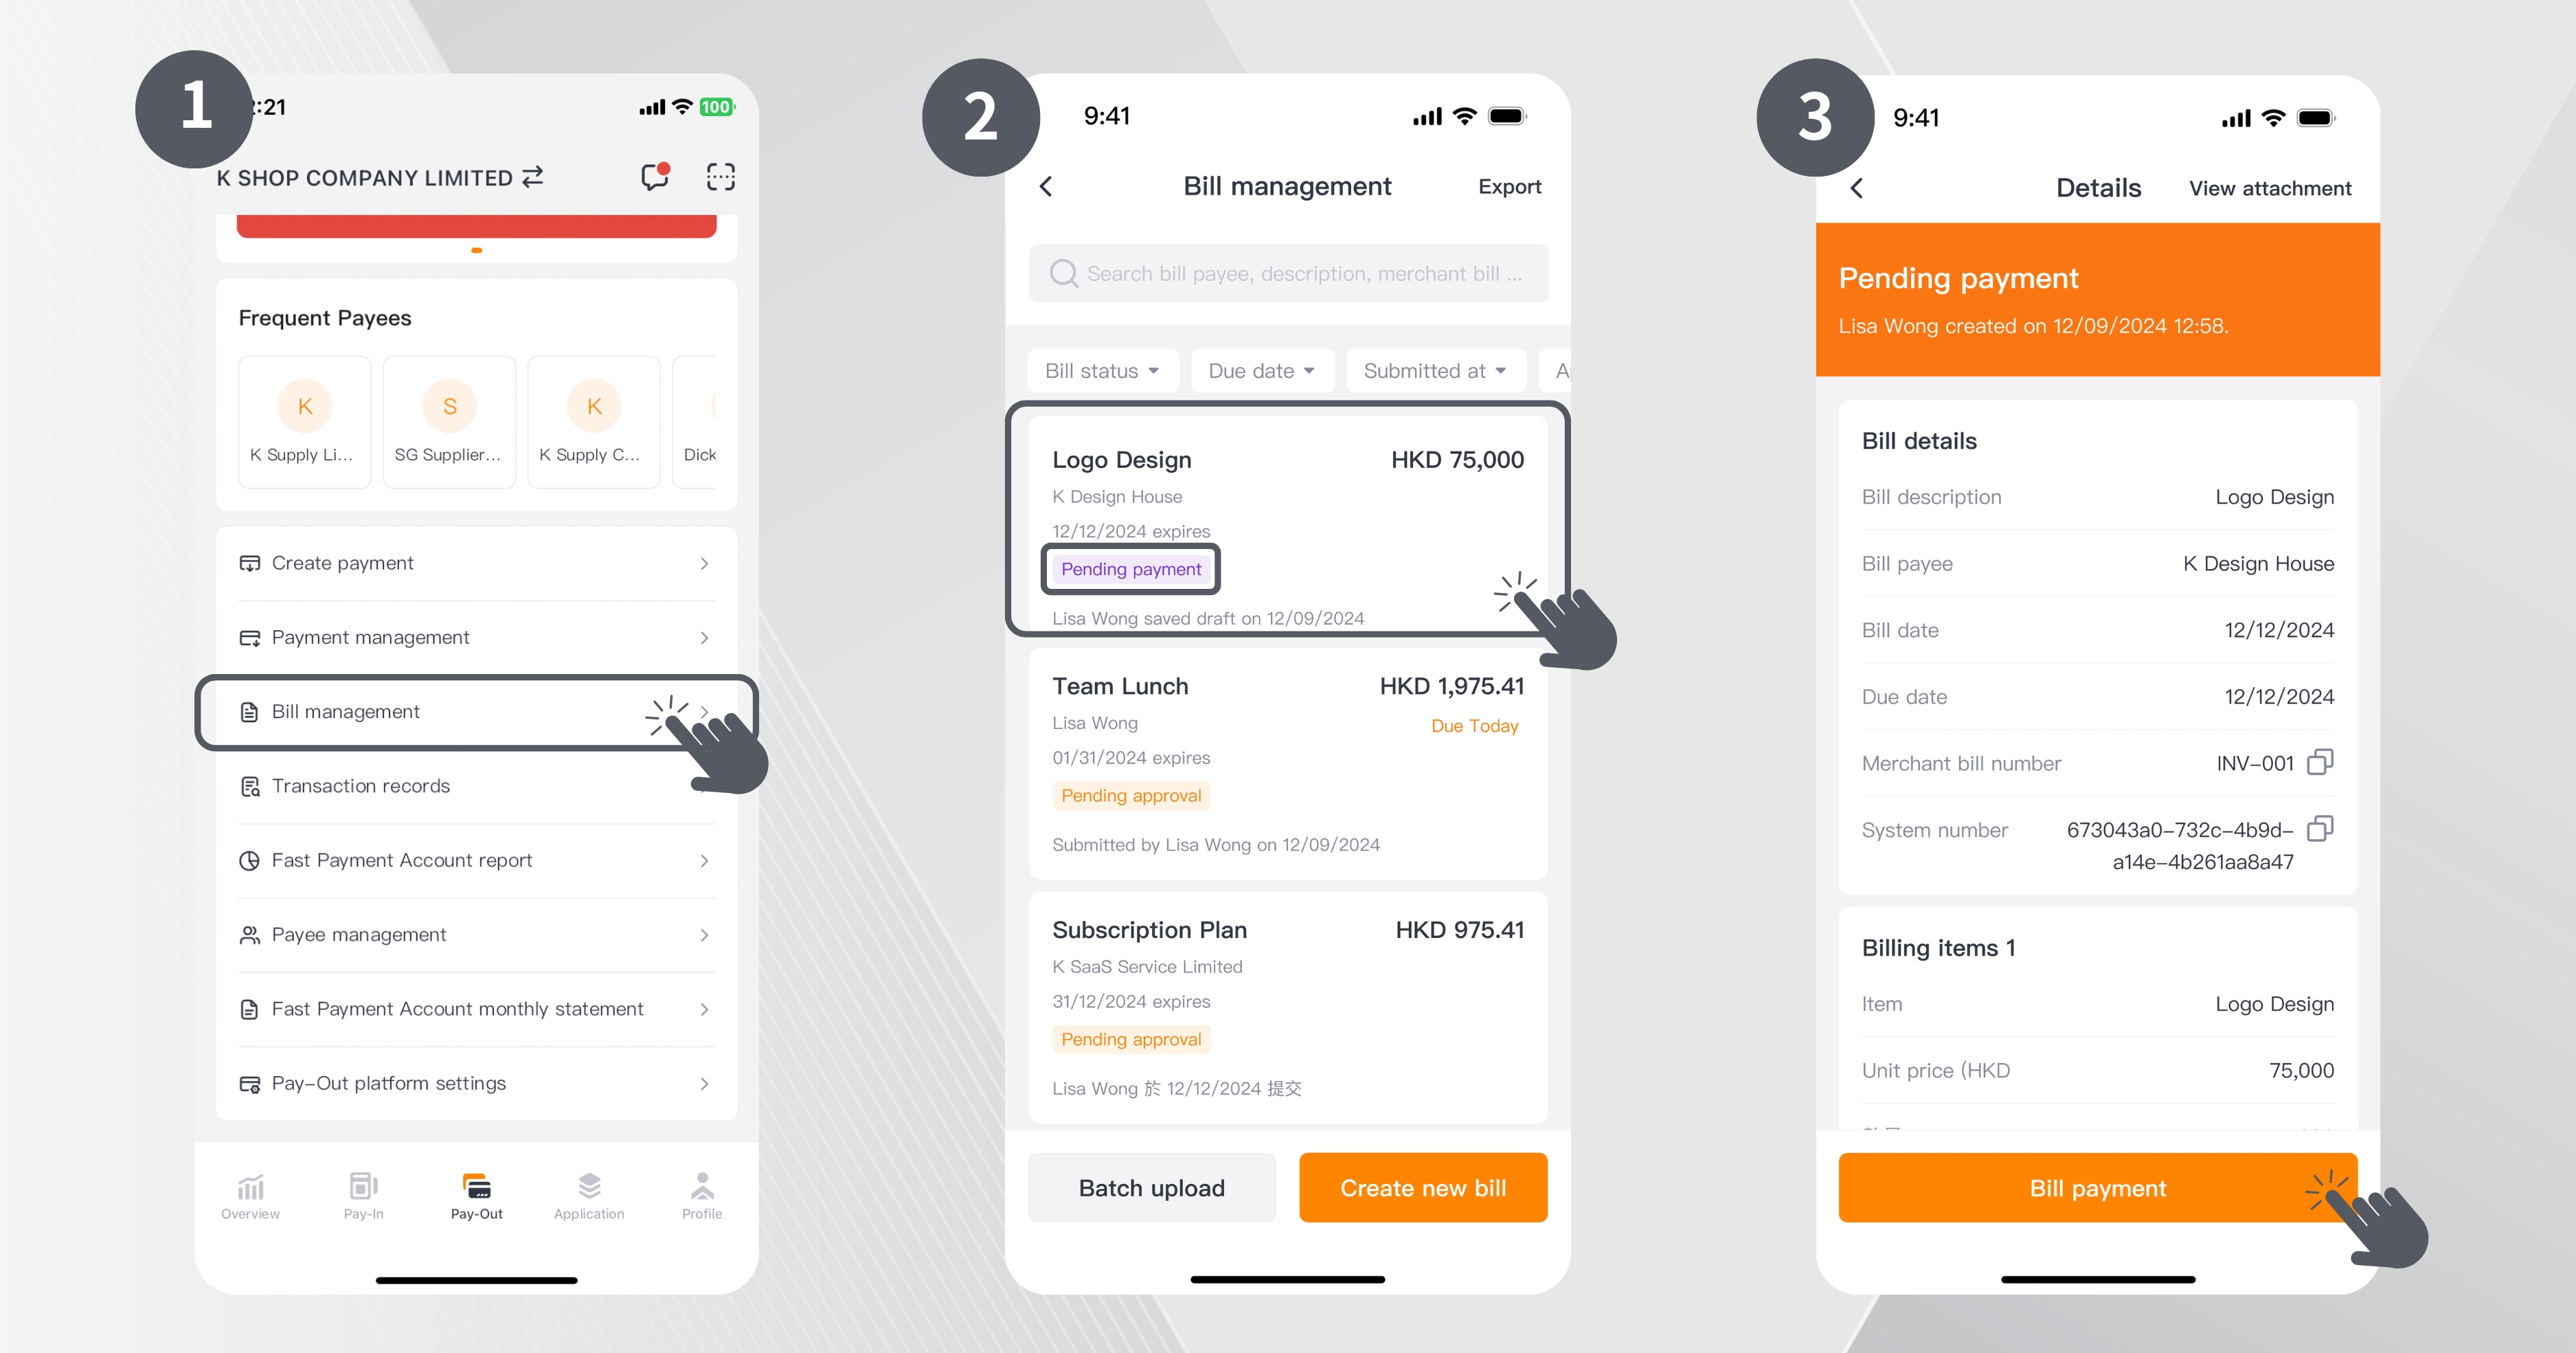
Step 1: Go to “Bill Management”, Approved bills will be shown as “Pending Payment”.
Step 2: Click on the relevant bill to view its details.
Step 3: Click “Bill payment”.
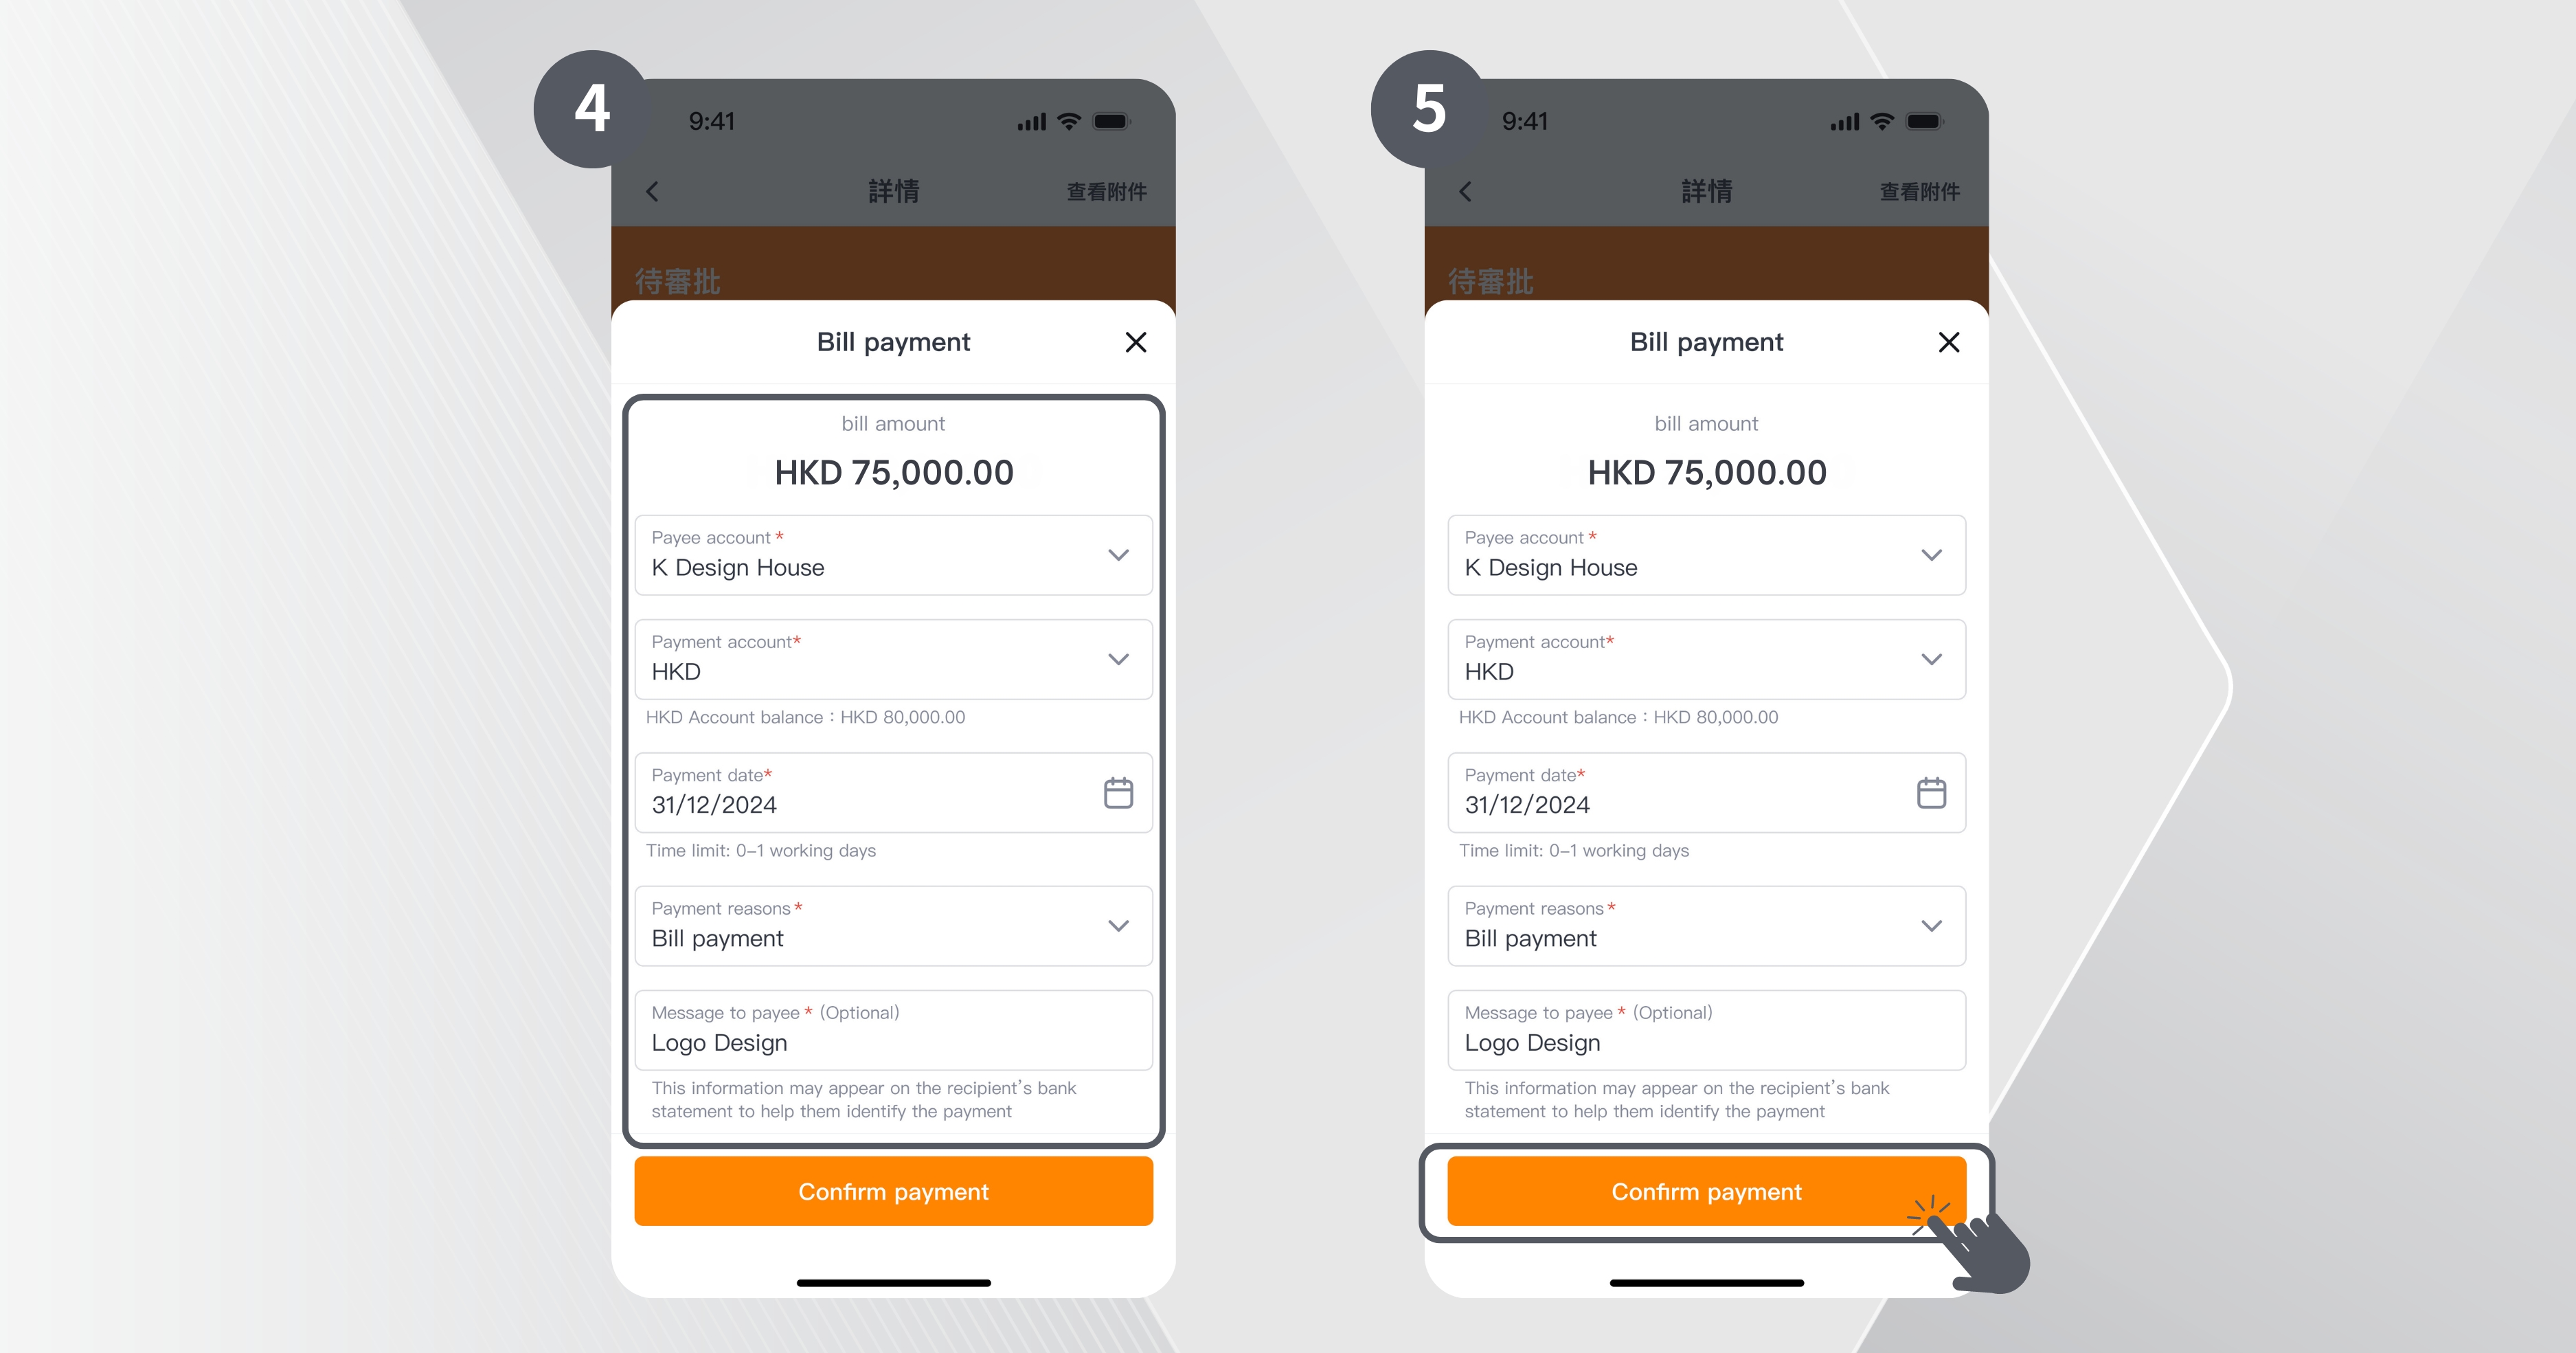
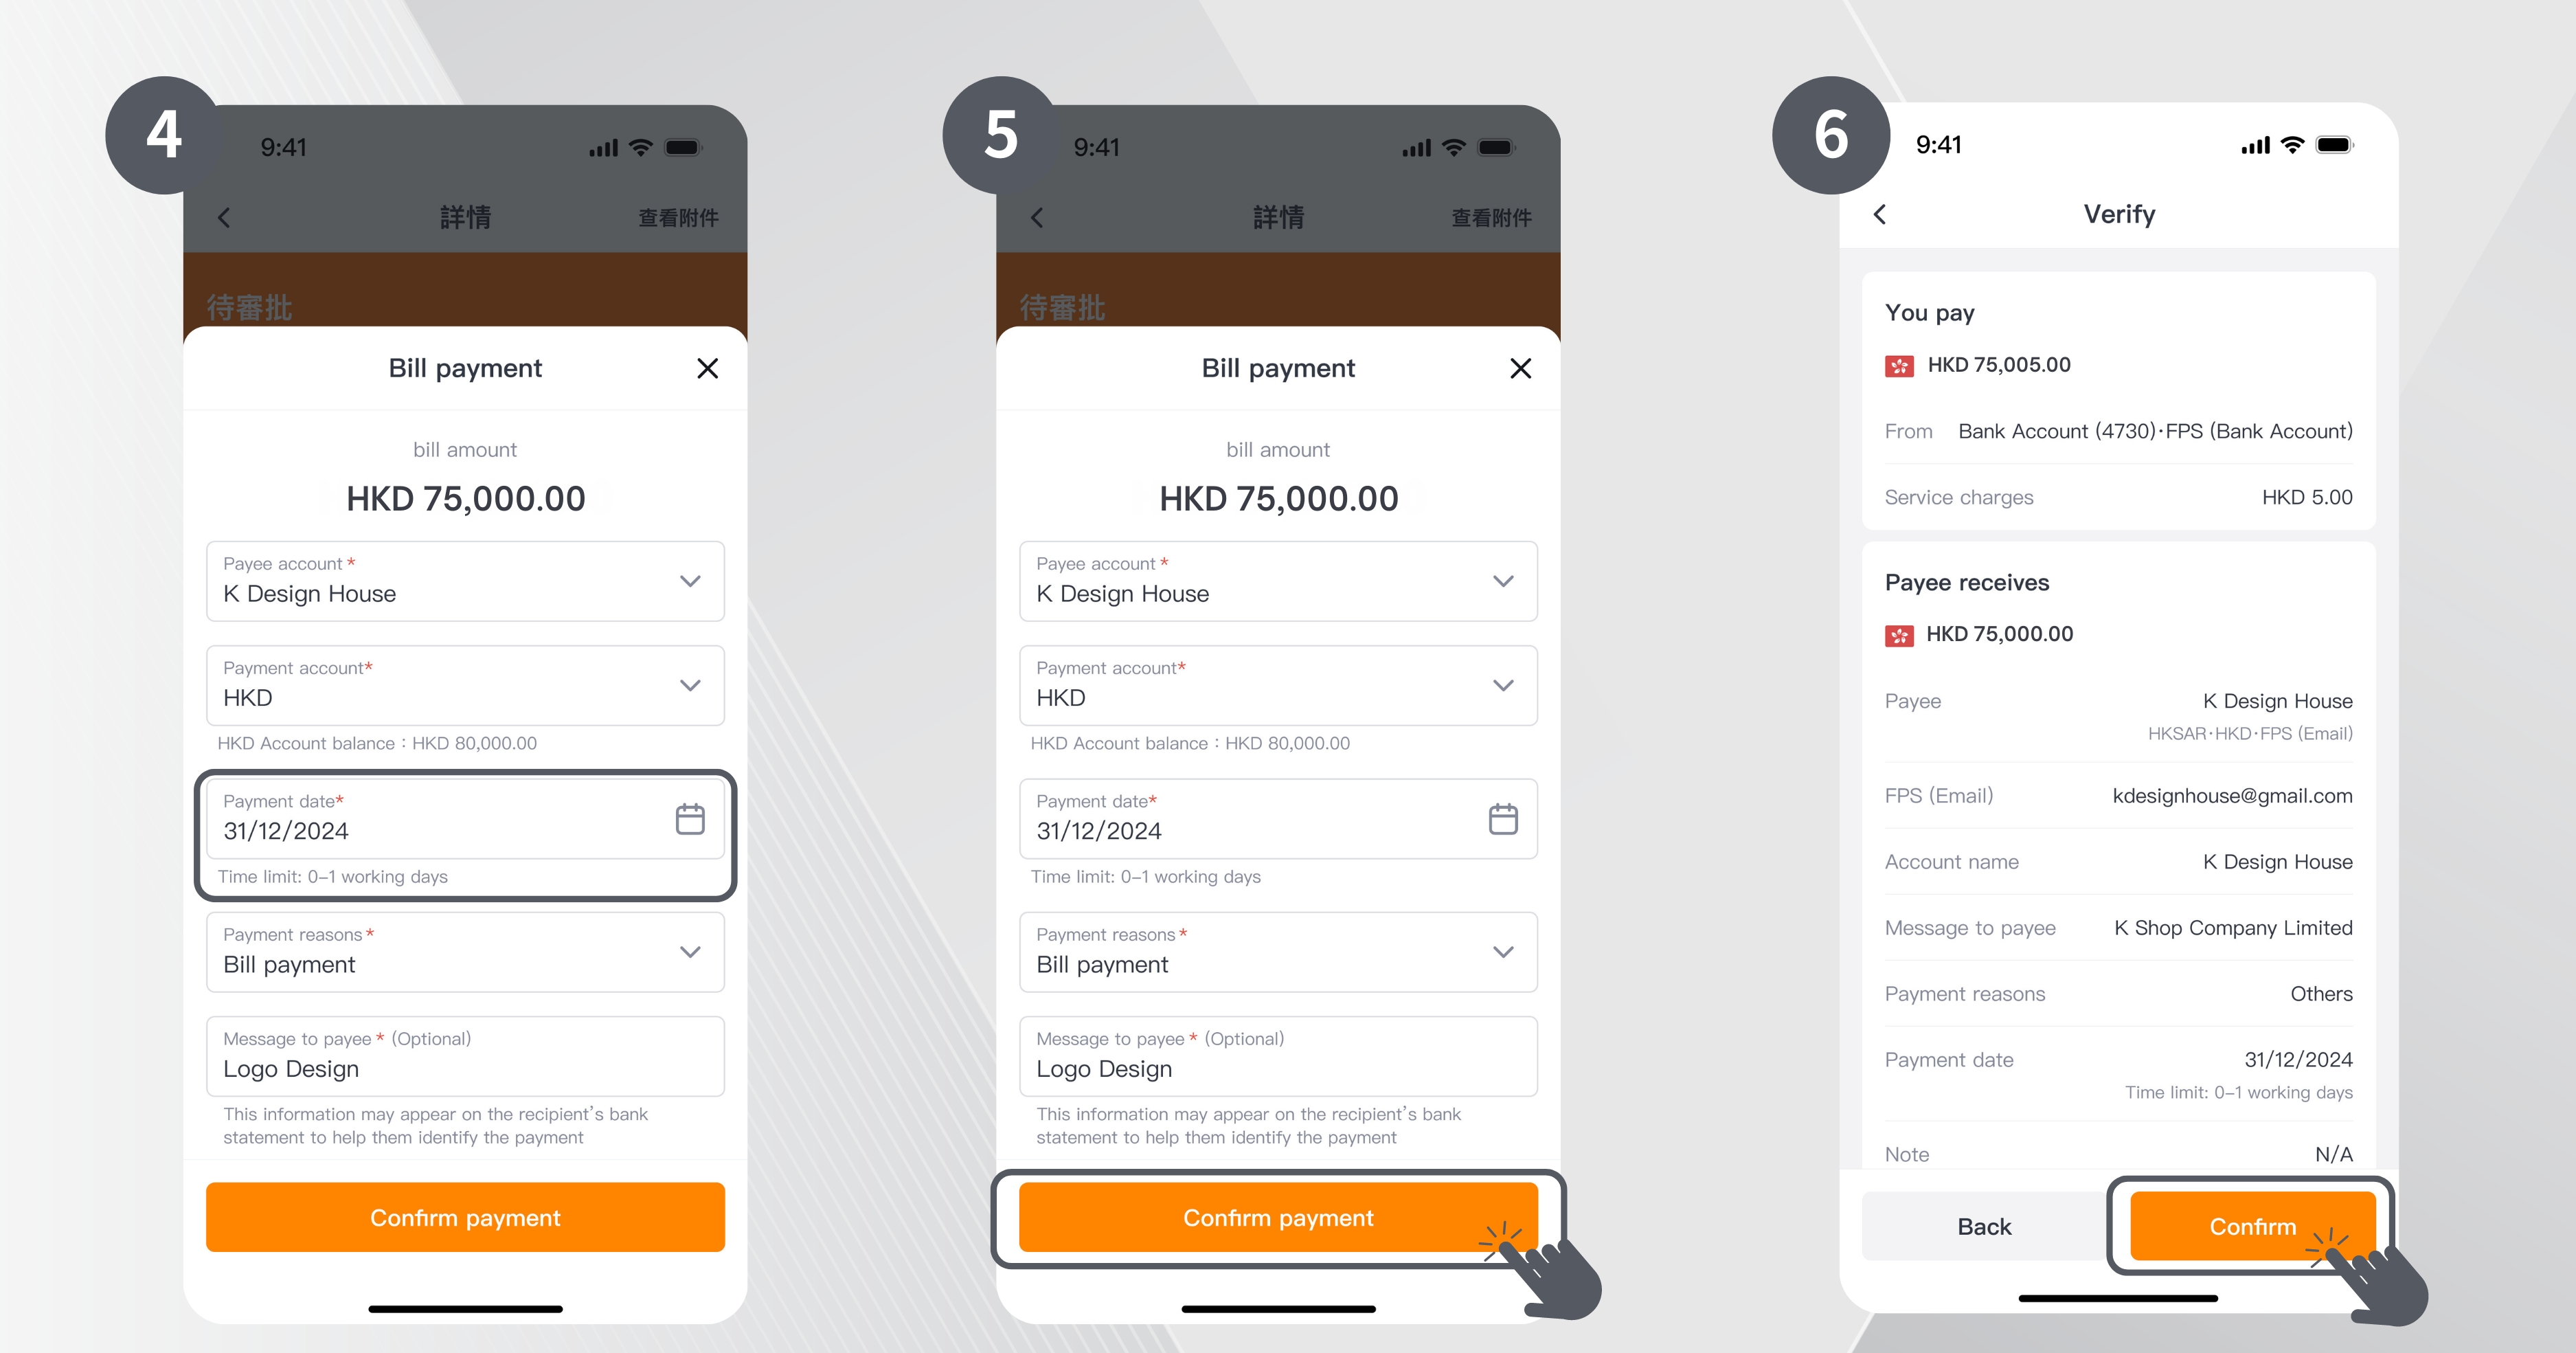
Step 4: Input the following payment details:
- Payee: Select an existing payee or create a new one.
- Select bank account: Choose the account and currency for the payment.
- Payment date: You can set a specific date for the payment or choose immediate payment.
- Payment reasons: Select the appropriate expense category; the system will also calculate category-based expense ratios.
- Message to payee:This information may appear on the recipient’s bank statement to help them identify the payment.
- My notes:This information is for internal reference and can provide additional information to payment approvers or other users.
Step 5: After entering all the details, click “Confirm payment”.
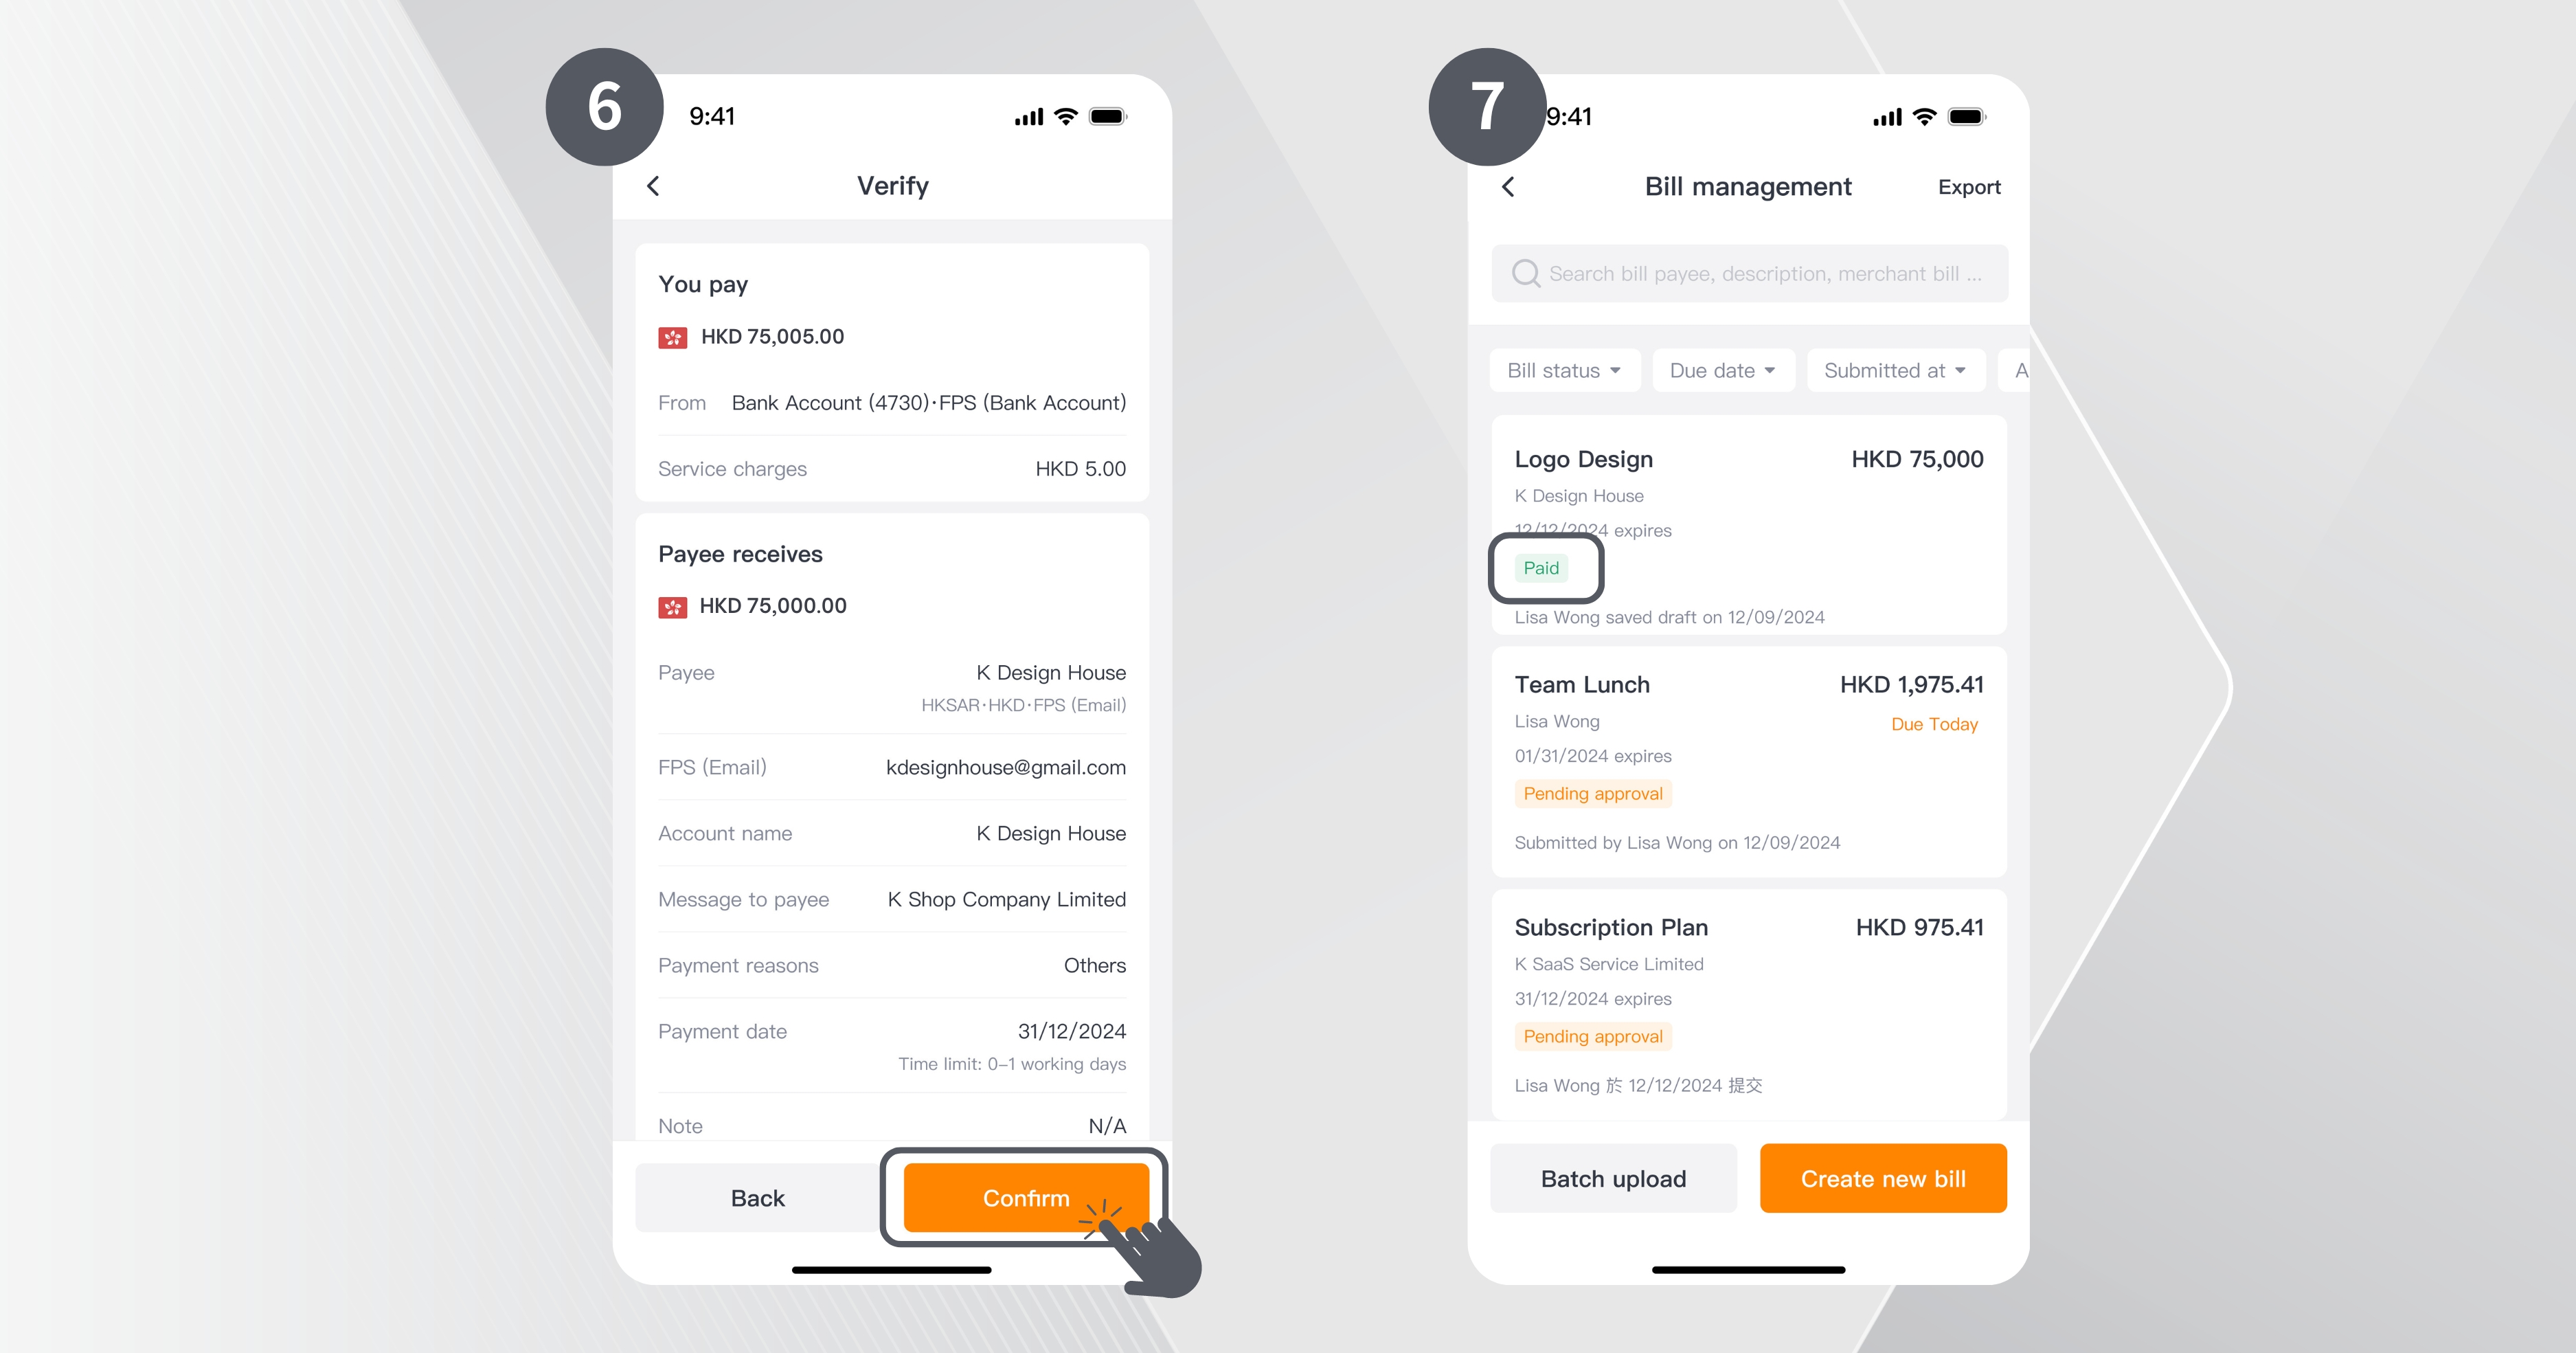
Step 6: Review the bill details again and click “Confirm” to finalise the payment or click “Back” to edit the details.
Step 7: Once confirmed, the bill will be marked as “Payment in progress” After successful payment, the bill status will change to “Paid”.
How to set a scheduled payment?
Step 1: On the “Pay Out” page, click “Bill Management”.
Step 2: Approved bills will be marked as “Pending Payment”, click on the relevant bill to view its details.
Step 3: Click “Bill Payment” and input payment details.
Step 4: Under “Payment Date,” you can set a specific date for the payment.
Step 5: After entering all the details, click “Confirm payment”.
Step 6: Review the bill details again and click “Confirm” to finalise the payment or click “Back” to edit the details. Once the payment request is approved, the system will automatically process the payment on the specified date.
How to approve pending payments?
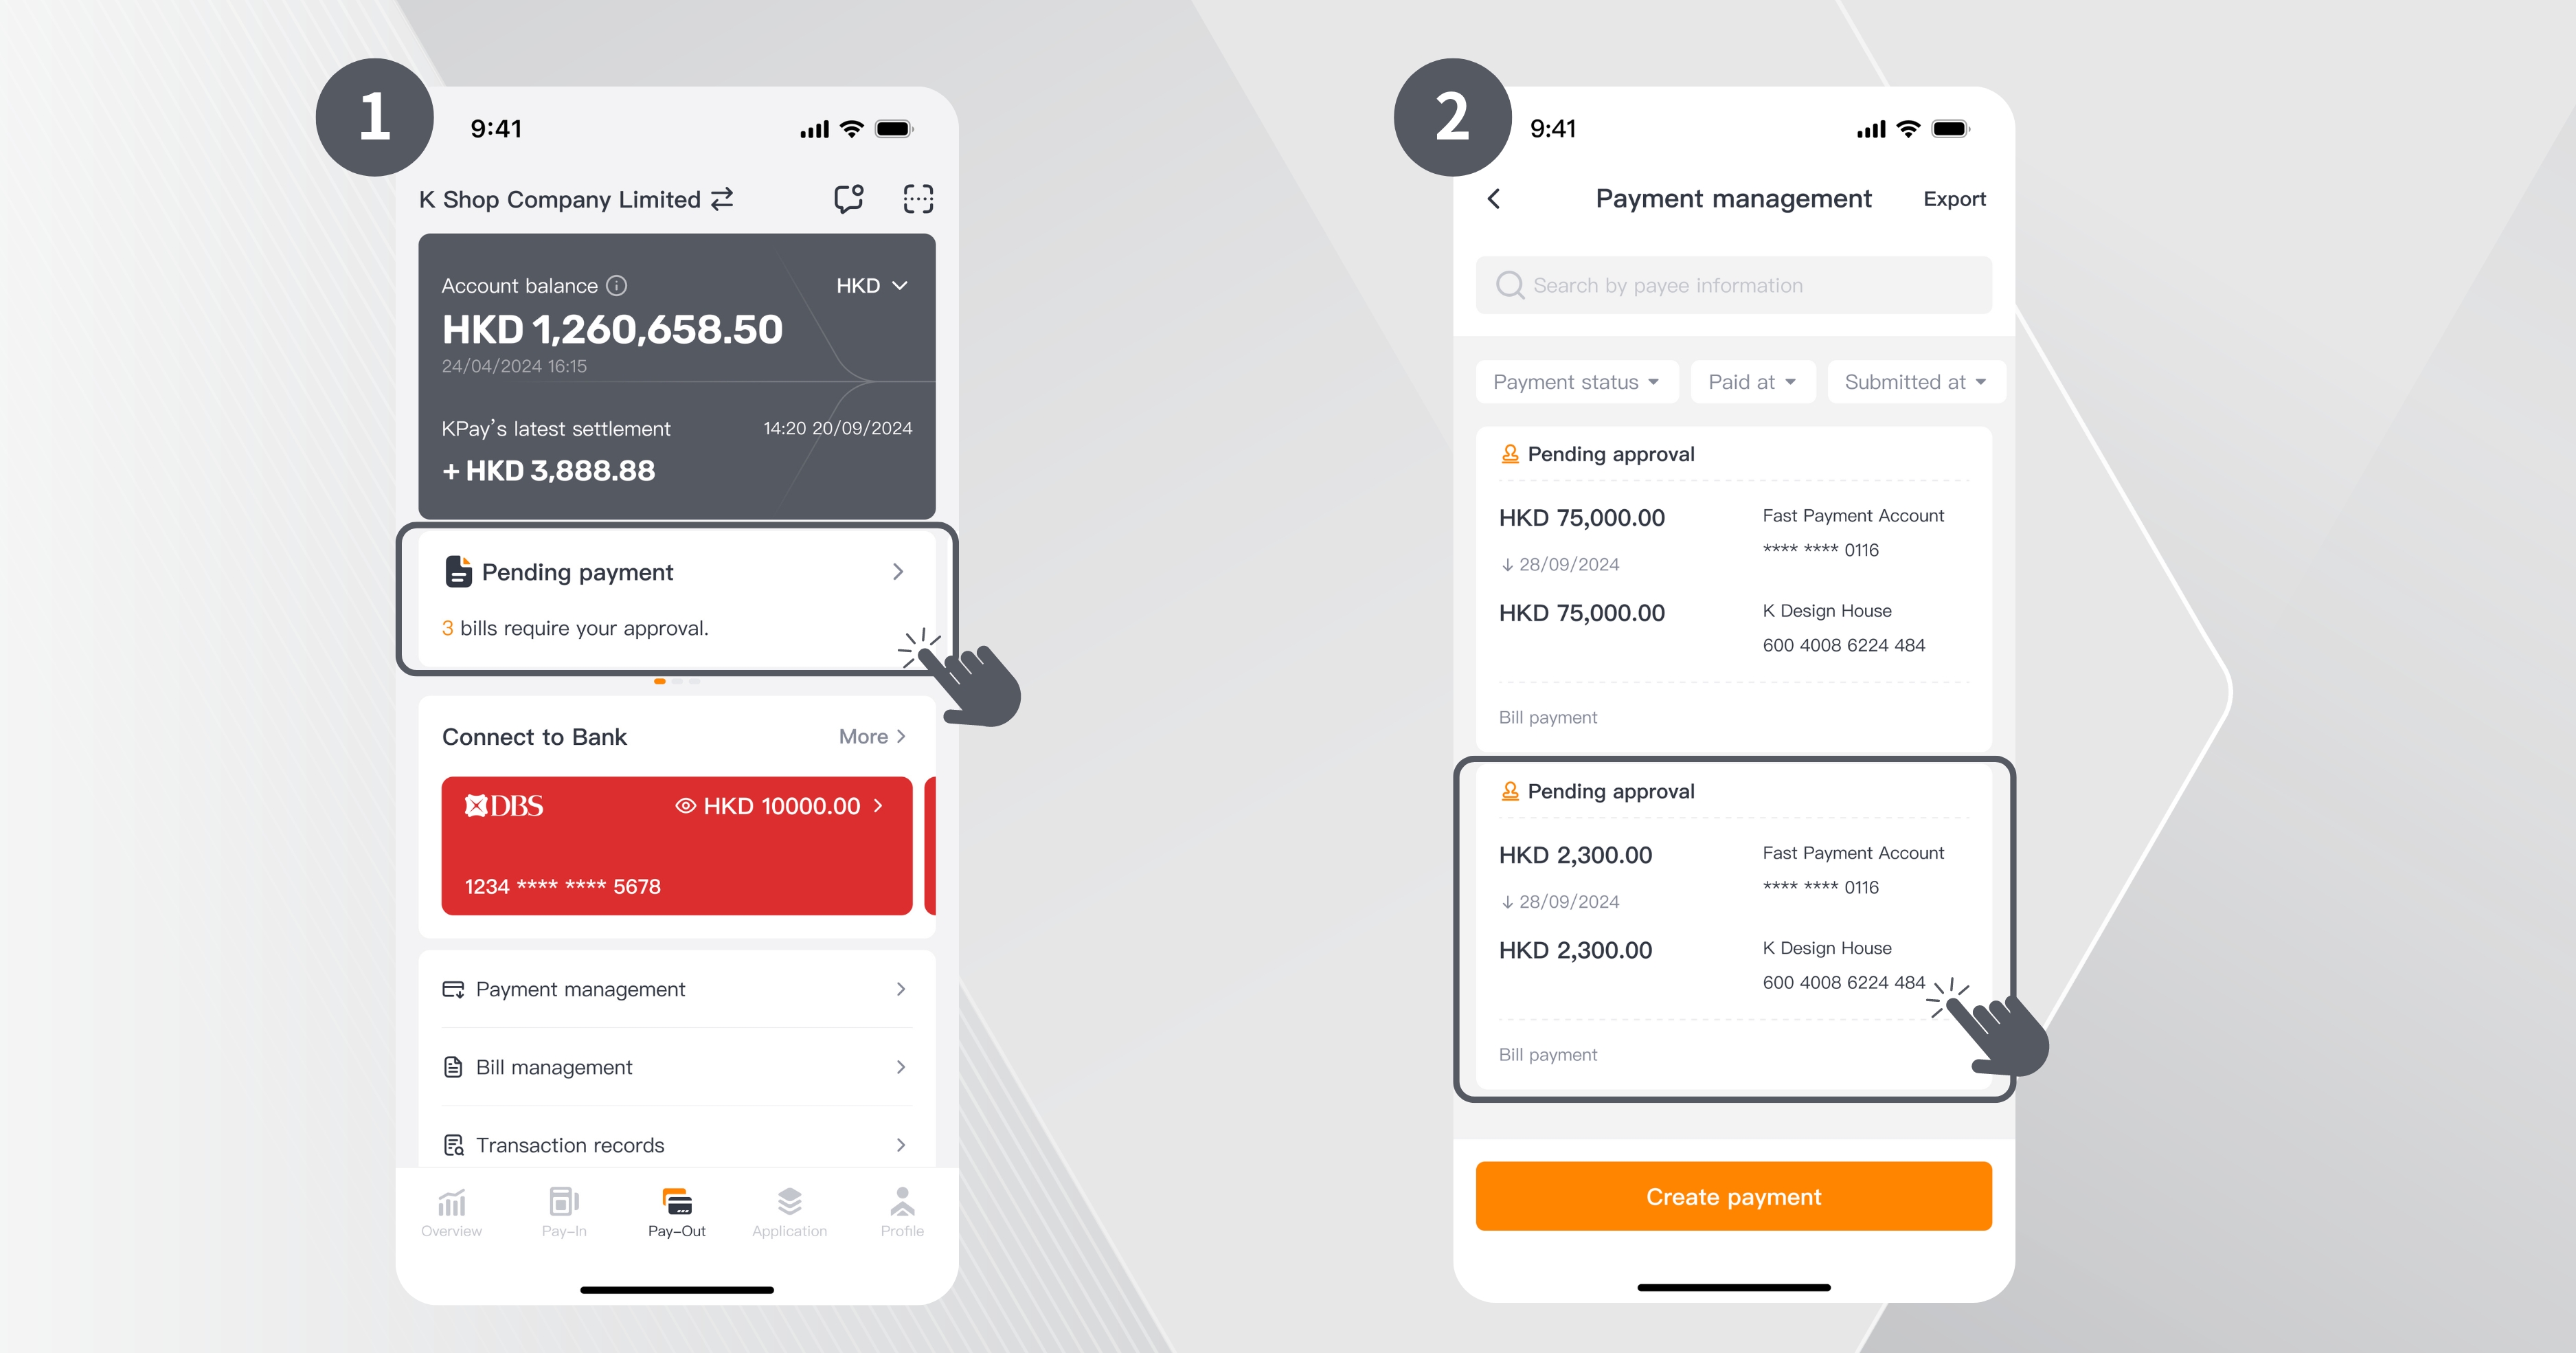
Step 1: On the Overview or Pay-Out page, click the “Pending Payment” notification to enter the payment management page.
Step 2: Select the bill you intend to approve to view its details.
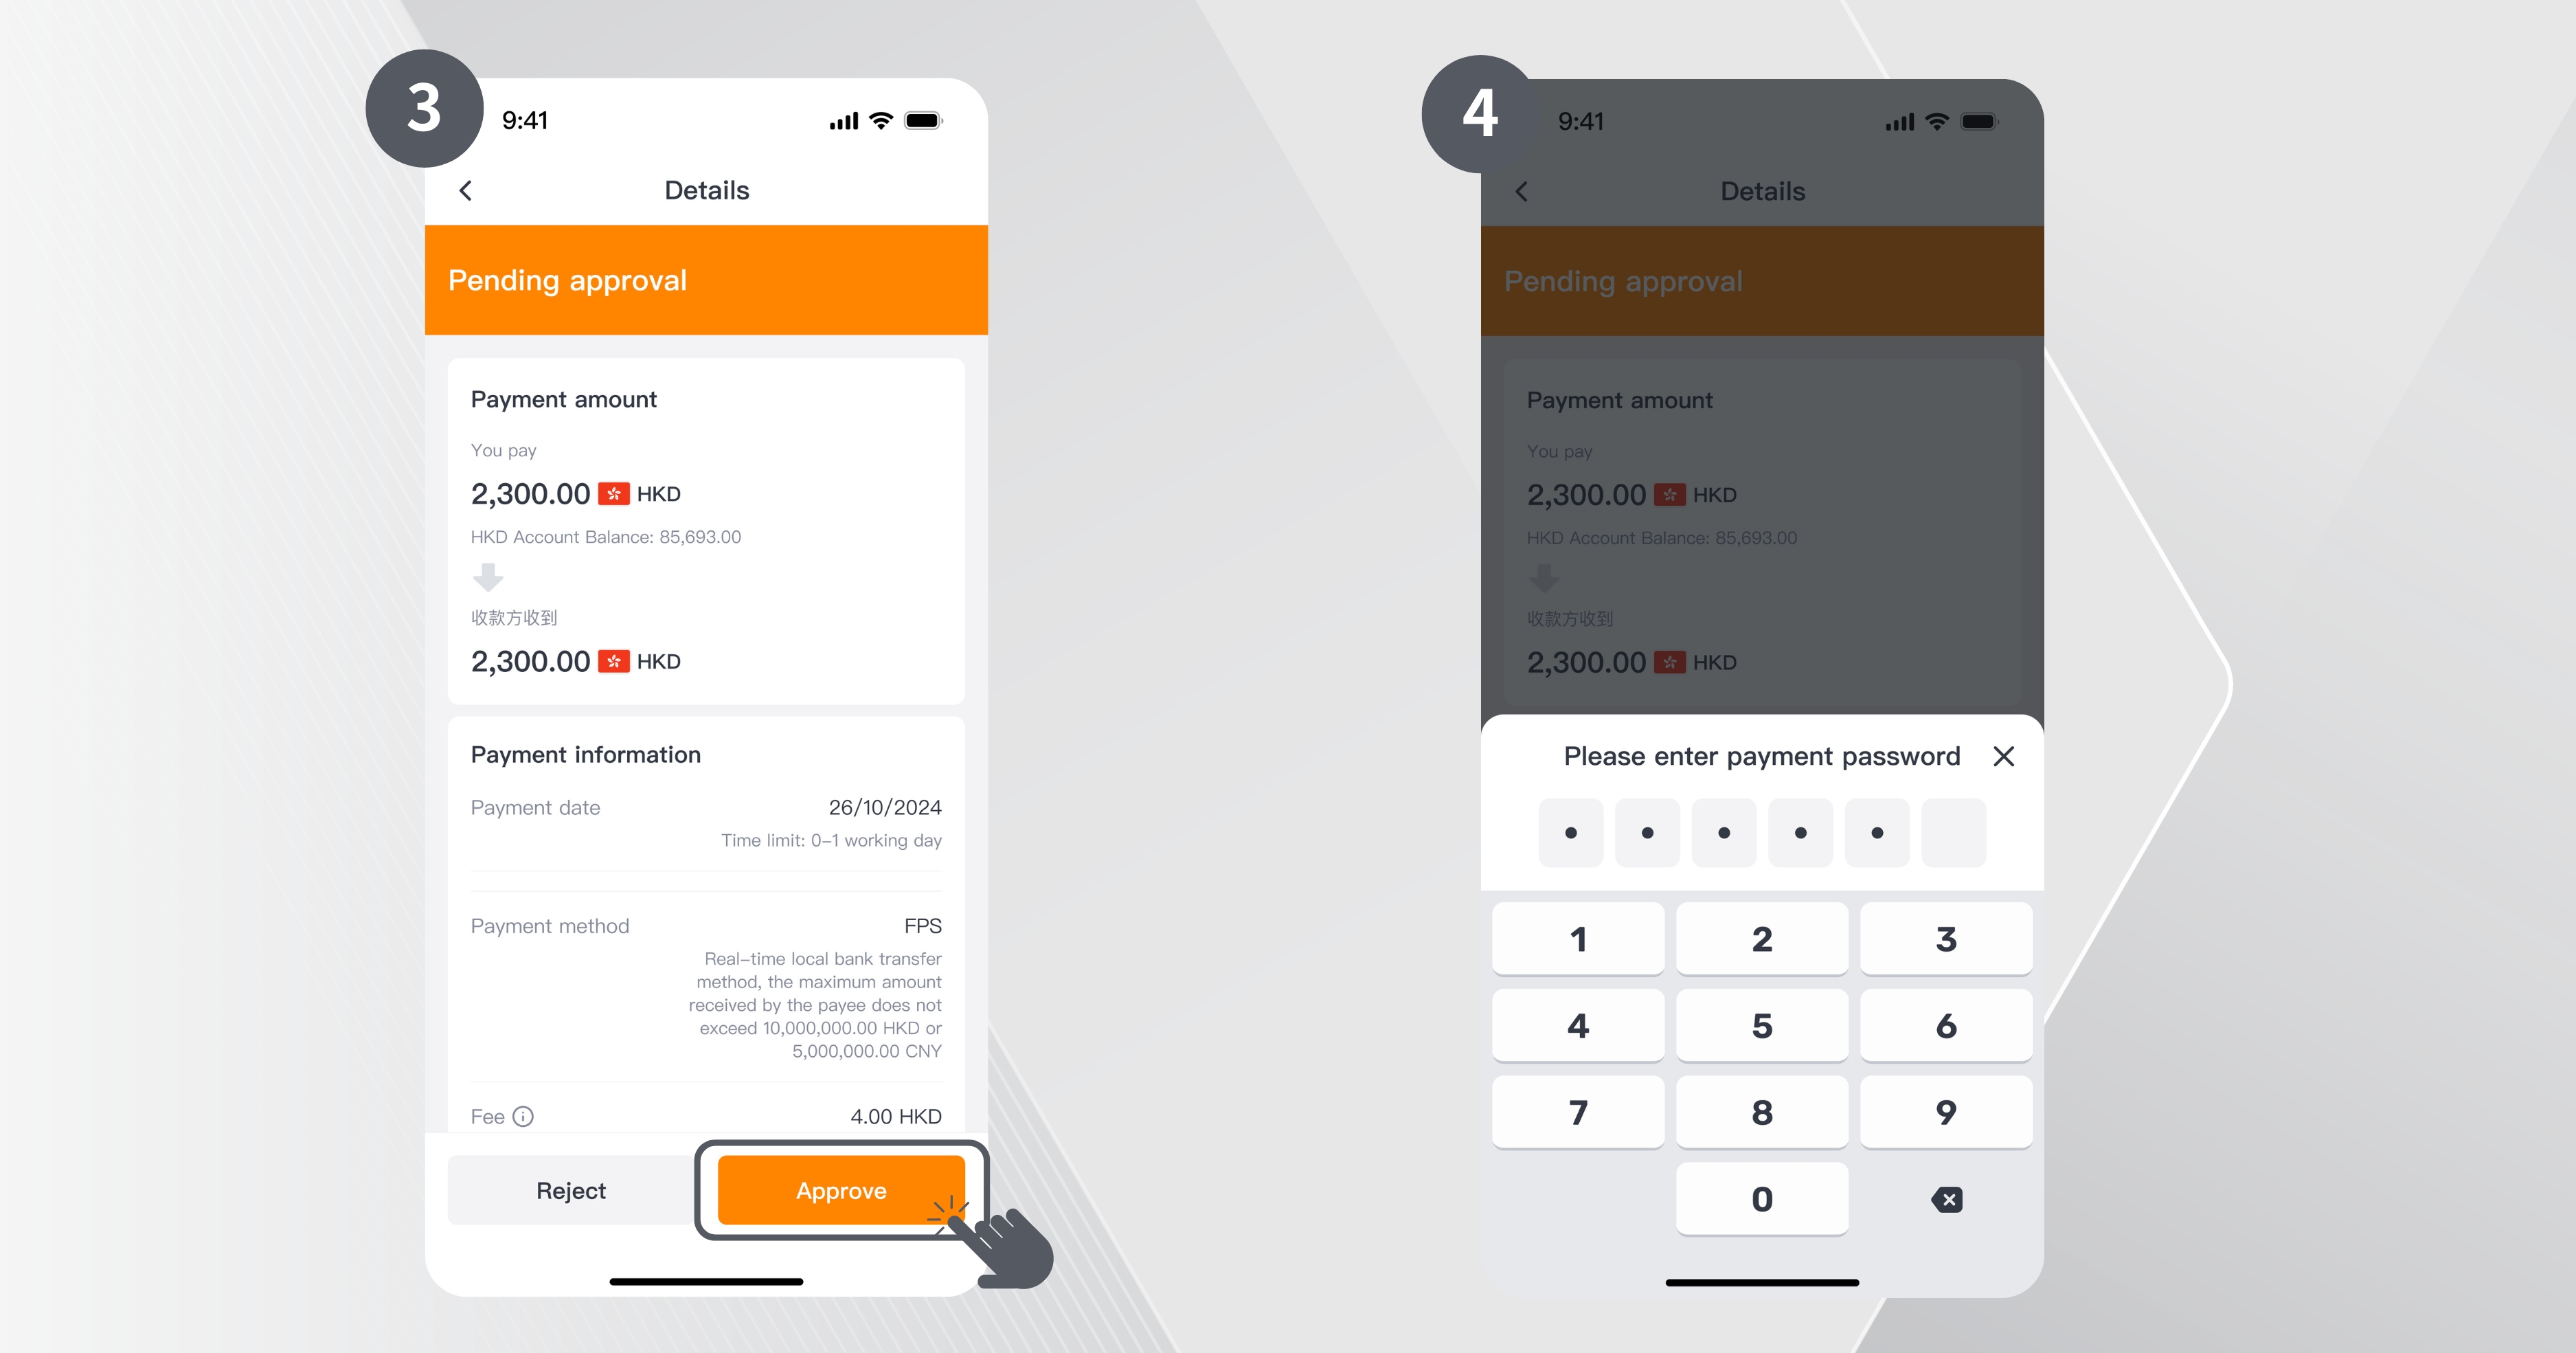
Step 3: After verifying the details, click “Reject” to cancel the payment instruction or “Approve” to confirm the payment.
Step 4: Enter your six-digit payment password, and the system will automatically execute the payment instruction.
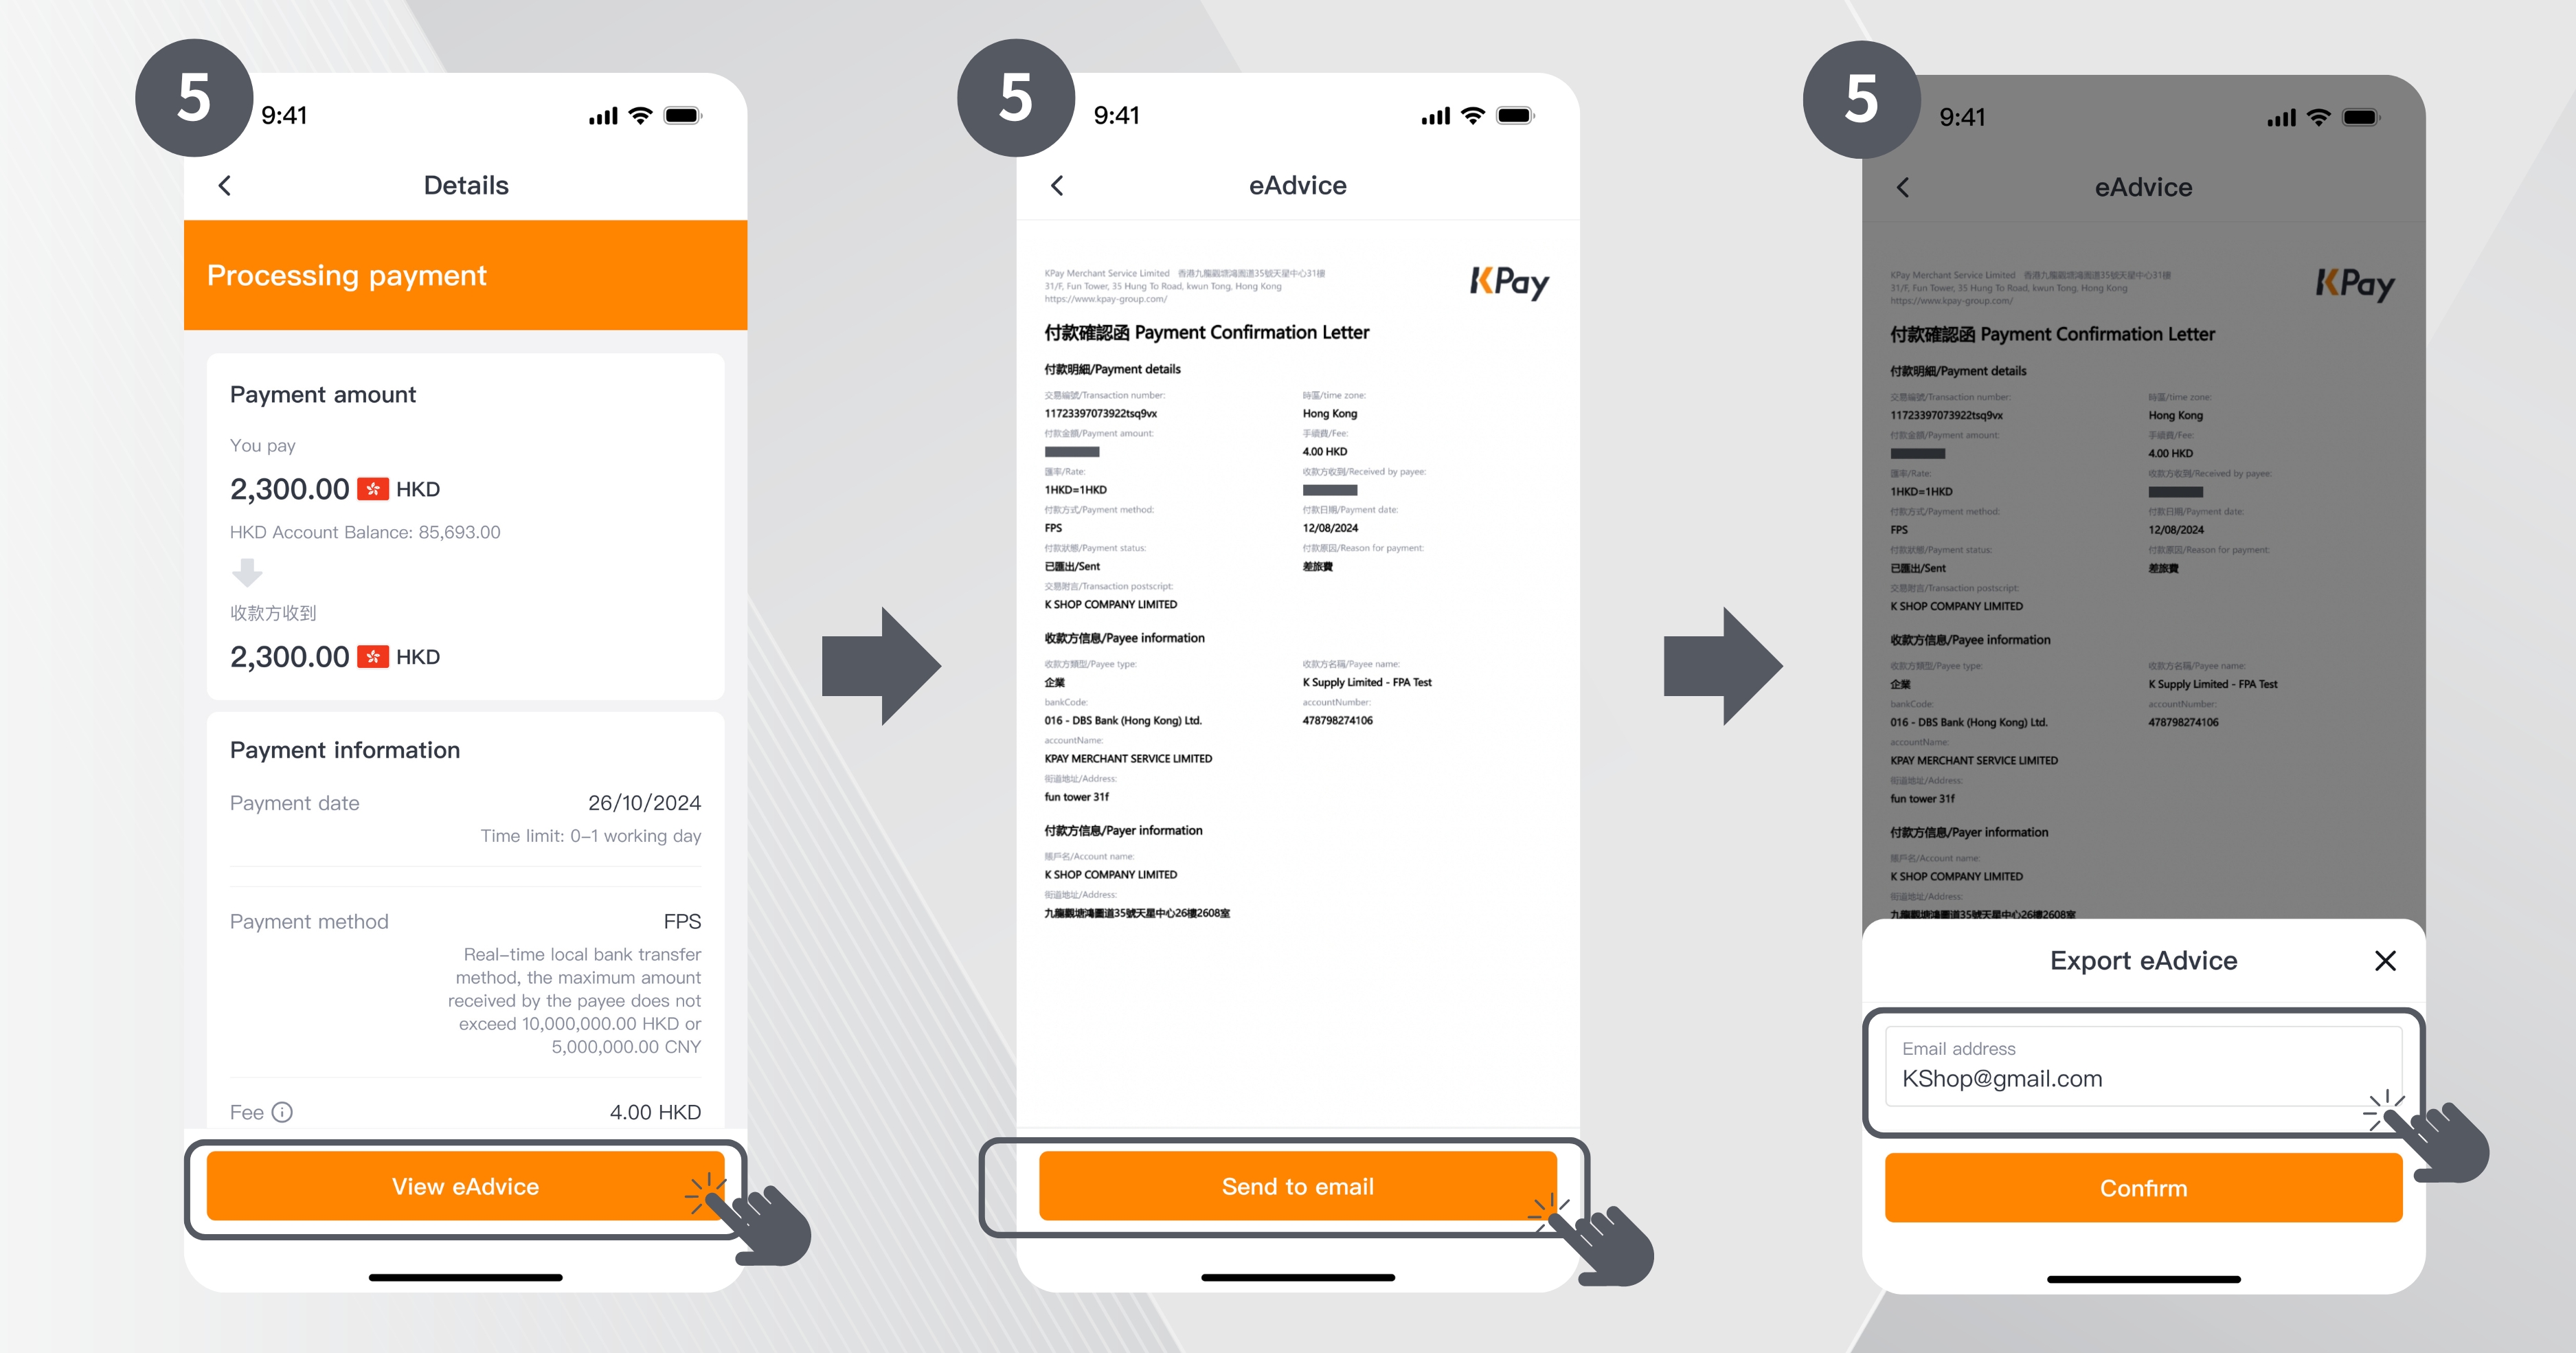
Step 5: Once the payment is confirmed, you can click “eAdvice” to review the record and send it to your email.
How to make direct payments to a specific payee (Local transfer)?
Step 1: On the "Pay-Out" page, click "Create payment."
Step 2: You can quickly select a frequent payee from "Frequent Payees"; alternatively, choose from the complete list of all payees, or click "Create new payee" to add a new payee.
Step 3: After selecting the payee, enter the payment details and click "Confirm" when finished.
- You pay: Enter the payment amount (the actual amount the payee will receive); the system will automatically calculate the total debit amount.
- Payment date: If no payment date is set, the system will default to "Pay now."
- Payment reasons: The system will auto-fill the "Payment reason" based on payment history, or you can quickly select a reason from the common reasons shortcut.
- Payment merchant: Select the merchant account from which to make the payment.
- Message to payee: This message may appear on the recipient's bank statement.
- My notes: This message is for internal reference only.
Step 4: Carefully review the payment details, then click "Confirm" to proceed with the payment; or click "Back" to return to the previous page and edit the payment details.
Step 5: If you are the approver for this payment, you can select "Approve immediately after submission" to complete the approval; if you are not the approver, the payment status will display as "Pending approval" after successfully creating the payment instruction. You can click "Complete" to exit, or click "Pay another amount" to continue creating additional payments.
How to make direct payments to a specific payee (Global remittance)?
Step 1: On the "Pay-Out" page, click "Create payment."
Step 2: You can quickly select a frequent payee from "Frequent Payees"; alternatively, choose from the complete list of all payees, or click "Create new payee" to add a new payee.
Step 3: After selecting the payee, enter the payment details and click "Confirm" when finished.
- You pay: Enter the payment amount; the system will automatically calculate the total debit amount and the amount the payee receives.
- You pay the Intermediary/agent fee: You can quickly select which party will bear the handling fees.
- Current exchange rate: Provides real-time currency exchange information.
- Amount received by payee: Enter the actual amount the payee will receive, and the system will automatically calculate your total remittance amount and the corresponding debit amount.
- Payment date: If no payment date is set, the system will default to "Pay now."
- Payment reasons: The system will auto-fill the "Payment reason" based on payment history, or you can quickly select a reason from the common reasons shortcut.
- Payment merchant: Select the merchant account from which to make the payment.
- Message to payee: This message may appear on the recipient's bank statement.
- My notes: This message is for internal reference only.
Step 4: Carefully review the payment details, then click "Confirm" to proceed with the payment; or click "Back" to return to the previous page and edit the payment details.
Step 5: If you are the approver for this payment, you can select "Approve immediately after submission" to complete the approval; if you are not the approver, the payment status will display as "Pending approval" after successfully creating the payment instruction. You can click "Complete" to exit, or click "Pay another amount" to continue creating additional payments.
How to track bill progress?
Step 1: On the “Pay Out” page, click “Bill Management”.
Step 2: Click on the record of the bill you wish to track.
Step 3: Scroll to the bottom of the bill details page to view the “Bill event logs,” where you can track the bill’s progress and latest status.
Step 4: Each step includes records of the bill’s progress, handler name, date, and time.
How to search or view specific past bills?
Step 1: On the “Pay Out” page, click “Bill Management”.
Step 2: Use the search bar to filter bills by payee, bill description, or merchant bill number; or use the filter settings to find bills matching specific criteria such as:
- Bill status/Due date/Submitted at/Approver/Submitter/Payment merchant
How to Quickly Deposit to Other Business Accounts from a KPay Business Account?
Step 1: On the "Pay-Out" page, click "Create Payment”.
Step 2: Click “To bank account."
Step 3: Select the bank account you wish to deposit into.
Step 4: After selecting the recipient, enter the payment details and click “Confirm” when finished.
- You pay: Enter the payment amount (the actual amount the payee will receive); the system will automatically calculate the total debit amount.
- Payment date: If no payment date is set, the system will default to "Pay now."
- Payment reasons: The system will auto-fill the "Payment reason" based on payment history, or you can quickly select a reason from the common reasons shortcut.
- Payment merchant: Select the merchant account from which to make the payment.
- Message to payee: This message may appear on the recipient's bank statement.
- My notes: This message is for internal reference only.
Step 5: Carefully review the payment details, then click "Confirm" to proceed with the payment; or click "Back" to return to the previous page and edit the payment details.
Step 6: If you are the approver for this payment, you can select "Approve immediately after submission" to complete the approval; if you are not the approver, the payment status will display as "Pending approval" after successfully creating the payment instruction. You can click "Complete" to exit, or click "Pay another amount" to continue creating additional payments.
If you have any questions about product features, feel free to contact our customer service team during office hours (Monday to Sunday, 10 AM - 10 PM) at 3706 7828 for immediate assistance.